
Imagine walking into your kitchen after sunset—the countertops glow with even, shadow-free illumination while your island becomes a sculptural focal point. This seamless magic comes from linear LED lighting: slim strips or rigid bars that disappear into architecture, leaving only pure light. Once exclusive to commercial spaces, these systems now deliver museum-quality illumination in homes while using 75% less energy than halogen. You’ll discover exactly where to position linear lighting, which profiles solve specific problems, and how to wire dimming controls without professional help.
The secret lies in treating light as architecture. Unlike bulky fixtures, linear systems integrate invisibly into cabinetry, ceilings, and stair edges. By the end of this guide, you’ll know how to create floating headboards, glare-free vanity lighting, and safe nighttime stair navigation—all with off-the-shelf components. Forget “accent lighting” as an afterthought; with these techniques, light becomes part of your home’s structure.
Key Linear LED Formats for Home Integration

Choose the right format based on where you need invisible illumination. Flexible LED strips work under cabinets or stair treads, hiding completely while emitting gentle washes of light. Rigid aluminum channels create crisp lines for surface mounting on walls or ceilings, with slim 8–12 mm reveals that vanish against trim. For true architectural magic, plaster-in channels disappear into drywall seams, making light appear from nowhere. Track rails offer adjustable spot placement for galleries or living rooms. All use 24V or 48V systems with cut-to-length flexibility every 25–100 mm.
Why Profile Choice Determines Your Results
Selecting the wrong profile ruins the effect. Under-cabinet lighting needs recessed aluminum channels to prevent glare on countertops. Stair risers demand IP65-rated flexible strips to withstand foot traffic. For shadow-gap ceiling details, plaster-in channels are non-negotiable—surface-mounted alternatives break the illusion. Always match the profile to your installation location; a kitchen island requires rigid pendant bars, while a bookshelf needs micro-channels under each shelf edge.
Plan Your Lighting Zones Before Purchase
Lighting must serve activities, not just aesthetics. Divide your space into three functional layers: ambient wash (100–150 lx for general room brightness), task lighting (300–500 lx for countertops or desks), and accent/safety zones (50–100 lx for toe-kicks or stairs). Sketch these zones on your floor plan before buying anything. This prevents over-lighting hallways or under-lighting kitchen workspaces.
Color Temperature & Brightness Cheat Sheet
Your living room needs 2400–2700 K warm light at 5–7 W/ft for cozy ambiance, while kitchen task zones require 2700–3000 K at 8–10 W/ft with 95+ CRI for true color accuracy. Bathrooms follow similar specs but prioritize moisture resistance (IP54 rating). Hallways only need 3–5 W/ft of 2700 K light—enough for navigation without disrupting sleep cycles. Critical mistake: Using 4000 K “cool white” in bedrooms disrupts melatonin production; stick to 2400–2700 K for relaxation.
Kitchen: Task & Ambient Lighting Combos That Work
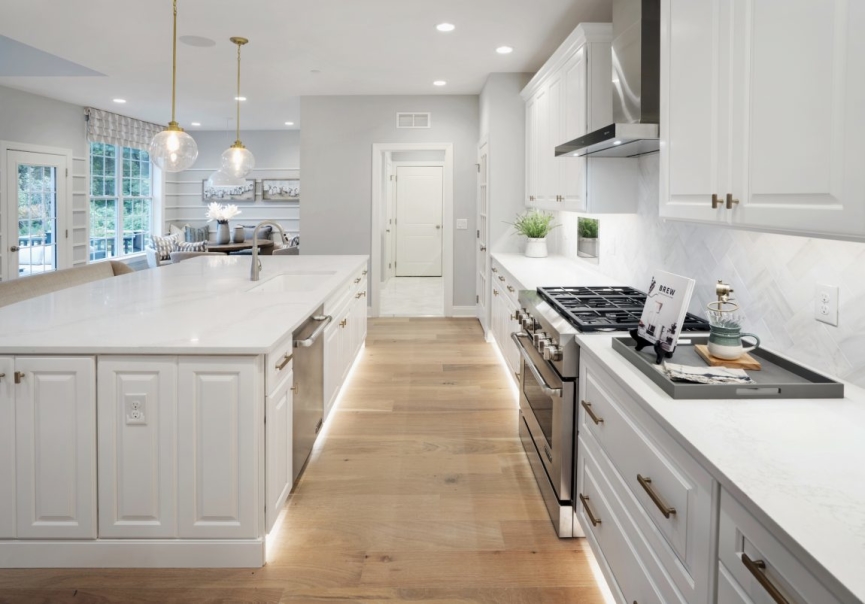
Under-Cabinet Strips Without Glare
Recess an 8 mm aluminum channel 30 mm behind your cabinet lip. This bounces light onto countertops instead of shining directly into your eyes. Use 95 CRI, 3000 K strips at 8–10 W/ft, and run them on a separate dimmer circuit for “night-light mode” at 10% brightness. Pro tip: Angle the strip slightly backward in the channel to prevent visible hotspots on the cabinet underside.
Floating Island Pendants
Suspend two 1.2 m rigid bars 850 mm above your island counter. Choose 10–12 W/ft strips in 2700–3000 K for both food prep and social gatherings. Cable-gripper kits let you adjust height without tools—crucial for matching counter-to-bar clearance. Avoid single-center fixtures; dual bars create balanced illumination across the entire workspace.
Toe-Kick Glow for Nighttime Safety
Mount IP54-rated 2400 K strips under cabinet bases at 5 W/ft, angled 45° toward the floor. Connect to motion sensors so the path lights automatically when you walk by at 3 AM. This creates a “floating cabinet” illusion during the day while solving dark-floor hazards at night.
Living Room: Cove & Shelving Drama
Floating Ceiling Cove Lighting
Route a 200 mm deep recess along your room’s perimeter. Install 5–7 W/ft 2700 K strips on aluminum channels aimed at the ceiling for 100–150 lx indirect light. The result? A visually lifted ceiling with zero visible fixtures. Warning: If your cove is shallower than 150 mm, light will spill downward—ruining the floating effect.
Bookcase Accent Lighting That Adapts
Mount micro-channels on shelf undersides at 5 W/ft. Stagger circuits so you can activate top rows only for “movie mode” or full illumination for cleaning. For valuable art, use 10° × 60° wall-grazer optics to highlight textures without hotspots.
Bathroom: Shadow-Free Vanity Lighting

Vertical Mirror Flanks
Install two 300 mm segments of 6 W/ft 3000 K strip vertically 150 mm from each mirror edge. The 95+ CRI ensures true skin tone rendering for makeup application. Always use IP54-rated profiles here—standard strips fail within months due to steam exposure. Key fix: If you see LED dots through clear diffusers, swap to 50% opal lenses or deepen the channel by 10 mm.
Shower Niche Illumination
Embed IP54 micro-profiles in tile lips at 8 W/ft, angled 30° downward. Connect to your vanity dimmer circuit for unified lighting scenes. Never use surface-mounted strips here—they collect mold in grout lines.
Stairs & Hallways: Safety Meets Style
Glare-Free Riser Lighting
Fix IP65 strips under tread noses at 4–5 W/ft, angled 30° downward. Add dusk-to-dawn sensors so steps illuminate automatically at night. Critical: Maintain 10 mm clearance between strip and step edge to prevent tripping hazards during installation.
Handrail Glow for Night Navigation
Route 10 mm × 10 mm channels into wooden handrail undersides. Use 3 W/ft 2700 K strips—bright enough to define steps but too dim to cause glare. This replaces bulky wall sconces while meeting building code requirements for path lighting.
Installation Guide: Avoid Costly Mistakes
Recessed Trimless Ceiling Slot (Intermediate Skill)
- Mark a 20 mm wide slot along ceiling joists
- Screw channel flanges to joists every 400 mm
- Tape and mud flush with ceiling surface
- Pull 24V wires from a hidden closet driver
- Snap in LED strip and test before installing diffusers
Time: 2–3 hours per 3m run. Pitfall: Skipping drywall screws through channel flanges causes sagging—add two extra screws if edges pull away.
Surface Channel on Tile Backsplash (Beginner Skill)
- Clean tile with alcohol
- Press thermal pad-backed strips into aluminum channels
- Drill holes every 400 mm and insert anchors
- Screw channels securely before snapping on diffusers
Time: 30 minutes per meter. Pro tip: Use 3M VHB tape only for lightweight channels under 1m—longer runs require mechanical anchors.
Dimming & Smart Control Essentials
Match drivers to your control system: ELV (forward-phase) for smooth residential dimming or 0–10V for commercial-grade precision. Always oversize driver wattage by 20%—a 100W driver maxes out at 80W continuous load. Program scenes like DINNER (25% cove light, 0% task) or CLEAN (100% all zones) via Lutron Caseta. For circadian health, specify tunable-white strips that auto-shift to 2700 K after sunset. Critical: PWM drivers below 1 kHz cause video call flicker—upgrade to 2 kHz+ models if Zoom meetings look strobe-like.
Common Mistakes & Quick Fixes
| Symptom | DIY Fix |
|---|---|
| Visible LED dots | Swap to 50% opal diffuser or deepen channel by 10 mm |
| Uneven wall wash | Reduce fixture-to-wall gap to 75 mm or use 10°×60° optic |
| Sagging ceiling channel | Add drywall screws through flange ears into joists |
| Flickering on video calls | Replace driver with 2 kHz+ PWM or switch to 0–10V analog |
Budget Snapshot (2024 USD)
| Component | Cost per Foot |
|---|---|
| LED strip (5W/ft, 90 CRI) | $4–6 |
| Surface channel + diffuser | $9–15 |
| Recessed trimless channel | $25–40 |
| 100W dimmable driver | $45–65 |
Start small with under-cabinet strips or a bedroom headboard glow. Within one weekend, you’ll transform ordinary rooms into architecturally lit spaces—no electrician required for most zones. The key is treating light as structure: when your fixtures vanish, what remains is pure, functional beauty.


