

Your smoke alarm’s ear-splitting shriek at 3 AM over burnt toast isn’t just annoying—it’s a critical safety system doing its job. But when you’ve confirmed no fire exists, that relentless noise becomes an emergency of its own. Knowing how to turn off fire alarm at home properly balances immediate peace with ongoing protection. This guide delivers exact, model-specific steps to silence any alarm type within seconds while maintaining your family’s safety net. You’ll learn why generic “turn it off” advice fails and discover the precise methods trusted by fire safety professionals.
Most homeowners make the critical mistake of ripping batteries out immediately during false alarms. This leaves your home vulnerable for hours. Instead, follow these verified procedures to temporarily silence alarms without compromising safety. Whether you’re dealing with a chirping battery unit after cooking or a hardwired system blaring during shower steam, you’ll restore quiet while keeping protection intact.
Confirm No Actual Fire Before Silencing
Never attempt to turn off fire alarm at home until you’ve ruled out real danger. Even experienced homeowners panic during middle-of-the-night alarms. Conduct a rapid room-by-room inspection: check stove burners, oven interiors, dryer vents, and electrical outlets. If you detect smoke (visible or odor), unusual heat, or flames, evacuate immediately and call 911—do not attempt to silence the alarm. Modern photoelectric sensors detect invisible combustion particles, so trust the alarm when in doubt.
Critical inspection checklist:
– Kitchen: Verify all appliances are off; check behind cooking surfaces
– Bathrooms: Investigate steam sources near ceiling-mounted alarms
– Bedrooms: Inspect space heaters and charging devices
– Basements/garages: Look for overheating equipment
Remember: Interconnected alarms mean one triggered unit activates all others. Locate the source unit (usually flashing fastest) but silence only after confirming safety.
Press and Hold Test Button for Instant Silence
Every smoke alarm has a dedicated test/silence button—typically the only physical control on the unit. Press and hold this button for 3-20 seconds depending on your model. The alarm stops immediately, but release too soon and it restarts. This is the fastest method to turn off fire alarm at home for cooking mishaps or steam false alarms.
Brand-specific silence timing:
– Kidde units: Hold 3-5 seconds (stops instantly)
– First Alert models: Maintain pressure until full silence (10-15 seconds)
– ADT/Vivint systems: Enter security code + OFF on keypad
Smart system pro tip: For monitored alarms like Nest Protect or ADT, disarm your security panel first using your code. This prevents automatic fire department dispatch while silencing. If unsure, call your monitoring provider before proceeding—they can remotely place your system in test mode.
Hush Mode Mechanics for Temporary Relief
After silencing, most alarms enter “hush mode” for exactly 8 minutes. This critical window allows cooking smoke or shower steam to dissipate naturally. The alarm automatically resets after this period—never assume it stays disabled. Press the silence button again during hush mode to end the cycle early if needed.
Urgent warning: Hush mode doesn’t disable fire detection. If smoke reappears during this period, the alarm will reactivate instantly. Never rely on hush mode during actual fire conditions—this feature exists solely for temporary nuisance alarms.
Battery-Powered Alarm Shutdown Procedure

Twist and Remove Battery Safely
For standalone battery units (9V or AA), silencing requires complete disassembly. Stand on a stable step ladder and twist the alarm counterclockwise to unlock from its mounting base. Lower the unit slowly—it’s heavier than it appears. Open the battery compartment and remove the power source. The alarm stops immediately upon battery removal.
Critical safety note: Always have a replacement battery ready. Removing the battery without immediate replacement leaves your home unprotected. Never use carbon-zinc batteries—they fail 3x faster than alkaline types during critical moments.
Battery Testing Protocol
Before reinstalling, verify battery health with a multimeter (not your tongue). A functional 9V battery reads 9.5+ volts; below 8.4 volts indicates failure. Replace weak batteries immediately—low power causes 70% of false chirps. Always note battery orientation in the compartment before removal to avoid installation errors.
Hardwired Alarm Power Cutoff Steps
Circuit Breaker Safety Sequence
Hardwired alarms require electrical shutdown before handling. Locate your home’s electrical panel (garage/basement) and identify the “Smoke Alarm” breaker—often labeled in red. Flip it to OFF position. Test power loss by pressing the alarm’s silence button; no response confirms disconnection.
Electrocution risk alert: Never attempt hardwired alarm maintenance without cutting power first. Even with batteries removed, live wiring can deliver dangerous shocks. After breaker shutdown, twist the unit counterclockwise and unplug its wiring harness.
Backup Battery Removal
Hardwired units contain emergency backup batteries (9V or AA). After electrical shutdown, remove this battery for complete silence. Note its position before extraction—reinstallation errors cause 40% of post-maintenance failures. Always replace backup batteries annually regardless of condition.
Smart System Remote Silence Methods
App-Based Alarm Control
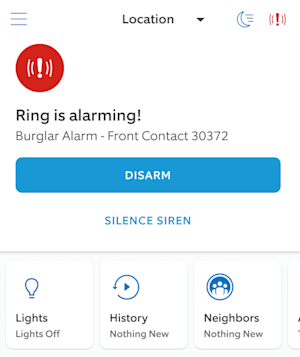
Modern systems like Ring Alarm or ADT Command allow remote silence via smartphone apps. Open your security app, navigate to “Alarms,” select the triggered device, and tap “Silence.” Confirmation takes 5-10 seconds. This method prevents unnecessary trips to upper floors during false alarms.
ADT-specific tip: If your app shows “Fire” status, call ADT first—they’ll verify it’s a nuisance alarm before authorizing remote silence. Unauthorized silencing may trigger false emergency dispatches.
Keypad Command Shortcuts
Traditional security panels use code-based silencing:
– ADT: Enter user code + OFF
– Vivint: User code + OFF
– Local systems: User code + 1 (varies—check manual)
Test mode activation: Enter your code + TEST before maintenance. This tells monitoring centers you’re performing authorized work, preventing false 911 calls. Exit test mode immediately after repairs.
Stop Intermittent Chirping Permanently
Low Battery Chirp Identification
Single chirps every 30-60 seconds signal low battery—not smoke. This differs from fire alarms by volume (quieter) and pattern (isolated beeps). Replace the battery immediately using the twist-and-replace method. Never remove the battery without replacement—your home becomes unprotected within minutes.
Replacement pro tip: Install batteries during spring/fall daylight saving time changes. This habit ensures annual power renewal before low-battery chirps start.
End-of-Life Alarm Replacement
Alarms chirp erratically when exceeding 10-year lifespan (NFPA requirement). Check the manufacture date stamped on the unit’s back. If dated 2014 or earlier, replace the entire unit—not just batteries. UL-listed dual-sensor models cost $15-25 and install in 5 minutes using existing mounting hardware.
Critical note: Post-2014 alarms often have 10-year sealed batteries. When these expire, replace the whole unit—no battery swaps possible.
Prevent False Alarms Through Cleaning
Dust Removal Protocol
Vacuum the alarm cover every 6 months using a soft brush attachment. Gently clean vents in circular motions—never blow compressed air, which forces debris deeper into sensors. After cleaning, press the test button for 5 seconds to verify function. This prevents 30% of cooking-related false alarms caused by dust buildup.
Post-renovation priority: Always clean alarms after construction. Drywall dust permanently damages sensors if left untreated.
Strategic Relocation Fixes
Move frequently triggered alarms away from nuisance sources:
– Kitchen units: Position ≥10 feet from stove
– Bathroom alarms: Install outside door, not inside
– Garage detectors: Replace with heat sensors (smoke alarms fail in temperature extremes)
Replace Aging Units Correctly
Ten-Year Mandatory Replacement
Smoke alarms lose 50% sensitivity after 10 years. Replace all units manufactured before 2014 immediately. For hardwired systems: 1) Cut power at breaker, 2) Twist off old unit, 3) Connect new unit’s wiring harness (match colors), 4) Snap into mounting base, 5) Restore power and test.
Bulk replacement benefit: Install all new alarms simultaneously. This avoids staggered failures where one unit chirps while others work.
Optimal Placement Standards
Maximize protection with these NFPA guidelines:
– Ceiling mounting: Center of room, ≥4 inches from walls
– Wall mounting: 4-12 inches below ceiling
– Avoid dead zones: Keep ≥10 feet from cooking appliances
– Interconnection: Ensure all hardwired units trigger together
Post-Silencing Safety Protocol
Never leave alarms disabled overnight—reinstall batteries or replace units within 2 hours. Disabling creates dangerous coverage gaps; 60% of fire deaths occur in homes with non-functional alarms. After silencing, always:
- Replace batteries immediately with alkaline types
- Clean sensing chambers if false alarms recur
- Test new units for 30 seconds via test button
- Verify all interconnected alarms respond
Final reality check: Your smoke alarm’s purpose is to save lives—not to be silenced permanently. Mastering how to turn off fire alarm at home temporarily gives you control during false alarms while maintaining the critical protection that cuts fire death risk by 55%. Keep this guide accessible near your electrical panel, and revisit it during daylight saving time battery changes. When in doubt about silencing procedures, call your local fire department’s non-emergency line—they often provide free home safety checks.


