

Your kitchen feels cramped, the bathroom tile screams 1995, and you’ve memorized exactly which corners to hide during video calls. You’re not alone—nearly 40% of homeowners tackle renovations yearly, but most waste months paralyzed by where to begin. The difference between a smooth transformation and a financial disaster lies entirely in your first 30 days. This isn’t about swinging hammers; it’s about strategic groundwork that prevents 90% of renovation nightmares. Follow this exact blueprint for how to start a home renovation confidently, whether you’re refreshing a powder room or gutting your entire house.
Pinpoint Your Renovation Trigger Before Spending a Dime
Your motivation becomes your anchor when contractors present $2,000 faucet upgrades at 11 PM. Most renovations stem from four distinct triggers—identify yours immediately to avoid costly detours.
Why Your Kitchen Feels “Off” (Aesthetic vs. Functional Fixes)
Outdated finishes like beige countertops or brass fixtures fall under aesthetic fatigue—fixable with paint and hardware swaps. But if you’re elbow-deep in dishes while trying to open the fridge, that’s functional failure requiring layout changes. Misdiagnosing this leads to wasted budgets: slapping marble on a cramped galley kitchen won’t solve traffic jams. Photograph your problem zones and label them “Aesthetic” or “Functional” before researching solutions.
Needs vs. Wants: The $10,000 Decision Filter
Create two columns on paper (not digitally—this forces brutal honesty):
– Non-negotiable Needs: GFCI outlets in wet areas, structural repairs, or stair railings for aging parents
– Luxury Wants: Steam showers, smart mirrors, or wine coolers
Rank each item 1-10. When your contractor suggests “upgrading” to quartz countertops, consult this list. If “quartz” ranks below “fixing leaky plumbing,” you’ve just saved $5,000. This physical document prevents emotional overspending during decision fatigue.
Build a Renovation Budget That Survives Hidden Wall Surprises
Running out of funds mid-remodel is the #1 reason projects stall. Smart budgeting starts with cold, hard numbers—not Pinterest dreams.
Calculate Your True Working Budget (Minus the “Hope Tax”)
Add all funding sources: cash savings, pre-approved HELOCs, or gifted money. Now subtract 10% immediately. That cushion covers “oh no” moments like discovering rotted subflooring. A $50,000 project? Your real budget is $45,000. Anything above that requires dipping into your contingency fund—not your emergency savings.
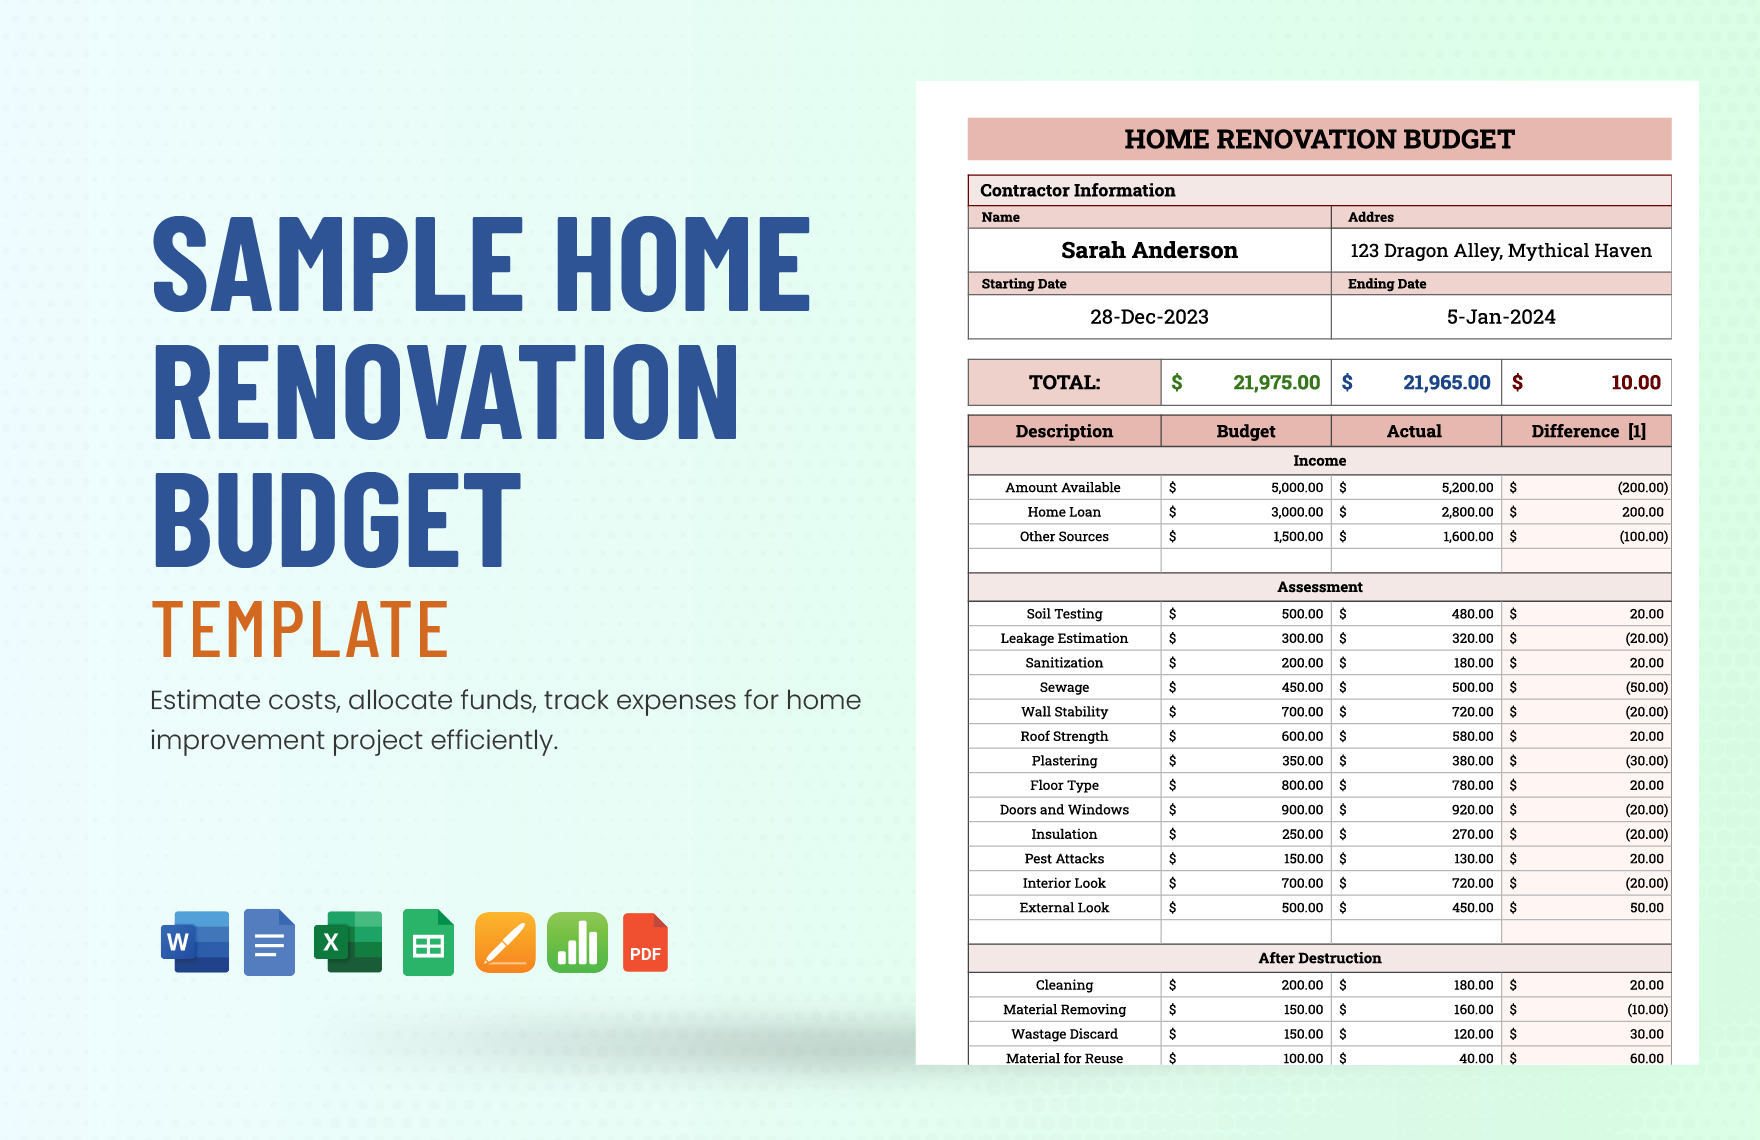
Line-Item Breakdown: Where 70% of Budgets Bleed
Track costs in these buckets—deviate and risk overspending:
– Structural/Permits (25%): Load-bearing wall removal, electrical panels, building permits
– Mechanical Rough-Ins (20%): Plumbing reroutes, HVAC ductwork, insulation
– Finishes/Fixtures (40%): Flooring, cabinets, tile, appliances
– Contingency (15%): Non-negotiable—use 30% for structural work, 15% for cosmetic
Benchmark locally: Call three contractors for ballpark quotes on your specific scope. If bids range from $40K-$60K for a kitchen remodel, your $45K budget needs adjustment now—not when demo reveals 1970s wiring.
Assemble Your Visual Blueprint in 48 Hours

Words like “modern farmhouse” mean nothing to contractors. Concrete visuals prevent $10,000 change orders.
Curate a “No Pinterest Overwhelm” Inspiration Library
Create phone album folders with SPECIFIC names:
– “Kitchen Cabinets: Flat-Panel Matte White”
– “Bathroom Tile: 12×24 Gray Porcelain”
– “Lighting: Black Industrial Pendants”
Include product links and dimensions. When your designer suggests “open shelving,” show them your “Pantry Storage: Closed Cabinets” folder—no misinterpretations.
Draft Floor Plans That Prevent Layout Nightmares
Use Magicplan app (free) to scan rooms with your phone. Mark:
– Traffic flow arrows (show how you move from fridge to sink)
– Existing electrical outlets (avoid placing cabinets over them)
– “Demolition Zone” stickers (red for tear-out, green for keep)
A client once discovered their dream island blocked the refrigerator door before demo—saving 3 weeks of rework. Do this while sipping coffee on day one.
Hire Your Renovation Dream Team (Without Getting Scammed)
The wrong contractor turns your dream into a stress-fueled nightmare. Vet like your sanity depends on it—because it does.
The Contractor Vetting Checklist: 5 Non-Negotiables
Interview three candidates and verify:
1. Insurance certificates—call their provider to confirm coverage
2. Two completed project visits—ask to see a job exactly like yours
3. Change-order policy—if they say “we don’t need written changes,” walk away
4. Payment schedule—never pay >10% upfront; tie payments to milestones
5. BBB/NARI membership—check for unresolved complaints
Red flag: Bids 20% below others. One client saved $8,000 upfront only to discover shoddy drywall and missing permits.
When to Hire an Architect (Spoiler: Not for Bathroom Updates)
Bring in an architect only for:
– Removing load-bearing walls
– Adding square footage
– Complex structural changes
For kitchen/bath remodels? A licensed designer is 60% cheaper and handles permits. Save $5,000 by hiring the right expertise at the right time.
Secure Permits Before Swinging a Hammer
Skipping permits risks stop-work orders and failed inspections. Do this before demolition.
Permit Triggers That Surprise Homeowners
You need permits for:
– Electrical: Adding outlets or upgrading panels
– Plumbing: Moving showers or sinks
– Structural: Even non-load-bearing walls in some cities
– Exterior: Replacing windows or adding decks
Call your building department now—not when drywall goes up. A kitchen remodel in Austin recently halted for 3 weeks because the contractor didn’t know cabinets over 84″ required fire-rated drywall.
The Permit Timeline Hack
Submit drawings immediately after finalizing plans. For cosmetic work:
– Day 1: Submit permit application
– Day 3: Schedule rough-in inspection
– Day 7: Receive approval (if drawings are perfect)
Delays happen when contractors submit incomplete plans. Demand proof of submission before writing checks.
Plan Your Living Arrangements to Survive the Dust Storm
Renovation dust infiltrates everything. Smart prep keeps your sanity intact.
Document Your Home Like an Insurance Adjuster
Before day one:
– Take timestamped photos of every room corner
– Measure window heights and note existing scratches
– Store in a cloud folder named “As-Built 2024”
When a contractor blamed pre-existing wall cracks for new damage, these photos saved $3,200 in repairs.
Temporary Kitchen Setup That Won’t Drive You Crazy
For kitchen remodels:
– Week 1: Set up microwave + mini-fridge in laundry room
– Week 2: Use folding table as prep station (cover with wipeable vinyl)
– Survival kit: Disposable plates, paper towels, and a “no cooking” rule after 7 PM
One client rented a portable toilet during bathroom remodels—worth every penny when the only working toilet backed up at 2 AM.
Execute Your Renovation Without Mid-Project Meltdowns
Understanding the sequence prevents trades from tripping over each other.
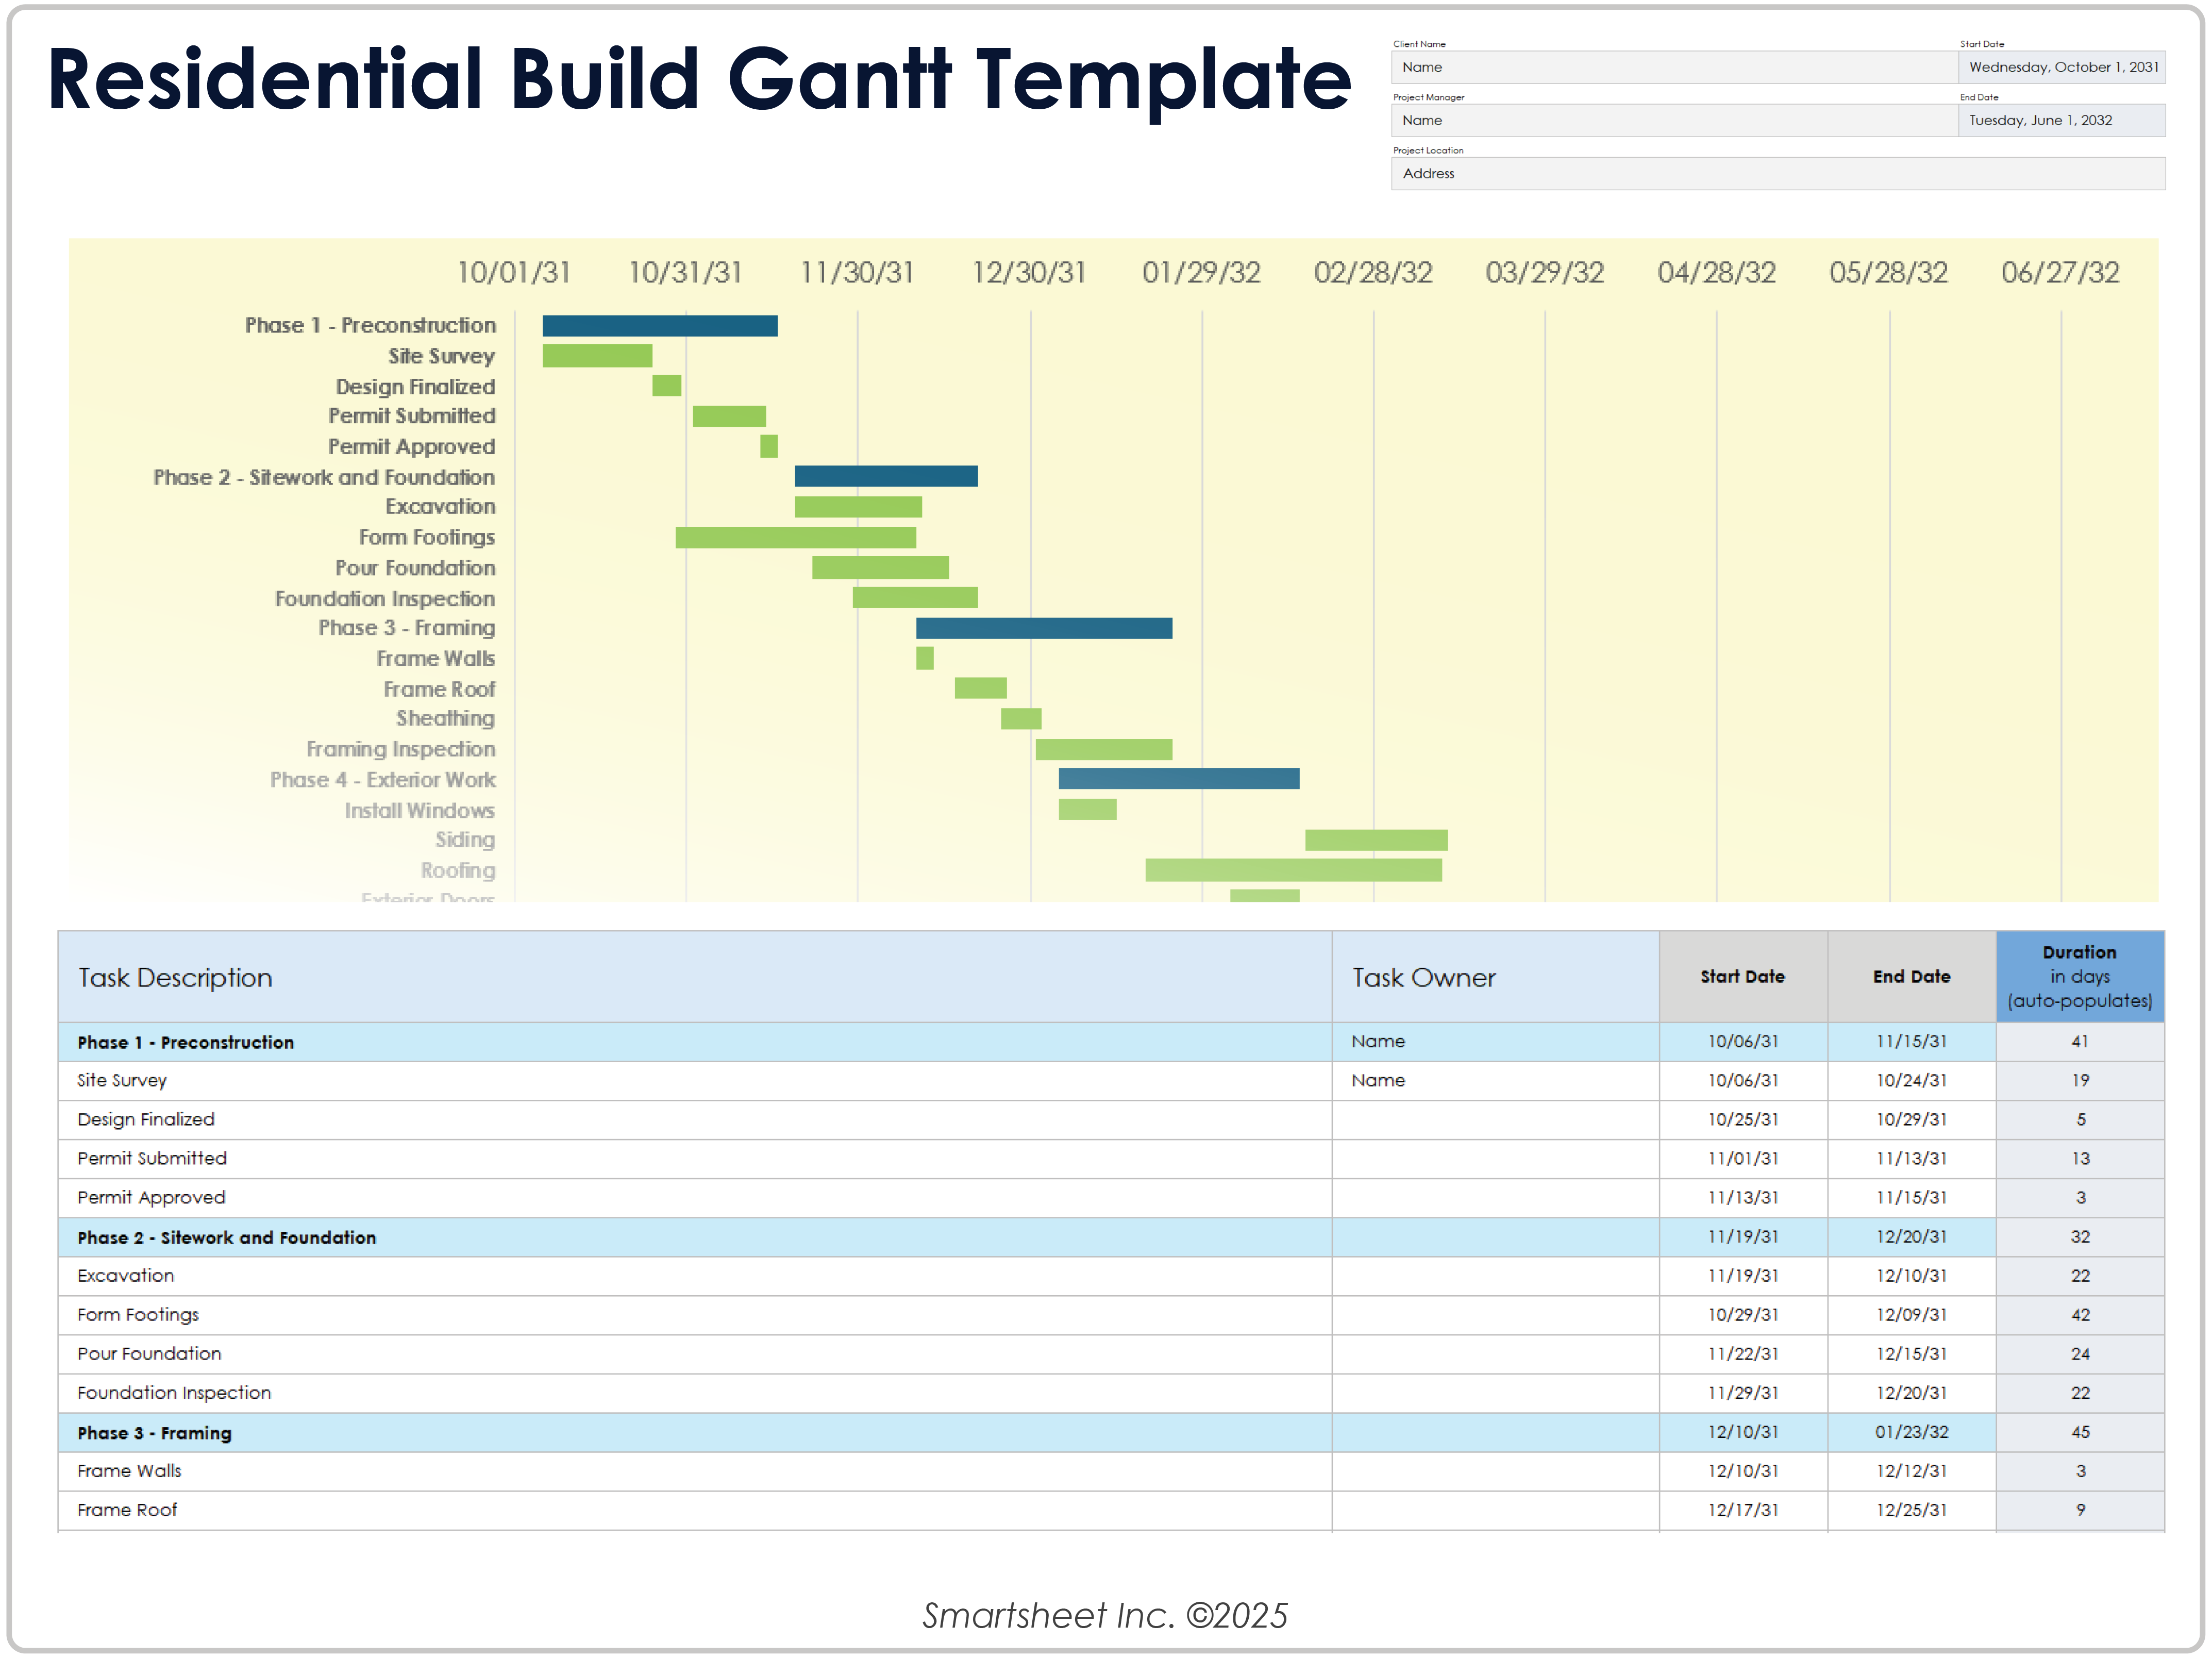
The Whole-Home Timeline That Actually Works
| Phase | Duration | Critical Living Tip |
|---|---|---|
| Structural | 2-6 weeks | Stay in home—but seal vents |
| Mechanical Rough-Ins | 1-3 weeks | Schedule water shutoffs for weekends |
| Drywall/Paint | 2-4 weeks | Run HEPA filters 24/7 |
| Flooring | 1-2 weeks | Move out—dust ruins new wood |
Overlap trades strategically: Have electricians rough-in while plumbers finish—cuts timelines by 30% if coordinated.
Weekly Site Meeting Agenda That Prevents Disasters
Every Monday at 9 AM:
1. Review next 3 weeks’ schedule (use Buildertrend app)
2. Confirm material deliveries (avoid “I’ll have it tomorrow” chaos)
3. Log change orders immediately in shared Google Sheet
One client caught a misordered $1,200 range hood during a Monday check-in—saving 10 days of delays.
Final Walk-Through: Catch Flaws Before You Pay
The last 48 hours determine whether you’ll love your space or spot flaws daily.
Room-by-Room Punch List That Works
Test everything:
– Electrical: Flip every switch with a lamp plugged in
– Plumbing: Run showers for 10 minutes to check drainage
– Cabinets: Open every door/drawer 5x to test alignment
A client found 17 outlet covers missing during their walk-through—caught before final payment.
Warranty Documentation: Your Future Self Will Thank You
Collect:
– Digital permits and inspection sign-offs
– Appliance manuals and paint color codes
– Tile/fixture warranties (store in “Renovation Vault” cloud folder)
When a faucet failed after 11 months, having the warranty saved $400 in replacement costs.
Starting a home renovation successfully hinges on 30 days of disciplined planning. Spend 80% of your effort defining needs, building bulletproof budgets, and hiring vetted teams—then watch construction flow smoothly. Your future self will sip coffee in that dream kitchen instead of chasing contractors for unfinished work. The perfect renovation isn’t about luck; it’s about launching right. Now go turn that Pinterest board into reality—one strategic step at a time.


