Your favorite fabric scissors suddenly can’t slice through cotton without snagging. Kitchen shears chew through chicken packaging like a dull saw. Before you resign yourself to buying replacements—or hunting for that mystery sharpener you bought years ago—know this: you can restore razor-sharp edges using items already in your home. From aluminum foil to ceramic mugs, these proven methods will save you money and frustration. Discover exactly how to sharpen scissors at home without sharpener using everyday household items that deliver professional results.
Aluminum Foil Quick Fix for Dull Scissors
Gather Heavy-Duty Foil for Effective Sharpening
Pull out your standard kitchen aluminum foil—no special equipment needed for this emergency sharpening solution. You’ll need one 12-18 inch sheet of heavy-duty foil (though regular foil works for moderately dull blades). Avoid recycled or bargain-bin foil that tears easily during cutting. Keep a clean cloth nearby to wipe away aluminum residue after sharpening. This method takes less than three minutes and works best for paper-cutting scissors that have lost their edge.
Execute Proper Foil Cutting Technique
Fold your foil strip lengthwise 3-4 times until you have a thick, one-inch wide band that won’t tear during cutting. Hold this band firmly against your work surface and make 10-15 full cuts from the scissor’s base to tip, slightly angling each cut to contact different blade sections. The aluminum acts as a micro-abrasive, realigning the cutting edge without removing significant metal.
Pro tip: If blades feel marginally sharper but still struggle with paper, repeat the process with fresh foil. Severely neglected scissors may need 25-30 cuts. Test sharpness by attempting to cut a vertical sheet of printer paper—sharp scissors should slice upward smoothly without tearing.
Sandpaper Precision Method for Restoring Scissor Edges
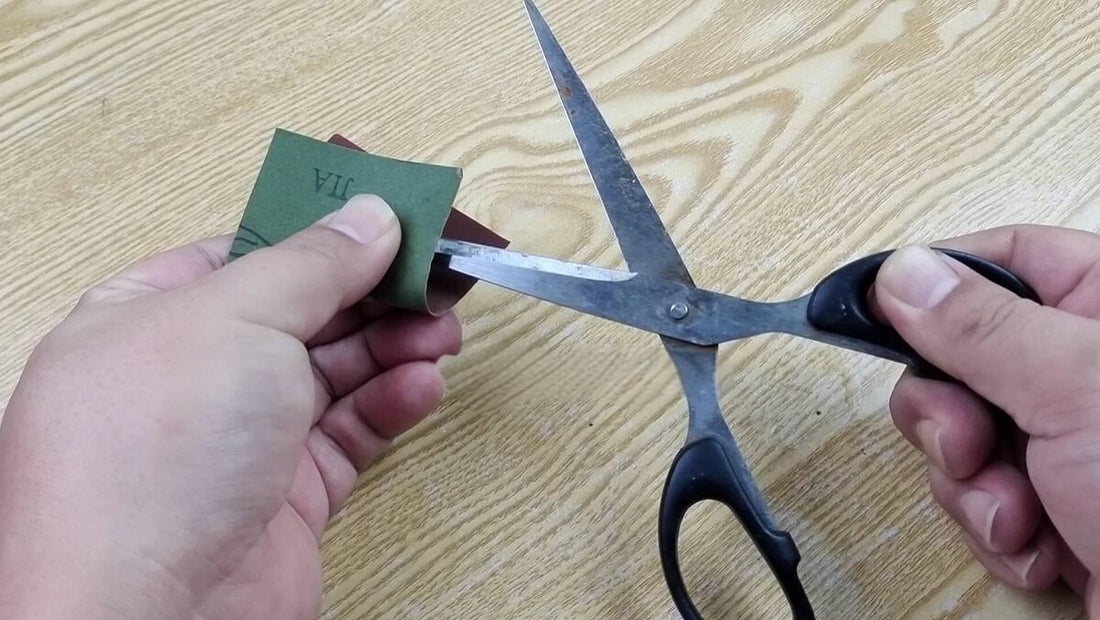
Choose Correct Grit for Your Scissor Condition
Match sandpaper grit to your scissors’ dullness severity: 150-grit for moderately dull blades, 220-grit for touch-ups. Always finish with 320-400 grit to polish the edge and remove microscopic burrs. Place your chosen grit on a flat surface with the abrasive side facing up. This method takes 5-7 minutes but delivers restaurant-quality sharpness for kitchen shears or fabric scissors.
Maintain Factory Angle While Sharpening
Open scissors to 90 degrees and position one blade flat against the sandpaper at 45 degrees—matching the original edge geometry. Draw the blade from base to tip in 10-15 smooth strokes, maintaining consistent pressure. Switch to fine-grit paper and repeat with lighter pressure for 5-8 finishing strokes. Critical warning: Test cutting ability after every 5 strokes. Over-sharpening creates a fragile edge that chips easily during regular use.
Steel Wool Polishing Technique for Fine Edges
Select Super-Fine Grade for Safe Sharpening
Choose 0000-grade (super fine) steel wool—the finest available—to avoid scratching your blades. Coarser grades damage the finish and create deep gouges that worsen cutting performance. Separate a palm-sized pad from the steel wool bundle, working over a trash can for easy cleanup of loose fibers. This method takes 3-5 minutes and works particularly well for maintaining already-sharp edges.
Polish Each Blade with Proper Technique
Hold the steel wool firmly and draw each blade through it 20-30 times, maintaining the existing angle. Rotate the wool pad frequently to expose fresh abrasive surfaces. Focus extra attention on any visible nicks or rolled edges. Finish with light, polishing strokes to remove microscopic burrs. Safety first: Steel wool fibers embed easily in skin. Wear gloves during this process and inspect blades thoroughly for embedded fibers before using.
Mason Jar Sharpening System for Perfect Angles

Glass Rod Method Using Household Items
Grab any smooth glass surface—mason jars work perfectly, but wine bottles or sturdy drinking glasses also serve well. The key is consistent diameter and flawless surface integrity. Avoid textured or decorative glass that creates uneven sharpening. This method takes just 2-3 minutes but provides surprisingly precise results because the glass automatically maintains the correct sharpening angle.
Perfect Sliding Motion Technique
Open scissors completely and position the glass between blades near the pivot. Close scissors gently while sliding toward the tips, maintaining light pressure throughout the motion. Complete 15-20 cycles, testing sharpness after each set of 5. The glass provides a perfect angle guide while honing the edge. Pro tip: For stubborn dullness, apply a tiny bit of olive oil to the glass surface to help carry away metal particles.
Ceramic Mug Bottom Trick for Emergency Sharpening
Identify Unglazed Ring on Your Mug
Flip your ceramic coffee mug upside-down. That rough, unglazed ring on the base? That’s your sharpening surface. Glazed ceramic won’t abrade metal, so test the surface with your fingernail first—you should feel slight roughness. Standard mugs from your cupboard work perfectly for this 2-minute sharpening technique.
Master Ceramic Strokes for Maximum Effect
Hold the blade at 45 degrees to the ceramic ring. Draw the full blade length across the surface 10-15 times per side, alternating blades to maintain balance. The ceramic dust created actually helps polish the edge. Wipe blades clean between sharpening sessions. Warning: Don’t use this method on expensive hair-cutting scissors—reserve it for household scissors only.
Tin Can Metal Rod Method for Quick Edge Realignment
Select Smooth Metal Surface
Clean, empty food cans work perfectly—just ensure the edge you use is smooth, not sharp from the can opener. Metal rods, chrome towel bars, or aluminum tubing also serve as excellent sharpening surfaces. This 3-minute method works best for kitchen shears that have become slightly dull from regular use.
Controlled Blade Passes for Consistent Results
Open scissors fully and place the metal surface between blades. Close while sliding along the metal, using consistent pressure. Complete 10-15 passes, occasionally reversing direction. Focus on smooth, controlled motions rather than speed. Pro tip: Wipe blades with a vinegar-soaked cloth afterward to remove any metal residue that could stain food.
Test Cutting Performance to Verify Sharpness
Paper Test Standards for Household Scissors
Hold a single sheet of standard printer paper vertically. Sharp scissors should slice upward smoothly without tearing or folding. Test different paper weights—if 20lb paper cuts cleanly but 60lb cardstock struggles, you need additional sharpening. For fabric scissors, use scrap cotton fabric: sharp blades create clean, straight cuts without snagging threads.
Hair and Thread Tests for Precision Scissors
For hair-cutting scissors, test on a single hair or thin thread—dull edges fold rather than cut cleanly. Never test sharpness on your fingers, as freshly sharpened scissors can cause serious injury. Critical warning: If your scissors still don’t cut properly after multiple sharpening attempts, they may have permanent damage requiring professional service.
Prevent Future Dullness with Proper Maintenance
Daily Maintenance Habits for Long-Lasting Sharpness
Wipe blades after each use, removing adhesive residue or fabric fibers immediately. Oil the pivot point monthly with a single drop of household oil. Store scissors hanging by the handle hole or in protective sleeves—never tossed in a drawer with other tools. These simple habits extend time between sharpening sessions by 300%.
Usage Best Practices to Avoid Premature Dulling
Use fabric scissors exclusively for fabric—never paper. Kitchen shears handle food packaging but never cut wire or bones. Cut at the optimal blade point—usually 1-2 inches from the pivot—for maximum leverage and minimal wear. Pro tip: Keep separate pairs for different tasks—this prevents cross-contamination and maintains optimal sharpness for each purpose.
Safety During Sharpening Procedures
Personal Protection Protocol for Safe Handling
Wear safety glasses to protect against invisible metal filings. Cut-resistant gloves prevent accidental slices when handling freshly sharpened blades. Work in bright, direct light to clearly see blade edges and angles. Critical warning: Never test sharpness by cutting toward yourself—always cut away from your body.
Workspace Preparation for Efficient Sharpening
Secure your work surface with non-slip mats. Position trash receptacles nearby for easy disposal of aluminum, sandpaper, and steel wool debris. Keep sharpening materials separate from regular kitchen supplies to prevent cross-contamination. Work on a stable surface at comfortable height to maintain proper control.
Sharp scissors transform frustrating cutting tasks into effortless precision work. Master the aluminum foil technique for quick touch-ups, sandpaper method for serious restoration, and ceramic mug approach when you’re in a pinch. With these proven methods for how to sharpen scissors at home without sharpener, you’ll save money while extending the life of your favorite cutting tools. Implement the daily maintenance habits described, and your scissors will deliver clean, precise cuts for years to come—no professional sharpener required.