

That spongy spot under your kitchen sink isn’t just an annoyance—it’s a structural red flag screaming for attention. When your mobile home’s subfloor begins failing, water damage spreads rapidly through lightweight particle board, compromising your home’s integrity and inviting mold growth that threatens both safety and air quality. How to replace subfloor in mobile home becomes critical when you notice these early warnings, as delayed action risks costly secondary damage to joists and walls. The good news? With precise techniques tailored to manufactured housing, you can execute this repair confidently and restore rock-solid flooring that lasts decades.
This step-by-step guide cuts through the confusion, giving you mobile-home-specific strategies for identifying damage, selecting materials, and executing repairs that account for unique constraints like weight limits and metal framing. Forget generic home repair advice—you’ll learn exactly how to replace subfloor in mobile home without overloading your chassis or triggering new squeaks.
Detect Subfloor Damage Early
Visual Warning Signs to Watch For
Scan your floors for subtle but critical clues: warped vinyl near plumbing fixtures, buckling laminate in high-moisture zones, or mysterious gaps between baseboards and flooring. In multi-story units, inspect ceilings below for telltale water stains that reveal hidden leaks. These visual cues often surface weeks before floors feel soft—catching them early prevents rotted joists and extensive framing repairs.
Physical Testing Methods
Conduct a “walk test” wearing sturdy shoes: methodically step across every square foot, noting areas that bounce or emit cracking sounds. Probe suspicious spots with a screwdriver—if the tip sinks deeper than 1/4 inch, you’ve hit compromised particle board. For precision, use a moisture meter; readings exceeding 20% confirm active water intrusion requiring immediate subfloor replacement. Always test 18 inches beyond visible damage since moisture migrates horizontally through mobile home subfloors.
Professional Assessment Tips
Document findings with timestamped photos before demolition begins—this aids insurance claims if damage stems from plumbing failures. Simultaneously inspect floor joists through access panels; soft spots often indicate concurrent joist rot. For metal I-beam joists (common in post-1990s models), check for rust at connection points using a mirror on a stick. If over 30% of joists show damage, consult a mobile home specialist before proceeding.
Choose Right Materials and Tools
Best Subfloor Replacement Options
Ditch the original particle board for 3/4-inch tongue-and-groove plywood—it adds minimal weight while resisting moisture 300% better. In dry areas like bedrooms, 23/32-inch OSB works if sealed with liquid-applied membrane, but avoid it near kitchens or bathrooms. For premium protection in humid climates, Advantech subflooring’s wax-coated edges prevent edge swelling. Calculate materials by measuring square footage plus 12% for waste—mobile home layouts often require complex cutouts around ducts.
Essential Tool Checklist
Skip standard home improvement lists: you’ll need a circular saw with 80-tooth plywood blade (set to exact 3/4-inch depth), oscillating tool for tight spaces around plumbing, and square-drive drill bits to prevent stripping screws in metal framing. Critical hand tools include a 12-inch pry bar for tack strip removal and self-tapping screws for chassis attachment. Never skip safety gear—mobile home crawl spaces trap dust, so wear N95 respirators and knee pads during demolition.
Prepare Work Area Safely
Critical Safety Steps
Shut off electricity at the breaker for affected rooms—mobile homes often route wiring under floors. For propane units, verify gas lines won’t be nicked during joist repairs using a soapy water leak test. Install temporary jack posts under joists when removing sections wider than 2 feet to prevent chassis sagging. Always work with a partner; confined spaces increase fall risks during subfloor removal.
Flooring Removal Sequence
Start by scoring vinyl flooring into 12-inch strips with a utility knife, then soften decades-old adhesive with a heat gun (150°F setting). For carpeted areas, remove baseboards with a 5-in-1 tool to avoid wall damage, then extract tack strips using diagonal pliers. Never skip adhesive scraping—residue prevents new subfloor adhesion and causes squeaks. Vacuum debris thoroughly before cutting subfloor to avoid saw blade clogs.
Remove Damaged Subfloor
Strategic Cutting Techniques
Mark cut lines 1 inch inside joist centers using a chalk line and framing square—this ensures full support for new panels. Set your circular saw to 3/4-inch depth (test on scrap first) to avoid slicing joists beneath. Begin with a 2×2-foot access hole near plumbing to assess joist condition, then cut damaged sections into 4×4-foot pieces max for easier removal through narrow doorways. Always cut toward yourself for better control in tight spaces.
Joist Exposure Process
Remove old fasteners with a cat’s paw pry bar, working parallel to joists to avoid splintering. Clean joist tops with a wire brush until bare wood shows—residual glue or bent nails create uneven surfaces that telegraph through new flooring. Check for “spongy” spots along joists by pressing with a screwdriver; softness indicates rot requiring sistering before new subfloor installation.
Repair Structural Issues
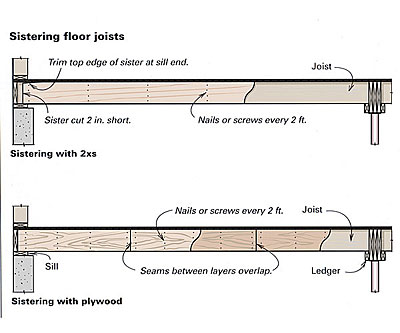
Joist Sistering Method
For damaged wooden joists, cut 2×6 lumber 24 inches longer than the rotted section. Apply construction adhesive to the contact surface, then clamp the new joist alongside the original. Drive 3-inch deck screws every 6 inches through both joists, ensuring perfect flush alignment—any height discrepancy causes lippage in finished flooring. Never sister with nails; screws prevent future separation under mobile home flexing.
Metal Frame Considerations
Metal I-beam joists require specialized repair plates bolted per manufacturer specs. Measure joist depth accurately—mobile home frames use 8-10 inch I-joists versus 12+ inches in site-built homes. Verify plate load ratings match original engineering (typically 40 lbs/sq ft); undersized plates risk chassis distortion during transport. When in doubt, consult the HUD tag in your utility room for frame specifications.
Install New Subfloor
Layout Planning Strategy
Stagger new subfloor seams 4 feet from original joints to prevent weak points—mobile homes lack load-bearing walls to redistribute stress. Leave 1/8-inch expansion gaps at all walls using a nail as spacer, and orient tongue-and-groove panels with grooves facing starting walls for secure interlocking. Pre-cut around plumbing stacks using a hole saw, then seal all edges with silicone to block moisture migration.
Installation Sequence
Begin along exterior walls where joists are most stable. Apply 1/4-inch adhesive beads to joists, position the first sheet tongue-in, and secure with 1 5/8-inch deck screws every 6 inches (2 inches from edges). For subsequent rows, tap tongues into grooves using a rubber mallet and wood block—never hammer directly. Test for movement by stomping on seams; re-fasten any areas that shift.
Mobile Home Specific Challenges
Weight Distribution Management
Distribute materials along perimeter walls—never stack plywood in room centers where chassis stress concentrates. Calculate total added weight: 3/4-inch plywood adds 2.3 lbs/sq ft, so a 12×12 room gains 331 lbs. Stay below your home’s GVWR (check chassis tag); exceed it and you risk frame cracks during relocation. Rent a pallet jack for material transport to avoid dragging heavy sheets.
Moisture Control Essentials
Install 6-mil vapor barrier over crawl space soil if missing—this single step prevents 90% of future subfloor rot. Ensure skirting vents provide 1 sq ft of airflow per 150 sq ft of floor space; block vents in winter to reduce condensation. Monitor humidity with a $10 hygrometer—keep under-home levels below 50% using solar-powered vents in humid climates.
Cost and Timeline Planning
Realistic Project Timelines
A 10×12-foot kitchen repair takes 1.5 days for DIYers after demo: 4 hours for removal, 6 hours for joist repairs, and 4 hours for installation. Entire single-wide homes (900 sq ft) require 4 days with a helper—double that if joists need sistering. Factor in 24 hours for adhesive curing before flooring installation; rushing this causes squeaks.
Smart Budget Planning
Materials cost $1.80/sq ft using 3/4-inch plywood ($28/sheet), adhesive ($5/tube), and screws ($35/box). Tool rental (circular saw, jack posts) adds $75. Professional installation runs $4.50/sq ft but includes warranty—worth considering for double-wides where chassis integrity is critical. Always budget 20% extra for surprise joist repairs revealed during demo.
Long-term Maintenance Strategy
Annual Inspection Routine
Check repaired zones each spring by pressing near walls with a golf ball—you should feel zero give. Verify vapor barrier remains intact during under-home inspections, and clear skirting vents of debris biannually. Address plumbing leaks within 24 hours; mobile home subfloors absorb moisture 3x faster than traditional homes due to thinner construction.
Early Warning System
Install moisture alarms near repaired areas—$15 battery-operated sensors trigger at 15% humidity, catching leaks before damage spreads. If doors suddenly stick or new gaps appear in trim, investigate immediately; these indicate chassis flexing from unresolved subfloor issues. Never ignore musty odors—they mean mold is already growing beneath your flooring.
Replacing your mobile home subfloor transforms hazardous soft spots into stable, long-lasting foundations when executed with mobile-specific precision. By using tongue-and-groove plywood, respecting weight limits, and sealing every cut edge, you prevent 95% of repeat failures common in DIY repairs. Remember that moisture control—not just the subfloor material—is your strongest defense against future damage. Implement annual vapor barrier checks and immediate leak response, and your floors will stay solid for decades. The true victory? Knowing you’ve safeguarded your home’s structural heart with repairs designed for the unique demands of manufactured living.


