

Drafty windows sucking energy from your home? You’re not alone—inefficient windows account for up to 30% of heating and cooling costs. Learning how to replace home windows properly transforms comfort while avoiding the $1,500+ repair bills that come from improper flashing or sealing. Whether you’re tackling a single pane or whole-house renovation, this guide cuts through the confusion. Discover exactly when to choose insert versus full-frame replacement, master the critical flashing sequence that prevents rot, and sidestep common DIY disasters that turn a weekend project into a year-long headache. You’ll gain actionable steps to install windows that last decades, not just seasons.
Window replacement isn’t just about swapping glass—it’s a precision integration with your home’s building envelope. One misplaced shim or skipped sealant bead invites moisture intrusion that rots framing within months. But done correctly, new windows slash energy bills by 12-33% while boosting curb appeal. This guide focuses on what actually matters: the flashing sequence that keeps water out, the shimming pattern that ensures smooth operation, and the safety protocols for pre-1978 homes. Forget theoretical fluff—you’ll get field-tested techniques used by professionals, adapted for confident DIYers.
Assess Your DIY Readiness Before Removing a Single Nail
Evaluate Project Complexity First
Full-frame replacement demands complete tear-out of existing windows, frames, and trim—essentially rebuilding the window opening from scratch. This method addresses underlying structural issues and allows size modifications but requires understanding flashing integration and building envelope sealing. Insert replacement keeps your existing frame intact, sliding a new window unit into place while preserving interior trim. This simpler approach works when frames remain structurally sound and you don’t need to change window dimensions. If your current frames show rot at the sill corners or cracked joints, full-frame becomes mandatory—you can’t insert new windows into compromised structures.
Essential Tools Checklist
Every successful window replacement requires precision tools for measuring, cutting, and sealing. You’ll need a 25-foot tape measure for exact dimensions, a 4-foot level for alignment verification, and a utility knife for trimming materials. A putty knife removes old sealants, while a drill creates pilot holes to prevent frame splitting. Stock up on composite shims for moisture resistance, backer rod for sealant control, and a quality caulking gun with smooth trigger action. Manufacturer guides provide product-specific tool lists, but these basics cover most installations. Skip the “good enough” tools—cheap levels cause crooked windows that jam within months.
Plan Realistic Timeframes
Ground-floor full-frame replacements consume 4-6 hours minimum per window—double that for upper floors due to ladder work and safety considerations. Insert replacements typically shave 1-2 hours off this timeline, but always budget extra time for guide review and unexpected complications. Weather delays, discovery of rot, or permit inspections can extend projects significantly. Never schedule replacements during rainy seasons; an exposed opening for more than 4 hours risks interior water damage. For whole-house projects, replace no more than two windows per day to maintain structural integrity and avoid temperature swings that stress remaining windows.
Choose Between Replacement Types for Your Specific Home

Insert Windows Preserve Trim
Insert replacements excel when existing frames remain solid and you want to maintain original architectural details. This method costs less, creates minimal interior disruption, and completes faster. However, it cannot fix rotted frames, restricts you to existing opening sizes, and may underperform if original frames lack proper insulation. Pro Tip: Test frame solidity by probing corners with a screwdriver—if wood crumbles, insert replacement is off the table. This approach works best for vinyl windows in sound wood frames where you prioritize speed over maximum efficiency gains.
Full-Frame Opens Possibilities
Full-frame replacement becomes necessary when frames show deterioration, you need egress windows, or want to resize openings. This comprehensive approach maximizes energy efficiency through complete thermal break installation and allows total design flexibility. Expect higher costs and more extensive finish repairs, but gain the opportunity to upgrade wall insulation around the opening. Critical Insight: Full-frame is the only solution for converting single-hung to double-hung windows or adding historical accuracy with divided lites. The extra 2-3 hours per window pays dividends in decades of trouble-free operation.
Specialized Retrofit Options
Narroline® conversion kits specifically retrofit 1968-plus Narroline® windows into modern tilt-wash double-hung units. This niche solution maintains original openings while adding easy-clean functionality—perfect for preserving historic character without sacrificing convenience. Unlike standard insert replacements, these kits include custom jamb liners that lock into original channels. Verify your window model first—these kits only fit specific vintage units and won’t work on newer replacements. For mid-century homes, this is often the sweet spot between preservation and modern performance.
Prepare the Window Opening Like a Seasoned Pro
Size Rough Openings Correctly
Your new window needs breathing room—rough openings must accommodate the unit plus installation tolerances for shimming and insulating. Measure twice, order once: incorrect sizing causes major headaches and potential structural issues. Account for flashing material thickness (typically 1/8 inch) and fastener embedment depth. The opening should be 1/2 inch wider and taller than the window frame to allow for proper insulation and alignment. Warning: Oversized openings lead to excessive foam use that warps frames; undersized openings force dangerous prying that cracks glass.
Integrate Water Barriers
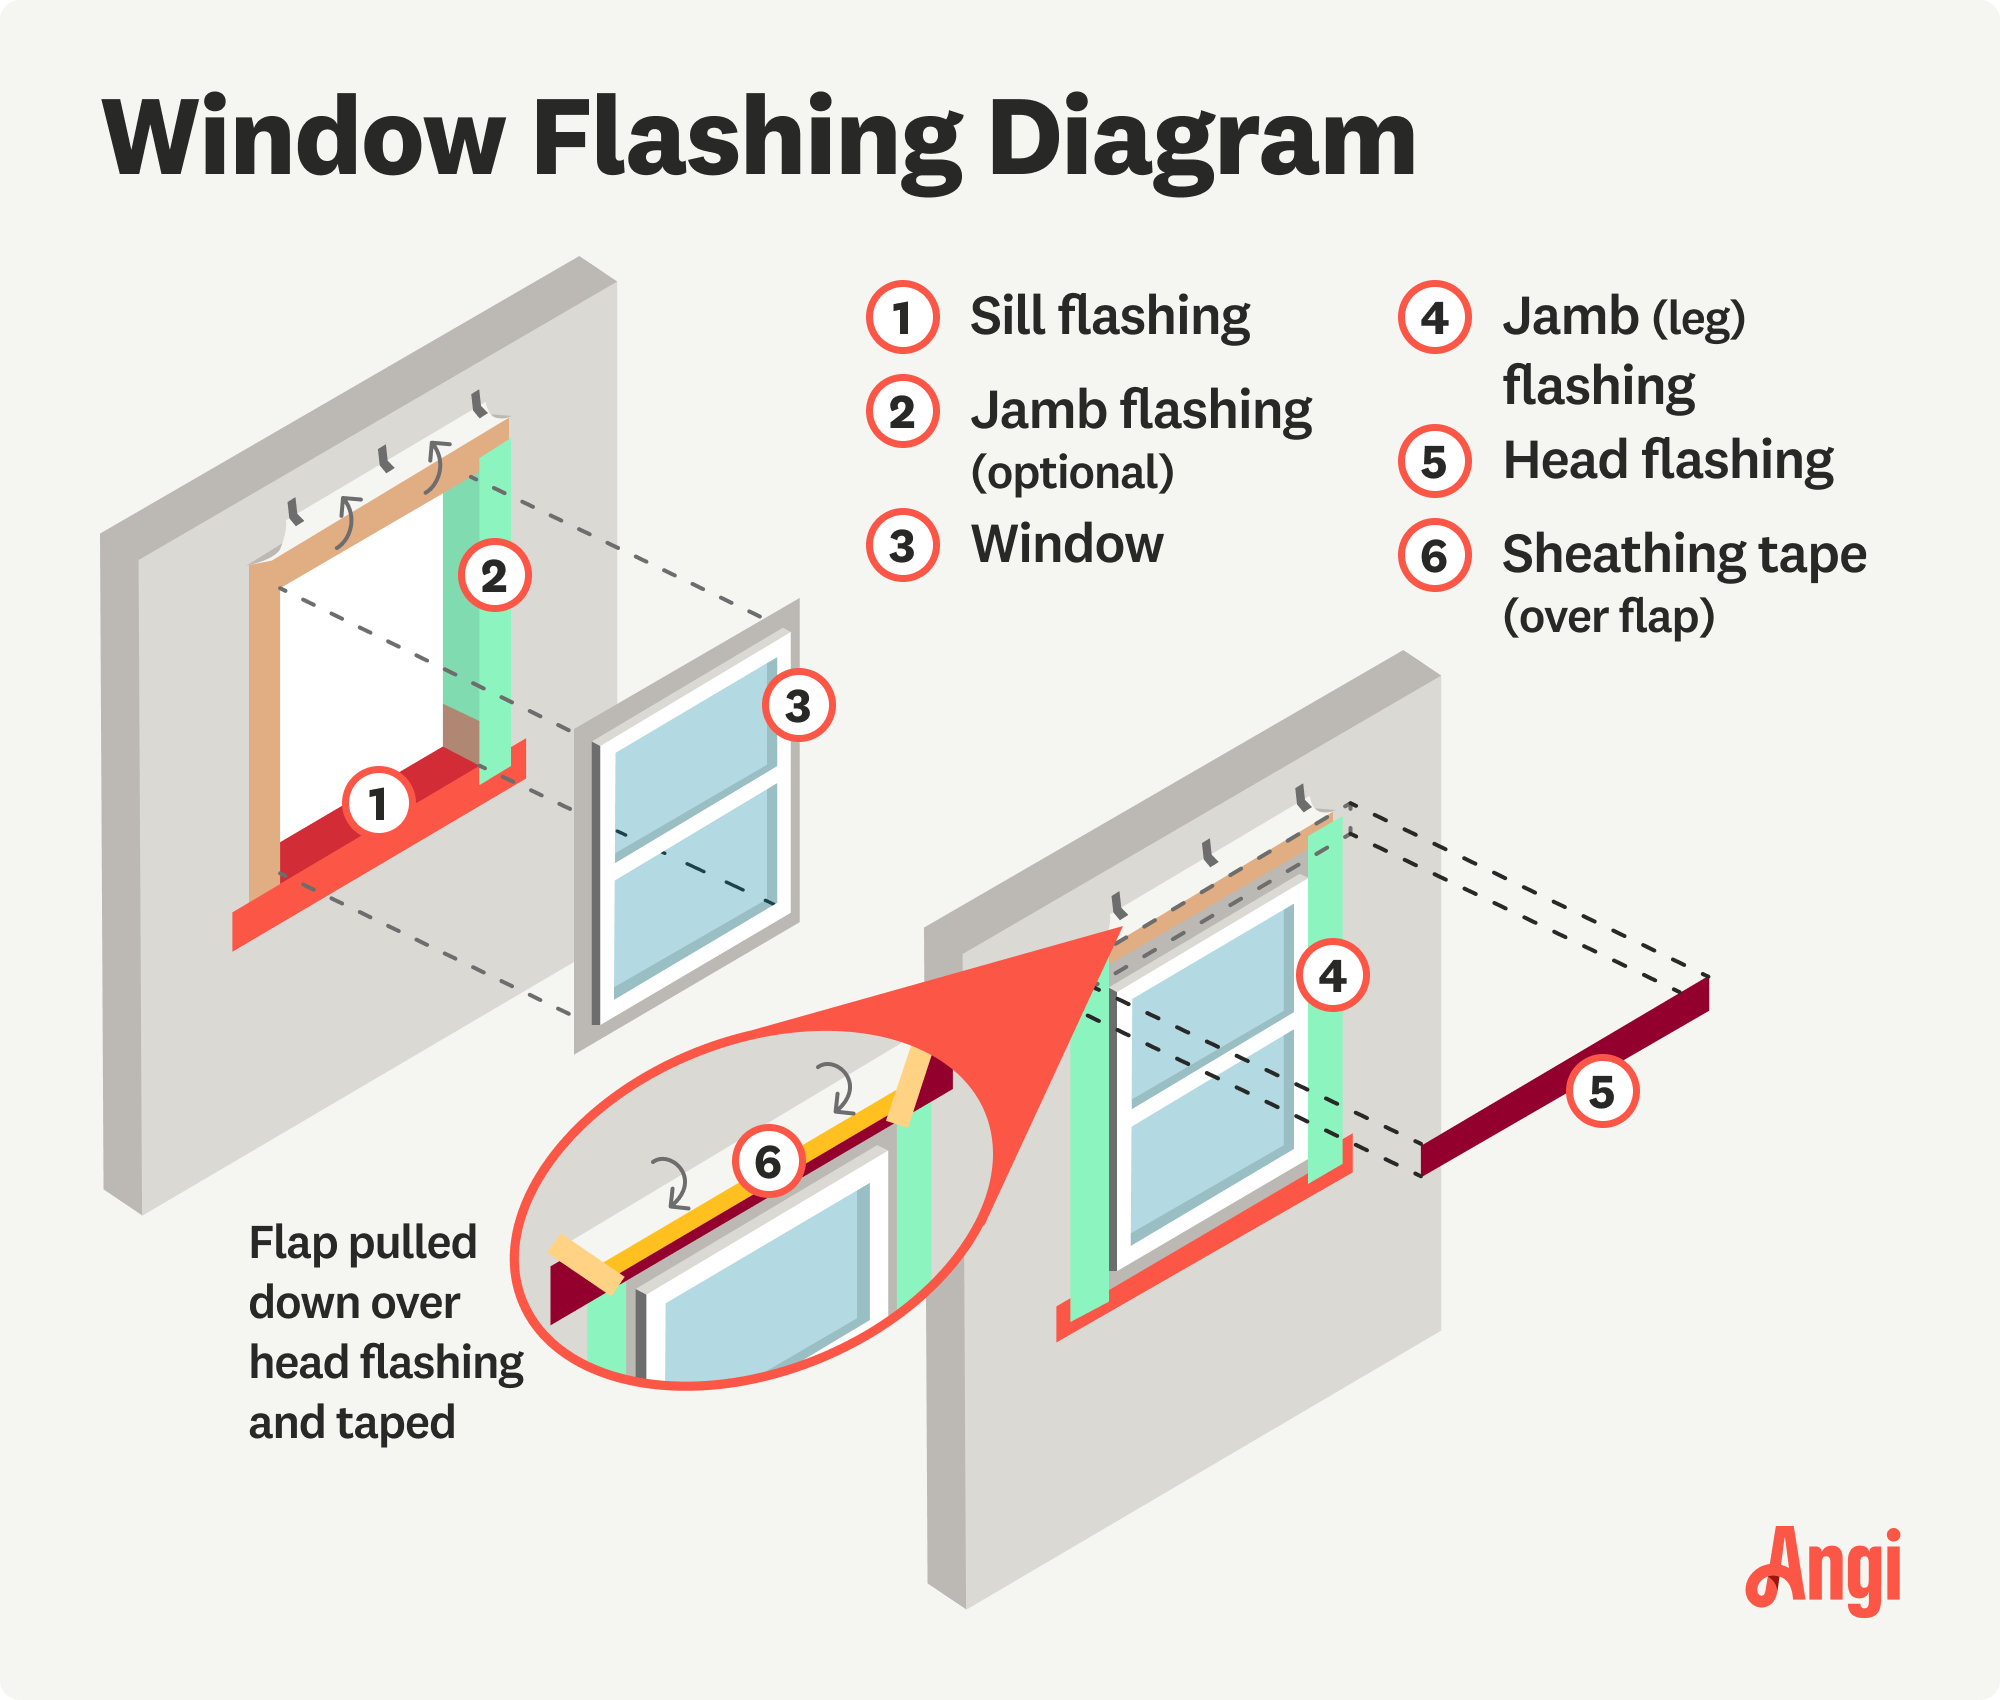
Windows must connect seamlessly with your home’s water resistive barrier system. Whether using traditional house wrap or liquid-applied membranes, installation sequencing varies by system design. Some barriers install before window placement, others integrate afterward—follow manufacturer specifications exactly. For house wrap, the critical “shingle principle” means upper layers must overlap lower layers so water flows downward. Install the sill flashing tape first, then jamb tapes, and finally head flashing. Skipping this sequence turns your beautiful new window into a leak factory within months.
Execute Critical Installation Steps That Prevent Future Headaches
Secure Proper Fastening
Window anchoring depends on wall construction type, wind load requirements, and fastener embedment depth. Wood frame walls need different fasteners than masonry or steel. Geographic location dictates fastening patterns—coastal areas require more aggressive anchoring. Never guess: check local building codes and manufacturer requirements. Place fasteners at 8-inch intervals along jambs and 6 inches at corners, ensuring they penetrate structural framing by at least 1.5 inches. Common Mistake: Over-tightening screws distorts frames, causing operation issues—stop when resistance increases slightly.
Flash Like a Pro
Proper flashing creates a continuous drainage plane directing water outward. Install materials shingle-fashion so water flows over—not behind—each layer. Choose between self-adhered tapes or liquid membranes based on your wall construction. For brick veneer, install through-wall flashing that extends into weep holes. At the head flashing, create a 2-inch upward turn at the exterior to prevent capillary action. Visual Cue: After installation, spray water on the head flashing—you should see runoff at the sill, not leakage inside.
Seal Against Elements
Apply sealant to bridge gaps between rough opening, window frame, and installation flange. Use backer rod to control sealant depth—too deep wastes material, too shallow fails to seal. Fill remaining gaps with low-expanding foam for air sealing. Select sealants compatible with your specific materials and climate conditions. Pro Technique: Apply sealant in a continuous bead without breaks, then tool it with a wet finger to force it into gaps. Never use high-expansion foam—it warps frames within weeks.
Shim for Perfect Alignment
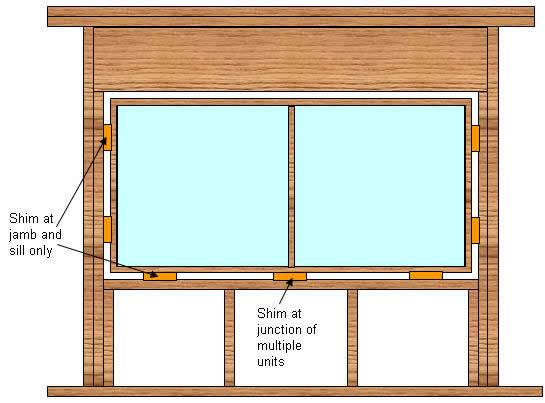
Strategic shimming ensures windows sit plumb, level, and square within openings. Place shims at manufacturer-specified points to distribute weight evenly and accommodate minor opening irregularities. This step affects operation, energy efficiency, and long-term performance—rushing here creates problems later. Expert Move: Shim at both top and bottom corners plus mid-height points. Test operation frequently during shimming—windows should glide smoothly without binding. Remove excess shim material with a sharp utility knife before finishing.
Address Safety and Lead Concerns Before Cutting a Single Nail
Handle Lead Paint Safely
Homes built before 1978 likely contain lead-based paint. Disturbing this during window replacement requires EPA-approved lead-safe practices. Contain work areas with plastic sheeting, use HEPA vacuums, and wear respirators with P100 filters. Never dry-sand or use heat guns on painted surfaces. In some cases, professional abatement becomes mandatory—check local regulations. Critical Step: Wet-scrape paint carefully into heavy-duty bags before window removal. Improper lead handling risks permanent neurological damage to children.
Dispose Responsibly
Old windows contain recyclable glass, metal, and wood components. Contact local waste management for recycling options and disposal regulations. Treated wood requires special handling, while usable windows might find new life through Habitat for Humanity ReStores. Never burn old painted windows due to potential lead contamination. Time-Saver: Schedule disposal pickup when ordering new windows—many suppliers offer take-back programs for old units.
Master the Replacement Process for Flawless Results
Start With Ground Floor Windows
Begin your window replacement journey with accessible ground-floor units. These provide learning opportunities without fall risks. Master techniques on simpler projects before tackling upper floors or complex installations. Pro Tip: Replace windows on cloudy days—direct sun causes premature sealant curing that creates gaps.
Test Operation Before Sealing
Before final sealing and trim installation, test window operation thoroughly. Check opening/closing, locking mechanisms, and weatherstripping compression. Adjust shimming as needed—fixing issues now prevents costly callbacks later. Red Flag: If windows stick after shimming, remove and recheck alignment—forcing operation cracks frames.
Budget for Hidden Issues
Expect surprises when opening walls. Rotten framing, inadequate insulation, or previous poor repairs complicate projects. Keep 20% budget cushion for unexpected repairs discovered during installation. Common Discovery: Termites in sill plates or missing cripple studs require structural fixes before proceeding.
Replacing home windows transforms your living space’s comfort, efficiency, and appearance—but success hinges on proper planning and execution. Whether you choose insert or full-frame replacement, meticulous preparation prevents costly mistakes. Start with simpler ground-floor projects, invest in quality tools, and never compromise on flashing or sealing details. Your new windows will reward your diligence with decades of reliable performance and energy savings. Final Checklist: Verify all seals with a dollar bill test (if it pulls out easily, reseal), schedule annual inspections, and keep manufacturer guides for warranty claims. When done right, how to replace home windows becomes your home’s most valuable upgrade—not a regrettable renovation.


