
That unsettling spongy feeling under your feet as you cross your mobile home is more than just annoying—it’s a warning sign of potential structural damage. Unlike traditional homes, mobile home floors face unique challenges with their particle board or OSB subfloors mounted over wooden joists on a steel chassis. When water damage or structural issues strike, you need a targeted approach to fix the problem correctly. This guide delivers exactly what you need to know about how to repair mobile home floor damage safely and effectively, saving you thousands compared to professional repairs.
Discover proven techniques that address the root causes of floor damage in manufactured homes, from identifying water intrusion points to reinforcing weakened joists. You’ll learn which materials work best for mobile home construction and how to prevent recurring problems that plague many manufactured home owners.
Spot Floor Damage Before It Worsens
Identify Water Damage Signs Immediately
Water damage creates unmistakable warning signs that demand immediate attention. Press firmly with your heel on suspicious areas—soft spots that give way indicate compromised subflooring beneath your feet. Look for discoloration near plumbing fixtures, around toilets, or beneath sinks where leaks frequently occur. Musty odors often signal hidden mold growth, while bubbling vinyl flooring reveals trapped moisture working its way upward through the subfloor.
Recognize Structural Warning Signals
Structural damage presents differently than water issues but requires equally urgent action. Doors that suddenly refuse to close properly often indicate floor settling or joist failure. Check for visible gaps where your floor meets baseboards—these spaces typically widen as structural integrity decreases. Bouncy sections in high-traffic areas suggest joist separation from main support beams. Cracks in walls or ceilings that follow floor joist lines signal serious support problems needing immediate attention.
Conduct a Professional-Level Inspection
Start your inspection by clearing the room completely—furniture hides critical damage indicators. Walk every square foot using a grid pattern, marking soft spots with chalk as you discover them. Invest in a $20 moisture meter from your hardware store—readings above 20% indicate active water problems requiring immediate action. Access your under-floor space to examine joist conditions from below, documenting everything with photos for your repair planning.
Essential Tools and Materials Checklist
Must-Have Tool Kit for Mobile Home Repairs
Hand Tools You Can’t Skip:
– 18-24 inch pry bar for controlled demolition
– Circular saw with plywood blade (set to exact subfloor depth)
– Sharp utility knife with extra blades for precise cuts
– 25-foot tape measure and 4-foot level for accuracy
– Block plane for perfect edge fitting during installation
Power Tools That Save Time:
– Cordless drill with full bit set
– Reciprocating saw for stubborn areas
– Powerful shop vacuum for debris removal
– LED work lights for under-floor visibility
Safety First Equipment:
– Impact-resistant safety glasses
– N95 dust masks for particle protection
– Headlamp for hands-free illumination
Smart Material Selection for Mobile Homes
Subfloor Materials That Last:
Choose 3/4-inch tongue-and-groove plywood (exterior grade) for maximum durability in your mobile home floor repair project. While 5/8-inch OSB costs less, it won’t withstand moisture as effectively. You’ll need construction adhesive rated specifically for subfloor use, 2.5-inch galvanized deck screws, and joist hangers for reinforcement work.
Waterproofing Supplies That Prevent Recurrence:
Install 6-mil plastic sheeting as your moisture barrier, sealing all seams with butyl tape. Apply waterproof membrane like RedGard in bathrooms and kitchens, extending 6 inches up walls. Keep 100% silicone caulk on hand for sealing every gap and penetration point—this step alone prevents 80% of recurring moisture issues.
Complete Mobile Home Floor Repair Process
Phase 1: Smart Demolition Techniques
Preparation Steps That Prevent Mistakes:
Remove everything from your repair zone before starting. Shut off utilities including water, electricity, and gas lines near your work area. Create under-floor access by removing skirting panels, then establish proper ventilation using fans. Position work lights strategically before beginning demolition.
Controlled Removal Process:
Score your cut lines with a utility knife and straight edge before cutting—this prevents damage to adjacent areas. Set your circular saw to exactly match your subfloor depth to avoid cutting joists. Work in manageable 2×4 foot sections, prying up damaged areas systematically. Critical step: Remove every fastener completely—missed nails cause future squeaks and flooring failures.
Phase 2: Joist Restoration Methods That Work

Sister Joist Installation for Maximum Strength:
Cut new joist lumber (2×8 or 2×10) to span the full distance between supports. Apply construction adhesive liberally to mating surfaces before positioning the new joist alongside the damaged one. Secure with 16d nails or structural screws every 12 inches, ensuring both ends rest securely on main beams. This technique adds strength without complete joist replacement, solving most structural issues in mobile home floor repair.
Phase 3: Professional Subfloor Installation
Plywood Installation Mastery:
Start installation from your room’s straightest wall, staggering joints at least 4 feet from previous rows. Apply construction adhesive to joists immediately before placing each sheet—this prevents premature drying. Use deck screws every 8 inches along joists, maintaining 1/8-inch gaps between sheets for expansion. Pro tip: Leave 1/4-inch expansion gaps at all walls to prevent buckling as your mobile home naturally shifts.
Fix Common Mobile Home Floor Problems Fast
Eliminate Annoying Floor Squeaks Permanently
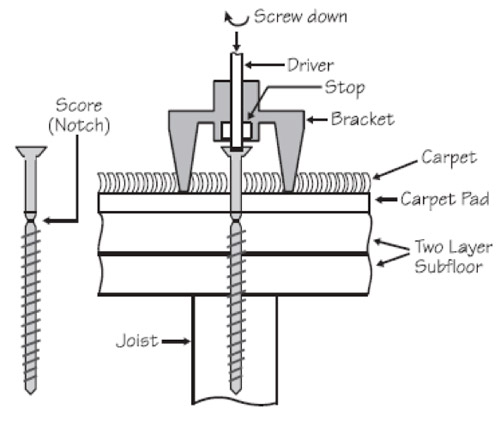
Locate squeak sources by walking your floor systematically and marking problem areas with painter’s tape. Access from below when possible to identify exact gap locations between joist and subfloor. Most squeaks result from loose connections—apply construction adhesive along all joist/subfloor joints and add deck screws through subfloor into joists at squeak locations. For carpeted areas, use specialized squeak repair kits with breakaway screws.
Solve Moisture Issues At the Source
Find water sources by checking all plumbing lines for active leaks, especially at joints and connections. Inspect windows and doors for water intrusion points during rain. Examine your roof for leaks that travel down walls to the floor. Critical step: Fix every water intrusion source before beginning floor repairs—otherwise, your how to repair mobile home floor efforts will fail within months.
Prevent Future Floor Damage
Monthly Maintenance That Saves Thousands
Walk your floors monthly, checking for new soft spots or developing squeaks. Inspect visible plumbing under sinks and around appliances for leaks. Monitor indoor humidity using an inexpensive hygrometer—ideal range is 30-50%. Address spills immediately to prevent subfloor saturation. Install water alarms near appliances for early leak detection before major damage occurs.
Long-Term Protection Strategies
Tighten marriage line bolts annually to prevent separation issues unique to mobile homes. Inspect pier condition after severe weather events, and maintain proper drainage directing water away from your home’s perimeter. Consider professional re-leveling if doors begin sticking or gaps appear between floors and walls—mobile homes typically need re-leveling every 2-3 years.
Smart Budget Planning for DIY Repairs

DIY Cost Breakdown (Per 100 Sq Ft)
Materials typically run $400-600 including subfloor, fasteners, and waterproofing. Tool rental adds $100-200 for specialized equipment, while disposal fees range $50-100. Your total DIY investment: $550-900 for complete professional-quality repair—less than half what professionals charge for similar work ($1,200-2,500 per 100 sq ft).
Money-Saving Tips for Mobile Home Owners
Purchase materials during seasonal sales to save 15-25% on your project costs. Rent specialized tools rather than buying—most hardware stores offer daily rates. Salvage undamaged flooring sections for future repairs, and combine repairs with other renovation projects for bulk pricing discounts. Consider phased repairs if budget constrained—address structural issues first, then finish with cosmetic improvements.
Your mobile home floor repair project becomes manageable when you focus on identifying and fixing the root cause before installing new materials. With proper tools, quality materials, and this systematic approach, you’ll restore your floor’s integrity and enjoy peace of mind for years to come. Remember that the success of how to repair mobile home floor damage depends on thorough preparation and attention to moisture prevention—skip these steps and you’ll face the same problems again within months. Start with a complete inspection, address structural issues first, and never skip the waterproofing phase for lasting results.


