
Radon silently infiltrates homes across America, representing the second leading cause of lung cancer and the primary cause among nonsmokers. This invisible, odorless gas seeps from soil into your living space with no warning signs—yet every breath you take increases your cancer risk. The good news? Learning how to remove radon from home doesn’t require complex science or extreme expenses when you follow proven methods. This guide delivers actionable steps to eliminate radon threats completely, from initial testing to system verification, ensuring your family breathes safely within days of taking action.
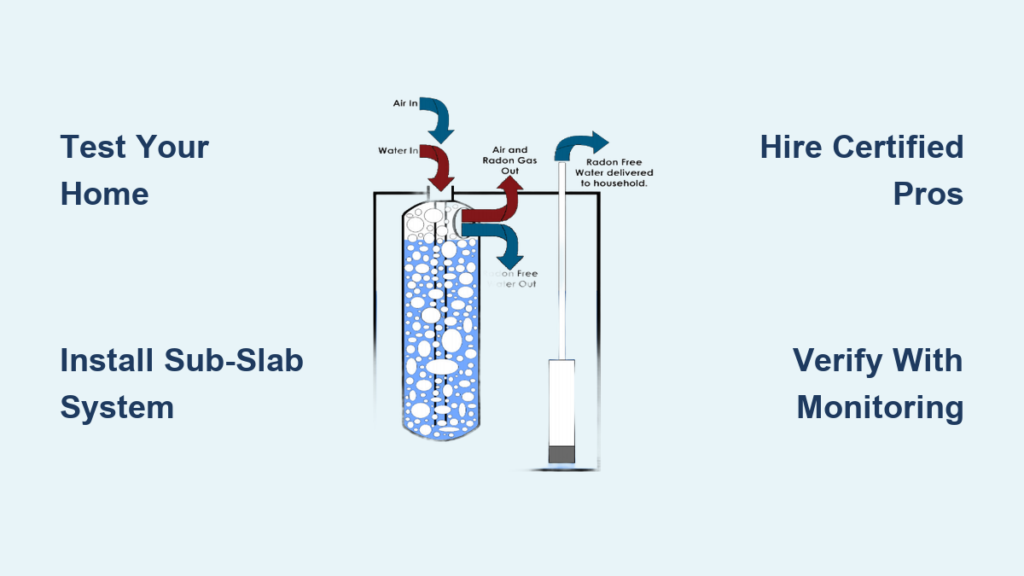
Test Your Home for Radon Before Installation
Skip this critical step and you might waste money on unnecessary systems or miss dangerous exposure levels. Every home—single-family, manufactured, or apartment—requires testing regardless of age or location. Your lowest living area provides the most accurate reading since radon settles downward, though real estate transactions require testing in any potentially habitable lower space.
Short-Term Testing: Your 48-Hour Radon Screening
Complete a quick screening test using charcoal canisters or electronic monitors in just two days. Seal your home 12 hours before starting and maintain closed conditions throughout testing—this means no open windows or exterior doors. Position the device 2-7 feet above floor level in an open central area, avoiding kitchens, bathrooms, closets, or near exterior walls. Never run whole-house fans during testing as they distort results. Short-term tests deliver rapid answers but can fluctuate with weather conditions.
Long-Term Testing: The Accurate Annual Assessment
Alpha-track detectors provide a true picture of your radon exposure over 3-12 months under normal living conditions. These account for seasonal variations that affect radon levels, preventing unnecessary mitigation from temporary spikes. While slower, long-term testing often saves money by confirming whether short-term high readings represent a genuine problem. Most homeowners find the wait worthwhile for peace of mind.
Free and Discounted Testing Options
State health departments offer free test kits (one per household while supplies last) to encourage widespread testing. Home improvement stores sell DIY kits for $10-$50, while real estate transactions require licensed professionals using continuous radon monitors. If you’re renting, remember Colorado law mandates landlord disclosure of radon information as of August 2023, and tenants retain the right to test their units independently.
Interpret Your Radon Test Numbers Correctly
The EPA’s 4 pCi/L action level isn’t a safety threshold—there’s no safe radon exposure—but represents the point where mitigation becomes cost-effective. Levels between 2-4 pCi/L still warrant action since cancer risk increases proportionally with concentration. Lower is always better when addressing how to remove radon from home.
Your Testing Decision Tree
- Initial screening: Conduct a short-term test as your first step
- Follow-up protocol: If results hit 4 pCi/L or higher, perform either a long-term test or second short-term test
- Mitigation trigger: Proceed with removal systems if long-term test exceeds 4 pCi/L or the average of two short-term tests does
Short-term readings above 8 pCi/L demand immediate action without waiting for follow-up tests. Higher initial results increase certainty that your home requires professional radon removal intervention.
Install Sub-Slab Depressurization: The Gold Standard Solution
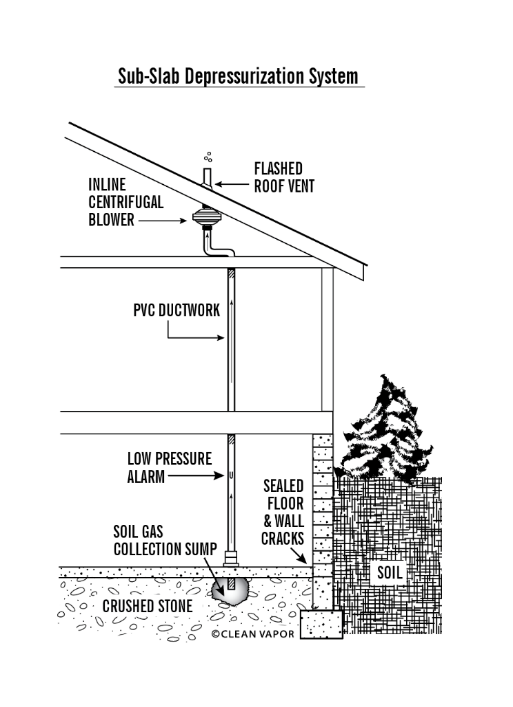
This proven method creates negative pressure beneath your foundation, stopping radon at its source with 80-99% effectiveness. The system operates continuously once installed, providing immediate protection with minimal maintenance.
Essential System Components You Need

- 5-inch foundation access hole for optimal suction
- 4-inch PVC piping for efficient gas transport
- Exhaust fan positioned outside or in attic space
- Manometer for real-time system monitoring
- Roof vent extending above eaves for safe gas dispersion
Professional Installation Timeline
Certified contractors typically complete installation in 4-6 hours with minimal disruption to your home. They drill through your foundation slab, create strategic suction points, and connect the PVC piping to an exhaust fan that continuously pulls radon from beneath your home. The gas safely releases above your roofline where it quickly dilutes to harmless levels.
Interior vs. Exterior Pipe Routing Options
Choose interior installation to conceal pipes within closets or utility rooms for aesthetic appeal, or select exterior routing for faster, often less expensive installation. Both methods achieve identical radon reduction—your home’s design and personal preferences determine the best approach when learning how to remove radon from home.
Hire Only Certified Radon Removal Professionals
![]()
Never trust your family’s health to uncertified contractors. Proper radon mitigation requires specific expertise and carries serious health implications if installed incorrectly.
Non-Negotiable Certification Requirements
- National Radon Proficiency Program (NRPP) certification
- National Radon Safety Board (NRSB) certification
- State licensing verified through regulatory agencies
- Insurance and bonding for liability protection
Smart Contractor Selection Checklist
Request minimum three bids from certified professionals and verify credentials through your state radon office. Demand contracts guaranteeing radon levels ≤4 pCi/L (ideally ≤2 pCi/L) with retesting provisions. Avoid contractors who pressure for immediate decisions, refuse written guarantees, or offer prices significantly below market rate—these red flags often indicate substandard work.
Seal Foundation Cracks to Boost System Effectiveness
While sealing alone won’t eliminate radon, it enhances your depressurization system’s performance and reduces conditioned air loss.
Target These Critical Areas First
- Basement floor cracks with epoxy or polyurethane sealants
- Foundation wall gaps using hydraulic cement
- Slab penetrations around utility pipes
- Crawl space membranes for homes with dirt floors
Realistic Sealing Expectations
Foundation sealants degrade over time and cannot create a complete radon barrier. Treat sealing as a complementary measure, not a replacement for active mitigation. Expect to reseal every 5-10 years as materials age—this maintenance task significantly improves your primary radon removal system’s efficiency.
Verify Your System Works with Continuous Monitoring
Post-installation testing confirms your radon removal system performs as promised and continues protecting your family long-term.
Daily Visual System Check
Your manometer displays system pressure through a clear tube with colored liquid. A zero reading means immediate system failure requiring contractor contact—this simple 10-second check prevents dangerous undetected problems. Monthly visual inspections take less than a minute but provide crucial peace of mind.
Professional Maintenance Schedule
- Annual inspections ensure optimal performance
- Fan replacement every 10-15 years ($150-$300)
- Biennial retesting verifies continued effectiveness
- Immediate retesting after major renovations or structural changes
Cut Radon Removal Costs with Smart Planning
National averages range from $1,000-$2,000 for professional installation—comparable to replacing a furnace. System complexity, home size, and foundation type affect pricing, but financial assistance options exist.
Available Assistance Programs
Colorado residents: Contact the state radon office for low-income mitigation assistance programs. Utah (Salt Lake County): Green and Healthy Homes funding supports qualifying families based on income. Many states offer similar programs—check with your local health department before proceeding.
Real Ongoing System Costs
Expect just $8-$10 monthly utility increase for continuous fan operation. Fan replacement costs $150-$300 every 10-15 years. Biennial testing adds $15-$50 per test—minimal expenses compared to potential cancer treatment costs.
Address Radon in Rental Properties and New Construction
Tenants have specific rights regarding radon exposure that many landlords fail to disclose. Colorado law now requires radon information in lease agreements, and tenants can void leases if landlords don’t mitigate elevated levels within 180 days after notification.
For new construction, request radon-resistant features during building—they prevent or minimize future radon entry while reducing potential mitigation costs. Building codes in high-radon areas may already require these features, so consult your builder about radon-resistant new construction techniques before pouring foundations.
Final Note: Implementing effective strategies for how to remove radon from home protects your family’s health with proven, affordable solutions. Most systems install in one day with immediate results—don’t wait for symptoms to appear. Test today, install tomorrow, and breathe safely for years to come. Remember that quitting smoking dramatically reduces lung cancer risk, especially when combined with radon mitigation since radon exposure multiplies smoking-related cancer risks.


