
That foggy window isn’t just annoying—it’s your home screaming for help. During winter, everyday activities like cooking, showering, and even breathing release gallons of moisture daily. When cold outdoor air meets warm indoor surfaces, condensation forms, creating perfect breeding grounds for mold and structural damage. Left unchecked, winter humidity can rot your home from within while costing you hundreds in energy bills.
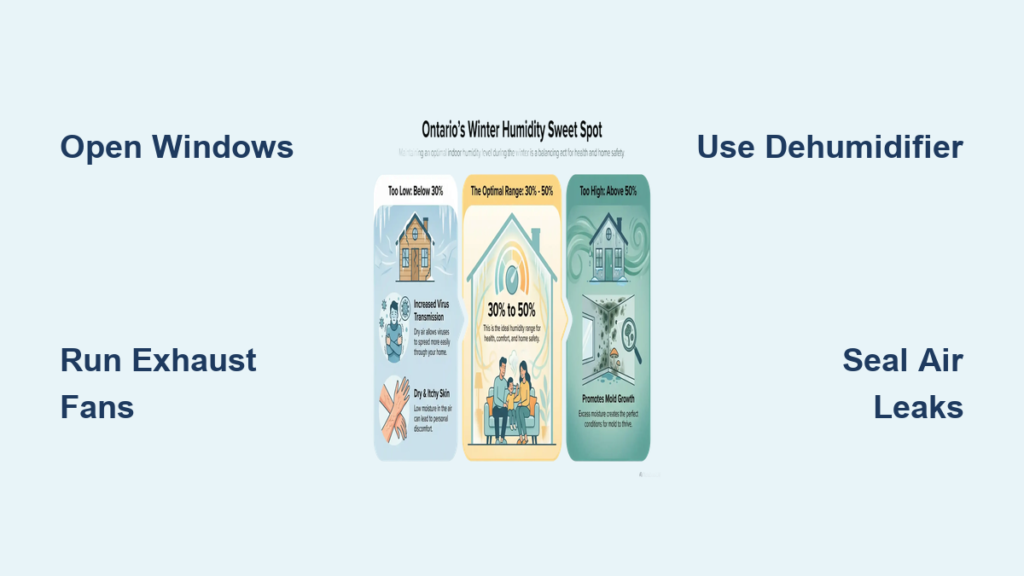
The good news? You can fix this without expensive equipment or professional help. This guide walks through proven methods to drop humidity from dangerous 70% levels down to healthy 30-50% ranges. Most homeowners see dramatic improvements within days using these strategies. You’ll learn exactly where moisture hides, how to eliminate it at the source, and which solutions work best for your specific home conditions.
Identify High Humidity Sources
Daily Moisture Culprits
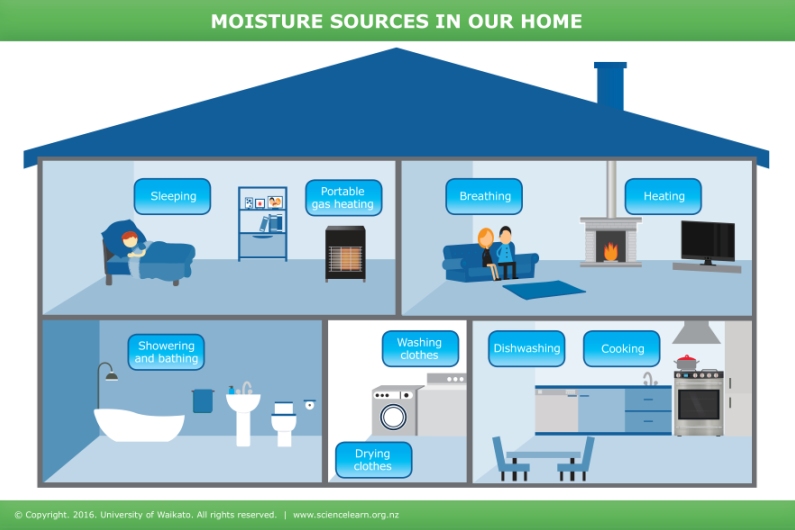
Your home generates 8-12 gallons of water vapor daily through normal living. Cooking releases 2-3 pints per meal when boiling water uncovered. Showers pump 2-3 pints of steam into air in just 10 minutes. Even breathing adds 0.2-0.5 gallons per person daily. These invisible moisture sources accumulate quickly in tightly sealed winter homes.
Check these common sources that sabotage your winter humidity control:
– Kitchen: Uncovered pots, boiling water, dishwasher steam
– Bathroom: Long, hot showers, bath water evaporation
– Living areas: Houseplants (especially overwatered ones), humidifiers still running
– Laundry: Indoor clothes drying, unvented dryers
– Basement: Foundation seepage, poor drainage
Quick Moisture Source Audit
Walk through your home with this checklist to pinpoint problem areas. Mark sources generating visible steam or condensation:
- [ ] Kitchen: Steam from cooking, dishwasher vent
- [ ] Bathroom: Foggy mirrors after showers
- [ ] Bedrooms: Condensation on windows overnight
- [ ] Basement: Damp walls, musty odors
- [ ] Laundry: Clothes drying indoors, dryer vent issues
Fix Immediate Condensation Problems
Emergency Window Fogging Solutions
When windows fog up, act fast within 30 minutes to prevent mold growth. Open affected windows completely for 5-10 minutes, even in freezing weather. This shock ventilation drops indoor humidity rapidly by replacing moist air with cold, dry outdoor air. Pro tip: Open windows on opposite sides of house for cross-ventilation. This creates airflow that removes moisture faster than single-window opening.
Kitchen Steam Control
Install these habits immediately to stop kitchen moisture at the source:
– Cover every pot with tight-fitting lids while cooking
– Run range hood 10 minutes before cooking starts
– Boil water sparingly—use electric kettle with auto-shutoff
– Wipe surfaces immediately after cooking to remove condensation
Ventilation Strategies That Work
Daily Air Exchange Protocol
Replace 15-20% of indoor air daily to maintain healthy humidity. This requires less than 30 minutes total:
Morning: Crack bedroom windows 2 inches while getting ready (10 minutes)
Cooking: Open kitchen window during meal prep (15 minutes)
Evening: Quick 5-minute window opening in living areas
Exhaust Fan Optimization
Bathroom and kitchen fans remove 50-75 CFM (cubic feet per minute) of moist air. Maximize effectiveness:
- Bathroom: Run fan 30 minutes after showers (set phone timer)
- Kitchen: Use highest fan setting when boiling water
- Maintenance: Clean fan grilles monthly—dust reduces airflow by 30%
Warning: Never run exhaust fans continuously in tight homes. This creates negative pressure, pulling moisture from walls and attic.
Temperature Control Tactics
Strategic Heating Zones
Cold surfaces cause condensation. Maintain minimum temperatures:
– Living areas: 68-70°F
– Bedrooms: 65-68°F
– Bathrooms: 70°F during showers
– Basement: 60°F minimum to prevent damp walls
Prevent Cold Spots
Identify problem areas with infrared thermometer:
– Check window glass temperatures
– Test exterior wall surfaces
– Monitor corners and behind furniture
Quick fix: Run ceiling fans clockwise on low speed to push warm air down exterior walls, raising surface temperatures 2-3°F.
Mechanical Dehumidification
Portable Dehumidifier Placement

Choose 35-50 pint units for winter use—larger capacity handles temperature fluctuations better. Place units strategically:
Basement: One unit handles 1000-1500 sq ft
Upstairs: Focus on bedrooms and main living areas
Kitchen: Temporary placement during cooking
Pro placement: Position dehumidifier away from walls (2 feet minimum) and heat sources. This improves air circulation and efficiency by 25%.
Whole-Home System Options
For persistent problems above 60% RH, consider these upgrades:
– HVAC integration: Add whole-home dehumidifier to existing ductwork
– Heat pump water heater: Acts as dehumidifier while heating water
– ERV/HRV conversion: Switch from energy recovery to heat recovery ventilation
Seal Moisture Entry Points

Window and Door Weatherization
Air leaks bring in humid outdoor air. Test with incense stick—smoke should flow straight, not waver. Seal gaps:
Windows:
– Replace worn weatherstripping
– Caulk gaps between frame and wall
– Install storm windows for extra barrier
Doors:
– Replace door sweeps
– Add weatherstripping around frames
– Seal threshold gaps
Foundation and Crawlspace Fixes
Stop ground moisture infiltration:
– Crawlspace: Install 6-mil plastic vapor barrier over dirt floors
– Foundation: Seal cracks with hydraulic cement
– Drainage: Extend downspouts 5-10 feet from house
– Grading: Slope soil away from foundation (2 inches per 10 feet)
Monitor and Control Systems
Hygrometer Network Setup
Deploy 3-4 digital hygrometers throughout home:
– Basement: Near floor level
– Main floor: Eye level in living areas
– Upstairs: Bedrooms and bathrooms
– Calibration: Place all units together for 2 hours, note any 5%+ variations
Smart Home Integration
Modern sensors send humidity alerts to phones. Set thresholds:
– Alert at 55% RH: Take immediate action
– Critical at 65% RH: Emergency ventilation protocol
– Optimal range: 30-45% RH during winter months
New Home Moisture Management
Construction Drying Period
New builds release trapped moisture for 12-24 months. Accelerate drying:
– Ventilate aggressively: Open windows daily despite cold
– Temporary dehumidifiers: Run 50-pint units continuously first winter
– Monitor closely: Check humidity 2-3 times daily initially
Tight Home Challenges
Extremely efficient homes trap moisture. Solutions:
– Mechanical ventilation mandatory: Install HRV system
– Professional testing: Blower door test identifies air leakage
– System design: HRV removes moisture better than ERV in humid climates
Warning Signs and Health Impacts
Visual Moisture Indicators
Spot problems before they cause damage:
– Windows: Fogging between panes indicates seal failure
– Walls: Water beads on cold surfaces
– Paint: Bubbling or peeling near windows and corners
– Wood: Dark staining or soft spots
Health Red Flags
High humidity triggers these symptoms:
– Allergies: Worsening symptoms indoors
– Respiratory: Increased asthma attacks
– Sleep: Disrupted breathing during night
– General: Persistent musty odors
Professional Help Guidelines
When to Call Experts
Seek professional assessment when:
– Humidity remains above 60% after implementing all recommendations
– Visible mold growth appears on walls or ceilings
– Structural damage suspected (rotting wood, warping floors)
– HVAC system operates improperly despite maintenance
Expert Solutions Available
Professionals provide these services:
– Infrared thermography: Detects hidden moisture in walls
– Blower door testing: Identifies air leakage pathways
– Whole-home assessment: Comprehensive ventilation and moisture analysis
– System redesign: May include ERV to HRV conversion or supplemental dehumidification
Emergency Protocol for High Humidity
Rapid Response Checklist (Humidity >65%)
Execute immediately:
1. Open all windows for 10-15 minutes
2. Run exhaust fans continuously
3. Deploy dehumidifiers on maximum settings
4. Eliminate moisture sources (cooking, showers, humidifiers)
Sustained Reduction Plan (24-48 hours)
Maintain control:
– Monitor every 2 hours with hygrometers
– Keep ventilation active with cracked windows
– Adjust heating slightly higher to reduce RH
– Evaluate effectiveness—seek professional help if levels don’t drop below 50%
Key takeaway: Winter humidity control requires consistent daily habits combined with proper ventilation and sealing. Start with immediate actions—open windows during cooking, cover pots, and run exhaust fans longer. Add dehumidifiers for persistent problems above 50% RH. Monitor with hygrometers and adjust strategies based on results. Most homes achieve healthy 30-45% humidity within 1-2 weeks using these methods. Remember that colder outdoor temperatures require lower indoor humidity targets—aim for 25-35% when temperatures drop below zero. Your home’s health depends on maintaining this balance throughout the winter season.


