
Your Home Assistant Overview dashboard should be your command center, not a confusing maze of misplaced cards and hidden controls. When temperature sensors are buried beneath rarely used switches or your favorite lights aren’t front-and-center, productivity suffers. The good news is that rearranging your Home Assistant Overview dashboard takes just minutes and transforms how you interact with your smart home. This guide reveals every method to organize your dashboard—from simple drag-and-drop moves to precise YAML configurations—so you can create a layout that works for your unique smart home setup.
Enter Edit Mode to Unlock Dashboard Customization
Before rearranging anything, you must activate edit mode—the gateway to complete dashboard control. Navigate to your Overview dashboard and find the three-dot menu in the top-right corner. Click it and select “Edit Dashboard” from the dropdown menu. Instantly, your interface transforms: cards develop visible handles, plus signs appear for adding elements, and your cursor changes to indicate positioning capability.
Pro tip: Edit mode remains active until you click “Done” or navigate away, giving you unlimited time to perfect your layout without time pressure. This persistent editing state allows you to step away, consider changes, and return without losing your progress.
Drag Cards to New Positions with Visual Guidance
The fastest way to rearrange your dashboard uses intuitive drag-and-drop functionality that requires no technical knowledge. Hover over any card until you see the grab handle appear (typically in the card’s top-left corner). Click and hold the handle, then move the card to your desired location. As you drag, a ghost outline shows exactly where the card will land—whether stacking vertically, creating a new row, or replacing another element.
Watch for these critical visual cues during dragging:
– Blue highlight: Card will stack vertically above or below existing cards
– Green highlight: Card will create a new horizontal row when released
– Red highlight: Card will replace an existing element (proceed with caution)
– Grayed-out areas: Indicates invalid placement zones based on grid constraints
Resize Cards for Optimal Information Hierarchy
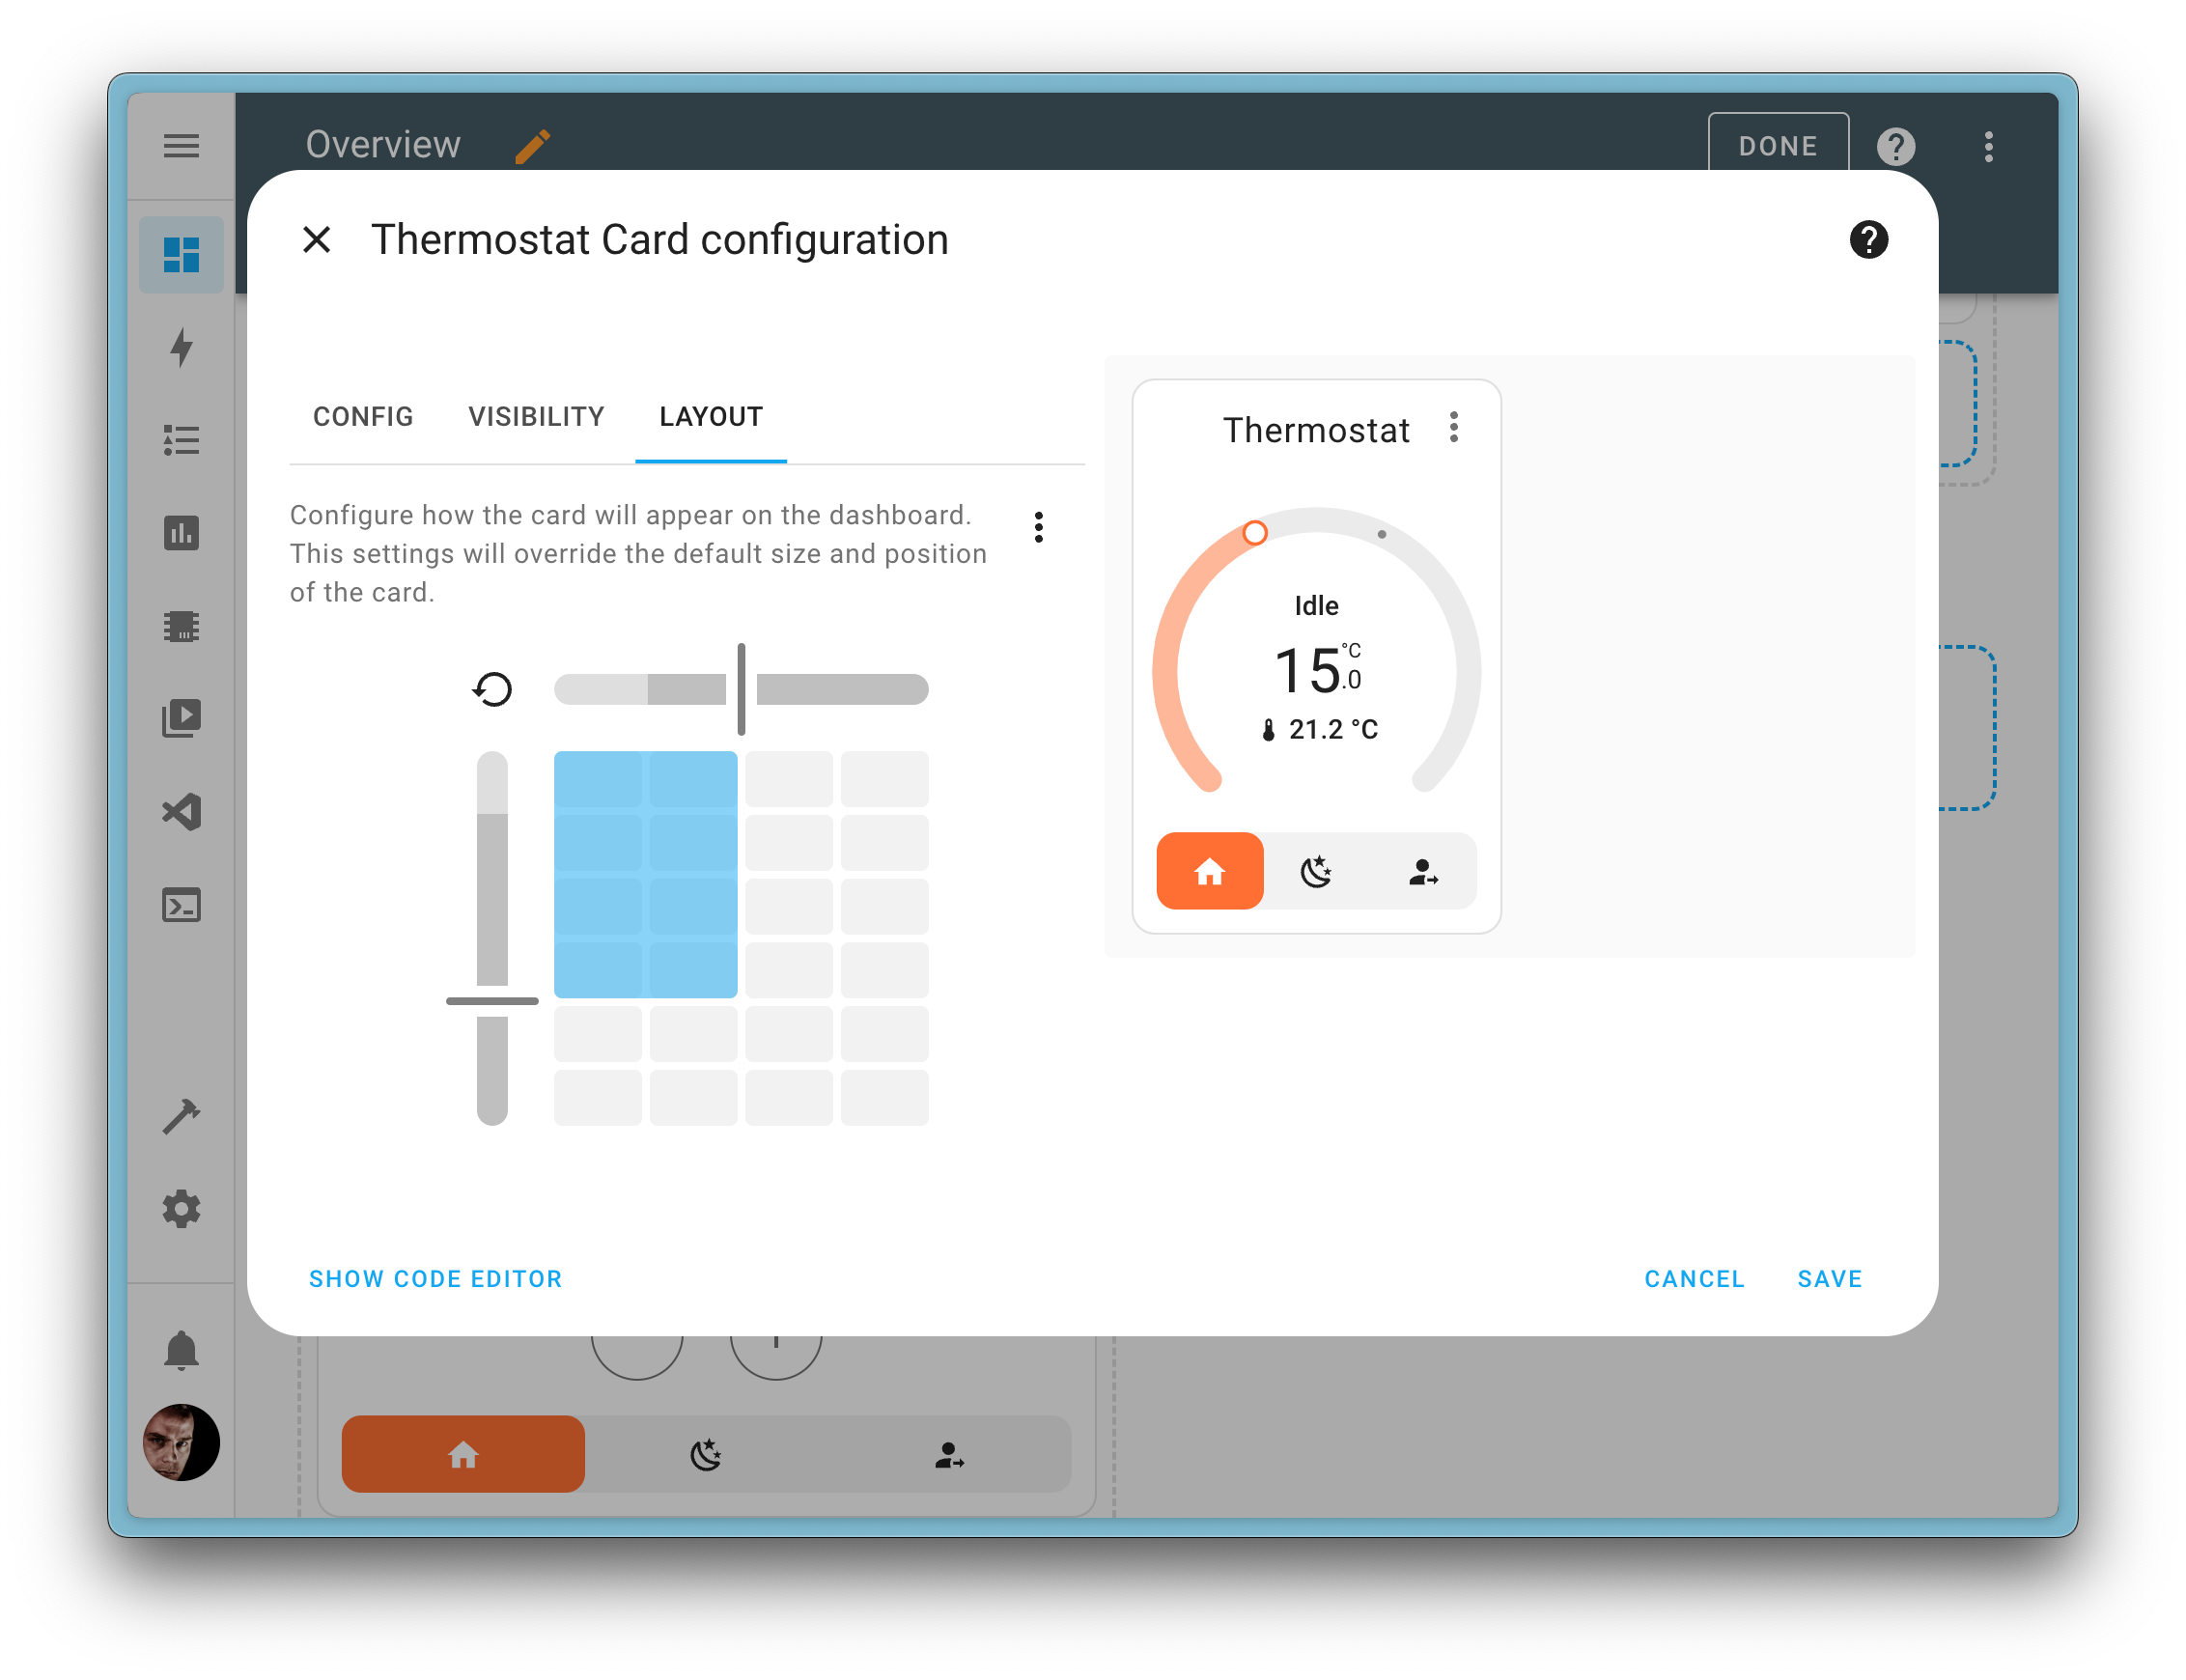
Not all cards deserve equal screen space—resizing creates visual hierarchy that guides your attention to what matters most. Click any card’s bottom-right corner to reveal resize handles. Drag diagonally to adjust both dimensions simultaneously, or use side handles for single-axis changes. Home Assistant’s responsive grid system automatically snaps cards to alignment points for a clean, professional appearance.
Recommended size configurations for common card types:
– Weather cards: Medium width (4-6 columns), short height (2-3 rows)
– Camera feeds: Large width (8-10 columns), medium height (4-5 rows)
– Sensor displays: Narrow width (2-3 columns), compact height (1-2 rows)
– Media players: Full width (12 columns), variable height (3-5 rows)
Group Related Elements with Vertical Stacks
Create organized zones for related devices by stacking cards vertically. While editing, drag one card directly over another until you see the “Stack” indicator appear between them. Release to combine cards into a vertical stack that collapses when not in use. This technique is perfect for grouping bedroom controls, HVAC components, or security systems into logical units.
Ideal vertical stacking combinations:
– All bedroom lights, switches, and window sensors in one collapsible group
– Thermostat card with complementary temperature and humidity sensors
– Security cameras organized by zone (front yard, backyard, garage)
– Media players grouped by room with associated volume and source controls
Design Horizontal Control Panels for Related Functions

Break free from vertical-only layouts by creating horizontal arrangements that display complementary information side-by-side. Add a “Horizontal Stack” card from the card picker, then populate it with 2-4 related cards. This configuration excels at creating intuitive control panels where related functions appear together.
Effective horizontal combinations for daily use:
– Temperature + humidity + air quality sensors for environmental monitoring
– Light brightness slider alongside color picker and on/off toggle for complete control
– Security system arm/disarm buttons with door status and motion alerts
– Media player volume slider with track information and playback controls
Precisely Position Cards Using YAML Configuration

For pixel-perfect control across all devices, dive into YAML configuration. While in edit mode, click the “Raw configuration editor” button. Each card displays as YAML with type, entity, and view_layout properties. Modify view_layout parameters to specify exact positioning coordinates:
yaml

view_layout:

  column: 2

  row: 1

  width: 2

  height: 1
Key advantages of YAML positioning:
– Exact card placement that remains consistent across browser refreshes
– Reliable layouts that survive Home Assistant updates
– Complex multi-column arrangements impossible through drag-and-drop
– Version control capabilities when backing up your configuration
Strategic Placement of New Dashboard Elements
Adding new cards shouldn’t disrupt your carefully crafted layout. Click “Add Card” to open the card picker, but pay attention to the preview pane showing exactly where your new card will appear based on your cursor position. Choose card types that complement nearby elements rather than creating visual clutter.
Smart placement strategies for new cards:
– Position weather cards near outdoor lighting controls for context
– Group battery monitors with device count cards for maintenance awareness
– Place energy monitoring cards adjacent to high-consumption devices
– Keep entertainment zones visually separate from security systems
Eliminate Dashboard Clutter by Removing Unused Cards
Clutter destroys dashboard usability—be ruthless when removing unnecessary elements. While editing, each card displays a trash icon in its top-right corner. Click it to remove cards you rarely interact with. If you haven’t clicked a card in two weeks, it probably doesn’t belong on your primary dashboard.
Quick audit checklist before keeping a card:
– Does this card provide actionable information I use daily?
– Do I check this sensor or control frequently enough to justify prime real estate?
– Could this data live on a secondary view instead of the main dashboard?
– Is there a more visual or efficient way to represent this information?
Preserve Your Layout Changes with Proper Saving
Your perfect arrangement disappears without proper saving procedures. After each major change, click “Done” to exit edit mode and permanently commit changes. While Home Assistant auto-saves minor adjustments, significant restructuring requires manual confirmation through this process. Always test your layout on mobile devices—what works beautifully on desktop often feels cramped on smaller screens.
Essential save verification steps:
– Refresh your browser page to confirm layout persists
– Check the mobile app layout on your smartphone
– Verify all card interactions still function correctly
– Confirm no cards disappeared or shifted position during rearrangement
Fix Common Dashboard Rearrangement Problems
Cards sometimes resist your attempts to rearrange them. If drag-and-drop fails completely, verify you’re actually in edit mode by looking for the blue bar at the screen bottom. Stuck cards often indicate browser cache issues—try incognito mode or force-refresh with Ctrl+F5. YAML configuration errors typically stem from improper indentation or missing colons.
Quick troubleshooting fixes for stubborn layout issues:
– Cards won’t move at all: Exit edit mode completely and re-enter
– Layout resets after saving: Clear browser cache and cookies before editing
– Mobile view appears broken: Check responsive settings in individual card configurations
– Elements overlapping strangely: Adjust minimum card heights in YAML configuration
Your Overview dashboard should evolve as your smart home grows and your needs change. Start with drag-and-drop for quick improvements, then advance to YAML positioning for complex arrangements that survive system updates. Schedule monthly layout reviews—remove unused cards, add new priorities, and adjust for seasonal changes in device usage. A well-organized Home Assistant dashboard transforms from an overwhelming collection of devices into your indispensable smart home command center, putting control exactly where you need it with minimal effort. The time invested in perfecting your layout pays dividends every time you interact with your smart home system.


