
Tired of weekly pet store runs for reptile food? Sick of watching crickets escape during feeding time? A properly managed home cricket colony solves these headaches in just eight weeks. These tiny protein factories cost pennies to maintain, reproduce faster than rabbits, and provide sustainable nutrition for pets or even your family table. Within two months, a single shoebox-sized setup can generate thousands of feeder insects—ending store dependency while saving you $200+ annually.
This guide cuts through hobbyist myths to deliver a battle-tested system. You’ll discover exactly which cricket species avoids cannibalism disasters, how to build escape-proof housing from dollar store supplies, and why 88°F is the magic temperature for rapid breeding. Forget vague advice—these actionable steps work whether you’re feeding one bearded dragon or launching a micro-farm business.
Choose the Right Cricket Species for Your Goals
House crickets (Acheta domesticus) dominate home setups for critical reasons. These light brown insects hit maturity in 8-10 weeks, tolerate temperature swings better than tropical species, and females lay 50-100 eggs daily under optimal conditions. Their 16-21mm adult size perfectly matches most reptiles’ feeding needs—too small and they won’t satisfy your pet; too large and they risk injury.
Tropical house crickets (Gryllodes sigillatus) accelerate your timeline significantly. With a 6-8 week egg-to-adult cycle, these pale brown jumpers resist common diseases like cricket paralysis virus better than other species. They demand warmer conditions (85-95°F) but maintain vigorous reproduction during seasonal changes—ideal if your home temperature fluctuates.
Banded crickets (Gryllus assimilis) solve escape disasters for larger predators. Their distinctive black bands make sex identification effortless, while weaker jumping ability prevents lid-jumping catastrophes. At 19-24mm, they’re perfect for feeding monitors or birds. Their docile nature also reduces cannibalism in dense colonies—a frequent pain point beginners overlook.
Why Your Species Choice Determines Colony Survival
- Avoid hybrid mixes: Cross-breeding creates genetic weaknesses that crash populations within months. Stick to one species.
- Identify sex early: Females develop a needle-like ovipositor (egg-laying tube) after their final molt at 5-6 weeks—males never develop this.
- Check supplier health: Reject shipments with sluggish movement or blackened body parts—signs of bacterial infection.
Build Escape-Proof Housing That Actually Works

Start with 14-gallon clear plastic totes—the only container size proven for beginner success. Smooth sides prevent climbing (unlike textured bins), while clear walls let you monitor populations without disturbing them. Here’s the ventilation hack most guides miss: Cut 60% of the lid’s surface area and replace it with aluminum window screen secured by duct tape. This prevents moisture buildup better than mesh-only lids while maintaining heat.
Implement a three-container system immediately to avoid colony collapse. Use 6-quart containers for pinheads (newly hatched), 14-gallon for juveniles, and 20-gallon for breeders. Stack them vertically on shelving units—this vertical farming approach maximizes floor space in apartments or garages. Crucially, each container needs 12-inch minimum height; crickets jump 18+ inches during feeding times.
Install 7-watt seedling heat mats under containers, controlled by thermostats maintaining 85-90°F consistently. Position digital thermometer probes at substrate level—not air temperature—to get accurate readings. During winter, increase temperatures by 5°F to compensate for seasonal slowdown; your colony will stall below 80°F.
Master Breeding Before Your First Batch Dies
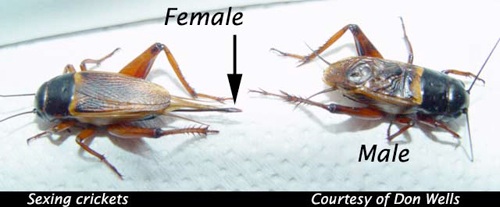
Sex identification separates thriving colonies from failures. Adult males display two cerci (tail appendages) and lack an ovipositor, while producing distinctive chirping sounds. Females show three cerci plus a prominent ovipositor—this difference only appears after the final molt at 5-6 weeks. Get this wrong, and you’ll have zero eggs.
Optimize mating with precise ratios and timing. Maintain one male for every 3-5 females—more males trigger aggressive fighting. Males begin calling 24-48 hours after their final molt. Females become most receptive during evening hours under dim lighting, with courtship lasting 10-15 minutes per successful mating. Skip this timing, and egg production drops 70%.
Prepare foolproof egg-laying substrate using a 50/50 mix of organic topsoil and coconut coir. Fill shallow trays with 2-3 inches of damp (not soggy) substrate. Replace it every 7-10 days—moldy substrate kills eggs within 48 hours. Under optimal conditions, you’ll harvest 100-150 eggs daily from every 10 breeding females.
Feed for Rapid Growth Without Mold Disasters

Base diet requires 18-20% protein commercial cricket feed as your foundation. Supplement with rolled oats or chicken layer mash for cost savings, but never exceed 30% of total diet—low-protein grains cause stunted growth. Add carrots or sweet potatoes for moisture and vitamins; skip leafy greens (they mold too fast). Crucially, include cuttlebone fragments for calcium—weak exoskeletons kill crickets during molting.
Adjust feeding schedules by life stage:
* Pinheads (0-1 week): Finely ground feed daily—you need a coffee grinder dedicated to cricket food
* Juveniles (1-4 weeks): Every 48 hours with increased portions
* Adults (4+ weeks): Daily feedings, but remove uneaten portions within 24 hours to prevent mold
Provide water through gel crystals lasting 3-5 days, or use saturated cotton balls replaced daily. Never use open water dishes—crickets drown within minutes. During gut loading (24-48 hours before feeding pets), switch exclusively to high-calcium foods like kale while removing all other feed.
Prevent the 3 Deadly Colony Killers
Mite infestations appear as tiny white or red specks crawling on cricket bodies. Prevention requires maintaining humidity below 60% and removing waste daily. At first sign of mites, apply food-grade diatomaceous earth around container edges—never directly on crickets. Quarantine new stock for two weeks before introduction; mites spread through contaminated shipments.
Cricket paralysis virus (CPV) kills colonies in days—symptoms include sluggish movement and death within 48 hours. Bacterial infections create foul odors and blackened body parts. Fungal issues produce white fuzzy growth on bodies. If you spot any of these, cull affected individuals immediately and disinfect containers with 10% bleach solution.
Overcrowding triggers cannibalism within 48 hours—watch for missing legs or antennae. Maintain proper container sizes and harvest regularly. Temperature fluctuations above ±5°F cause irregular molting; invest in a thermostat with battery backup for power outages.
Harvest and Process for Maximum Value
Size sorting determines your profit potential. Use 1/8-inch mesh for pinheads, 1/4-inch for juveniles, and hand-sort larger sizes with tweezers. Sort early morning when crickets are least active—this precision sizing commands $0.10 per cricket from pet stores versus $0.05 for mixed sizes.
Euthanize humanely for processing: Place crickets in sealed containers and freeze for 48 hours at 0°F. For immediate feeding, use dry ice in ventilated containers for 30 minutes—ensure complete cessation of movement before handling. Never use CO2 without proper training; improper use causes prolonged suffering.
Process crickets into powder using a dehydrator at 95°F for 8-12 hours, then grind with a dedicated coffee grinder. Store in airtight containers with desiccant packets—6 months frozen, 3 months refrigerated. Live storage requires identical environmental controls; separate sizes to prevent cannibalism.
Scale Into Profit With These Numbers
Fifty breeding females produce 500-1000 adult crickets monthly after accounting for 60-70% survival rates. Startup costs stay under $100 for basic setups, with monthly operating costs of $15 for feed and electricity. Retail prices reach $0.10 per cricket, with wholesale at $25 per 1,000—making break-even achievable in 60 days.
Target these high-demand markets:
* Local reptile rescues (consistent bulk orders)
* Online sales via Facebook reptile groups ($0.08/cricket shipping included)
* Human consumption markets (protein powder sells for $30/lb)
Quality control separates hobbyists from profitable farms. Sort by 0.1g weight increments for size consistency. Maintain zero pesticide residues through strict sanitation—test with home pesticide strips monthly. One contaminated batch destroys your reputation instantly.
Final Note: Success in how to raise crickets at home hinges on three non-negotiables: precise temperature control (85-90°F), daily humidity checks (40-60%), and immediate waste removal. Implement these today, and within eight weeks you’ll never buy feeder insects again. For maximum results, start with 100 tropical house crickets—they’ll produce your first harvest while you master the system. Your reptile’s healthier meals and your wallet will thank you.


