

Imagine gathering around a beautiful wooden table you built with your own hands—no store-bought furniture can match that pride. Learning how to make a wooden table at home transforms simple lumber into a functional heirloom that lasts decades. Whether you’re a complete beginner or looking to level up your skills, this guide provides everything you need to create a professional-quality table without expensive tools or years of experience.
This comprehensive walkthrough covers two approaches: a simple pine table perfect for first-timers and an advanced white oak design with steel base for experienced builders. You’ll discover material selection secrets, essential tool requirements, and step-by-step construction techniques that professional woodworkers use. Most importantly, you’ll gain the confidence to tackle this rewarding project from start to finish.
Select Your Perfect Table Design: From Simple Pine to Premium Oak
Simple Pine Table for First-Time Builders
Start with a basic 61-inch dining table using construction-grade pine that costs under $150 and requires minimal tools. This beginner-friendly design creates a classic farmhouse-style table that comfortably seats six people. The straightforward construction uses pocket hole joinery that hides all fasteners underneath, giving your project a professional appearance even if you’re new to woodworking.
Advanced White Oak and Steel Hybrid
Take on a premium 7-foot dining table combining white oak with a custom-welded steel base. This sophisticated design showcases woodworking mastery while creating a stunning centerpiece worth thousands if store-bought. The steel base provides industrial contrast to the warm wood grain, making this table an instant conversation starter in any dining room.
Space-Saving Variations for Any Room
Adapt these techniques for coffee tables (16-18 inches high) or console tables (30 inches long) by simply adjusting dimensions. The fundamental principles remain identical—only measurements change. This flexibility means you can create custom furniture perfectly sized for your specific space without learning entirely new techniques.
Gather Essential Materials: Wood Selection and Tool Checklist
Budget vs Premium Wood Options
Beginner Pine Build:
– 3 boards: 2×12×8 pine (tabletop)
– 4 pieces: 4×4×8 pine (legs)
– 2 pieces: 2×4×8 pine (short aprons)
– 2 pieces: 2×12×8 pine (long aprons)
Premium Oak Build:
– White oak boards: 9 feet long, 1.5 inches thick
– Steel tubing: 1×3 rectangular tube for base
– Steel plate: 1/4 inch thick for mounting
Pro Tip: Buy 15% extra lumber to account for mistakes and seasonal wood movement—expect 1/8 inch expansion across a 40-inch width during humid months.
Must-Have Tool Kit for Home Builders
Basic Requirements:
– Circular saw with sharp blade
– Power drill with 3/8 inch bits
– Pocket hole jig (Kreg recommended)
– 4 bar clamps (minimum 24 inch)
– Measuring tape and square
– Sanding equipment: belt sander plus 80/220 grit paper
Safety Essentials: Never skip polycarbonate safety glasses, a dust mask or respirator, and hearing protection—woodworking generates dangerous airborne particles and noise levels.
Prepare Lumber Properly: Avoiding Common Beginner Mistakes
Store-Bought vs Rough Lumber Processing
Most beginners buy S4S (surfaced 4 sides) lumber from home centers—it’s ready to use but costs more. Rough lumber from lumber yards saves 30-50% but requires milling. Critical step: Stack lumber in your workspace for one week before cutting to prevent warping after assembly. Use stickers (thin wood strips) between boards for proper air circulation.
Milling Steps for Professional Results
- Joint one face flat on jointer
- Plane opposite face parallel at planer
- Joint one edge straight and square
- Rip to width on table saw
- Cut to rough length 1 inch longer than final
Warning: Never skip the acclimation period—wood that hasn’t adjusted to your workshop humidity will warp after assembly, ruining your table.
Assemble Your Tabletop: 3 Professional Joining Methods Compared

Board Layout Strategy for Maximum Beauty
Arrange boards tabletop-down on a flat surface. Flip and rotate each piece to find the most attractive grain pattern. Mark the best face with chalk—this becomes your visible surface. Grain matching tip: Alternate grain direction (arches up, then down) and avoid placing knots at edges for professional results.
Joining Methods Compared
Pocket Hole Joinery (Beginner): Drill pocket holes every 7 inches along board edges using 3/8 inch bit. Use 2.5 inch pocket screws driven at 15-degree angle. This method hides all fasteners underneath.
Biscuit Joints (Intermediate): Mark biscuit locations every 20 inches. Cut slots with biscuit joiner. Biscuits align boards perfectly during glue-up but require precise marking.
Traditional Mortise and Tenon (Advanced): Creates the strongest joint but requires specialized tools and significant skill.
Glue-Up Process: The Make-or-Break Step
Dry Fit First: Clamp boards together without glue. Check for gaps and adjust edges with hand plane if needed. Mark board order with pencil across joints.
Critical Timing: Work quickly—wood glue starts setting in 10-15 minutes. Have all clamps pre-positioned before starting. Apply glue in zigzag pattern, clamp sequentially, and remove glue beads after 45 minutes with putty knife for clean results.
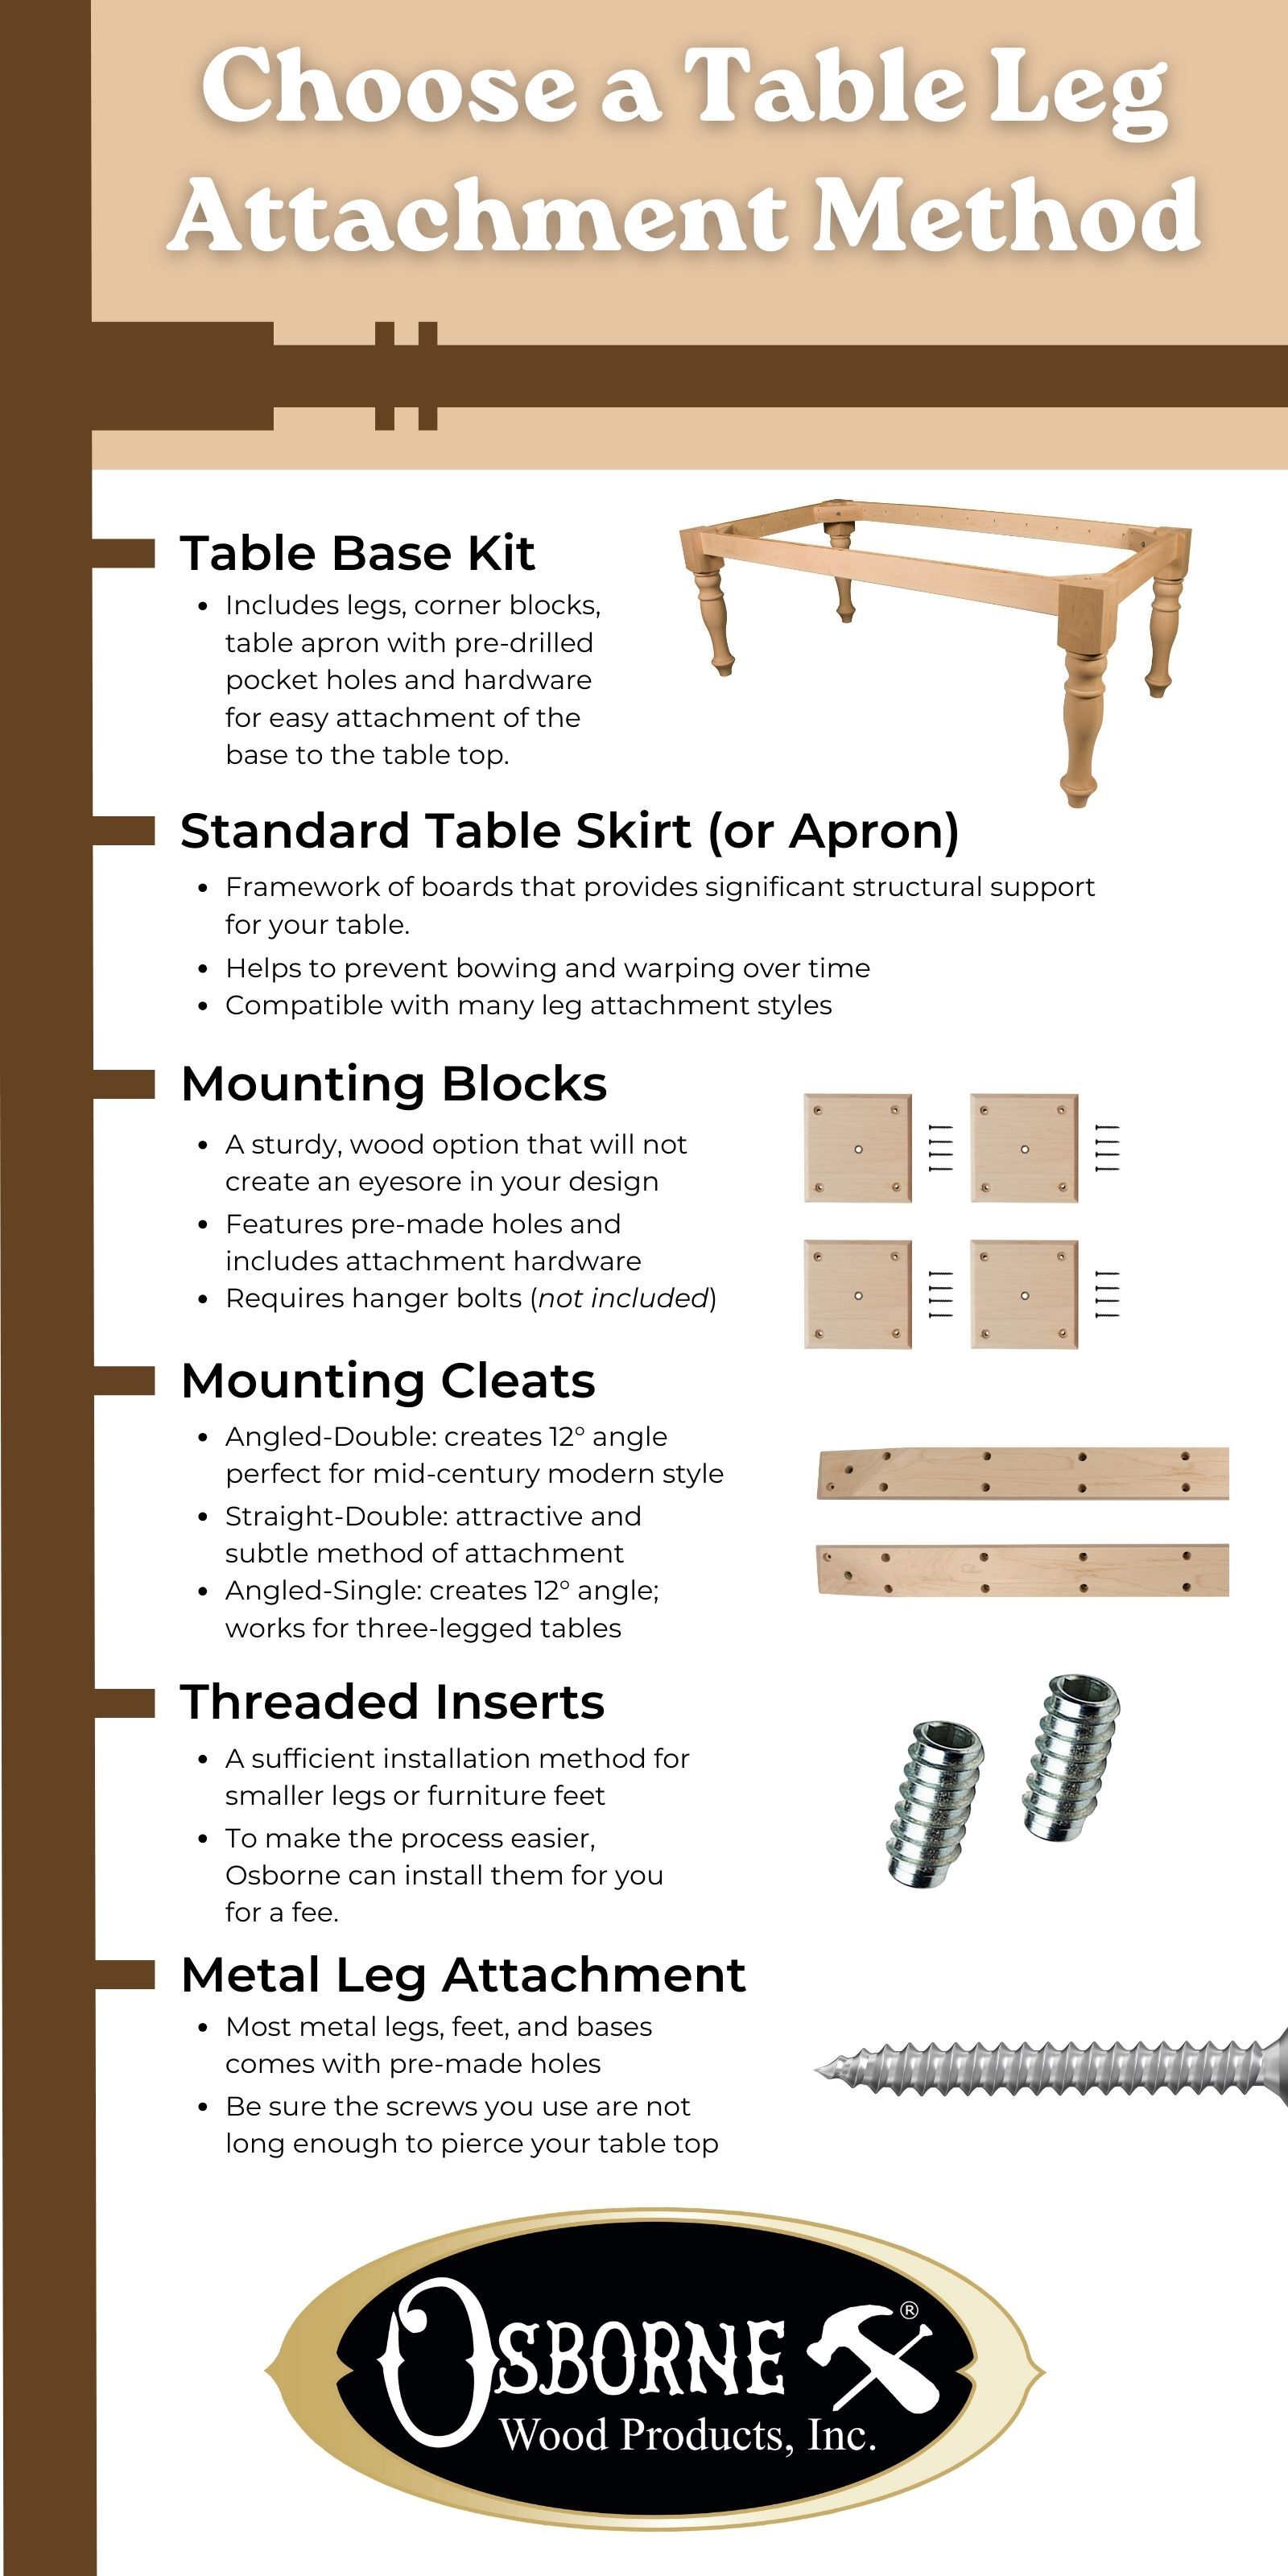
Build a Rock-Solid Base: Aprons and Leg Attachment Techniques
Apron Construction Essentials
Cut List for Standard Table:
– Short aprons: 18.75 inches (fits between legs)
– Long aprons: 49 inches (connects leg pairs)
– Height: 4 inches wide for classic proportions
Attachment Methods:
1. Pocket screws: Drill holes facing inward, invisible from outside
2. Mortise and tenon: Traditional joint for advanced builders
3. Half-lap joints: Strong connection using dado blade
Leg Attachment System That Prevents Wobble
Preparation Steps:
1. Cut all four legs to exactly 28.5 inches
2. Clamp legs together and cut simultaneously for uniform length
3. Mark 3 inches from top for apron placement
Stability Check: Stand assembly on flat floor. Any rocking indicates uneven legs—plane bottom of longer legs until all contact evenly. Pro tip: Install corner braces for extra stability on large tables—this prevents the most common cause of table wobble.
Master Precision Sanding: The Secret to a Smooth Finish
Progressive Sanding Protocol
Grit Sequence:
– 80 grit: Remove milling marks and level surfaces
– 120 grit: Refine scratch pattern
– 220 grit: Prepare for finishing
– 320 grit: Between finish coats
Sanding Direction: Always sand with the grain, never across. Use random orbital sander on large surfaces, hand sanding for corners and edges.
Dust Removal System: Vacuum entire surface with brush attachment, wipe with tack cloth, blow out crevices with compressed air, and finish with denatured alcohol wipe—any dust particles will ruin your finish.
Apply Protective Finish: Stain Options for Different Wood Types
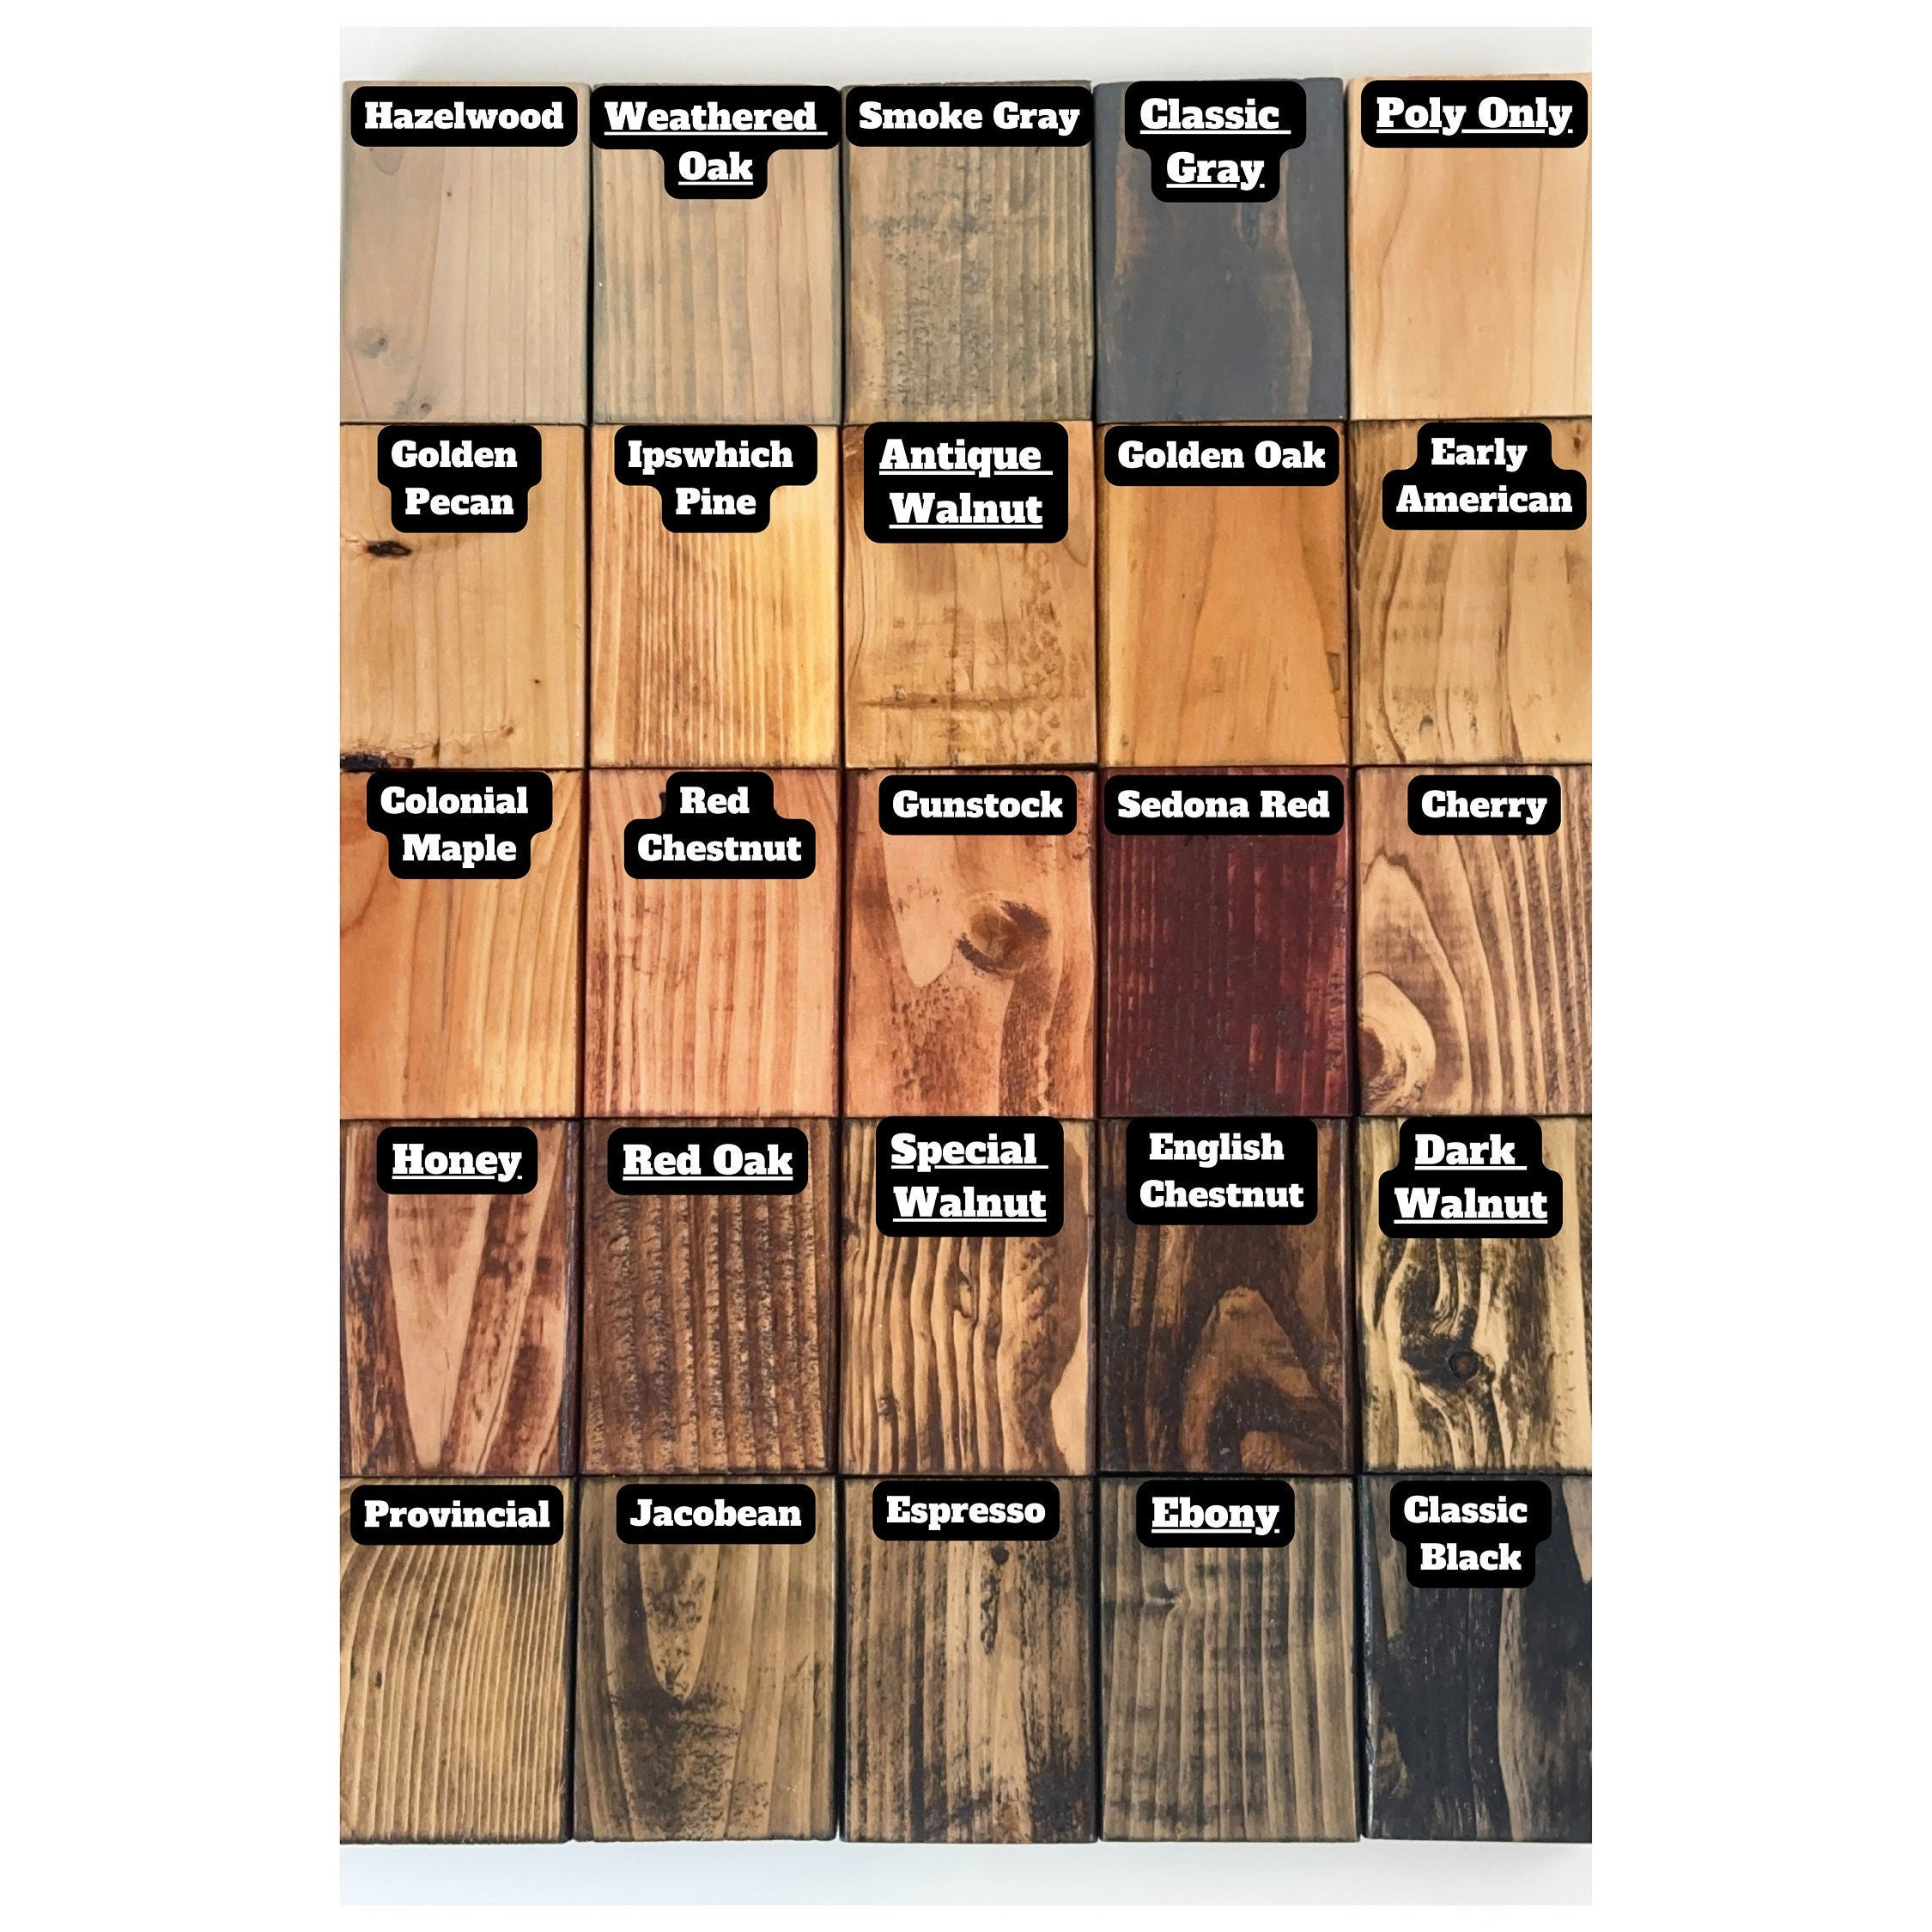
Stain Selection Guide
- Pine: Golden oak or weathered gray (avoid dark stains that highlight grain inconsistencies)
- Oak: Natural or dark walnut (showcases beautiful grain pattern)
- Cherry: Skip stain, use clear finish only (naturally deepens to rich color)
Professional Application Technique
- Test stain on scrap piece first
- Apply with foam brush, working quickly
- Wipe off excess with clean rag
- Lightly sand between coats with 320 grit
- Apply second coat after overnight drying
Warning: Never skip the test piece—stain results vary dramatically between wood species and even between individual boards.
Quality Control: Testing Stability and Preventing Wobble
Final Assembly Checklist
- Install tabletop inserts if using removable base
- Attach base using appropriate hardware
- Add felt pads to leg bottoms
- Apply final coat of finish to underside
Pro Inspection Points:
– Apron joints tight with no gaps
– Tabletop flat within 1/16 inch across 6-foot length
– Finish evenly applied with no drips or brush marks
– All hardware properly tightened
Wood Movement Management
Expect 1/8-1/4 inch width change seasonally. Ensure mounting allows movement—never screw base rigidly to tabletop. Maintain consistent humidity (35-55%) when possible. This prevents cracks that develop when wood expands against fixed hardware.
Maintenance and Long-Term Care for Your Handmade Table
Daily Protection Strategies
- Use coasters for hot dishes
- Wipe spills immediately
- Avoid placing wet items directly on wood
- Lift objects—never drag across surface
Seasonal Maintenance
- Tighten hardware annually (wood shrinks/swells)
- Inspect finish for wear spots
- Deep clean with wood-safe cleaner
- Apply refresher coat of finish every 2-3 years
Troubleshooting Common Issues:
– White water rings: Apply heat with iron through cloth
– Scratches: Touch-up marker or light sanding/re-staining
– Loose joints: Add corner braces or re-glue components
Your homemade wooden table will become a family heirloom with proper care. Start with the simple pine design to master fundamentals, then tackle more advanced builds. The satisfaction of gathering around your handcrafted table makes every hour invested worthwhile—this is what learning how to make a wooden table at home is truly about.


