
That jagged line spreading across your living room window isn’t just unsightly—it’s actively draining your energy bill and inviting pests inside. Every temperature swing causes the crack to expand, turning a minor flaw into a full-pane emergency within weeks. Most homeowners don’t realize that 90% of cracks under 12 inches can be permanently repaired for under $50 with basic tools. This guide reveals exactly how to fix a cracked window at home safely and effectively, whether you’re dealing with a hairline fracture from thermal stress or impact damage from a rogue baseball.
Stop ignoring that crack before it becomes a safety hazard or forces expensive replacement. You’ll learn to identify your specific crack type, choose between temporary fixes and permanent epoxy repairs, and recognize when professional help is essential. By the end, you’ll save hundreds while restoring your window’s structural integrity and energy efficiency.
Identify Your Window Crack Type Before Repairing
Hairline vs Stress vs Impact Cracks
Hairline cracks feel smooth to the touch and rarely exceed 3 inches. These surface-level fractures typically originate from minor impacts like closing a window too forcefully or thermal stress during sudden temperature shifts. Run your fingernail perpendicular to the crack—you shouldn’t catch any edge. Left unaddressed, these can spread into full fractures within months.
Stress cracks emerge spontaneously without direct impact, often starting at the window’s edge. They follow straight or gently curved paths caused by house settling, improper installation, or extreme temperature differences between indoor and outdoor surfaces. These require immediate attention as they indicate underlying structural issues.
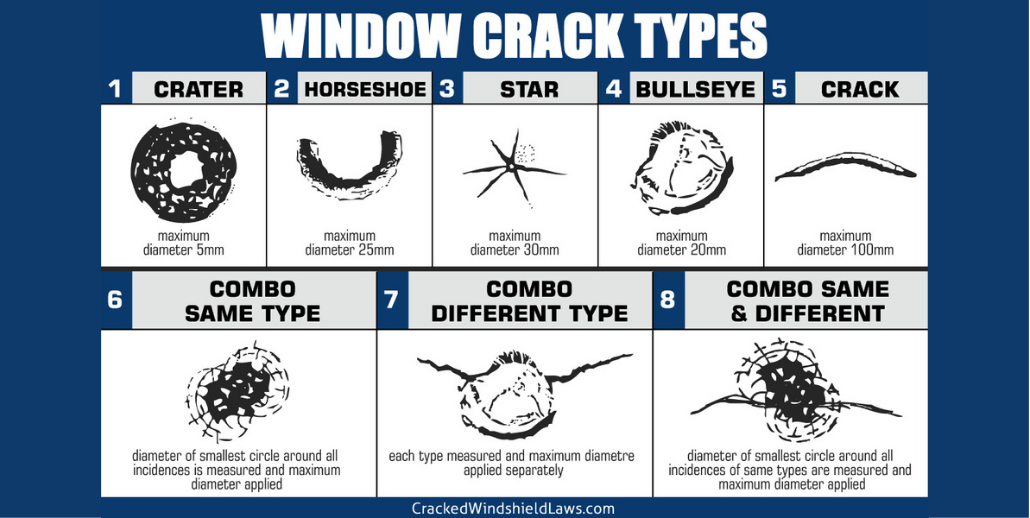
Impact cracks create distinctive patterns: bullseye rings around the strike point or spiderweb fractures radiating outward. These result from flying debris, hail, or accidental collisions. The center point usually shows chipped glass or a visible impact crater.
Edge Cracks and Spider Webs
Edge cracks beginning within 1 inch of the frame signal serious problems. These often stem from improper installation where the glass was forced into a too-small opening, causing constant pressure. Such cracks compromise the entire pane’s stability and require professional assessment before DIY repair.
Spider web cracks feature multiple fractures branching from a central impact point. Even if individual cracks seem small, this pattern indicates significant structural compromise. Attempting repair on spider web cracks longer than 6 inches usually fails—replacement becomes the smarter choice.
Essential Safety Setup Before Handling Broken Glass

Mandatory Protective Gear Checklist
Never touch cracked glass without cut-resistant gloves rated ANSI Level 3 or higher. Pair these with ANSI Z87.1 safety goggles (regular glasses won’t stop shards) and long-sleeved cotton clothing. Closed-toe leather boots prevent foot injuries from falling fragments. Keep a dustpan and shop vacuum within arm’s reach—glass shards can travel 10+ feet when the pane shifts.
Pro tip: Place a thick cardboard sheet against the window’s interior side before starting work. This contains falling glass if the pane shatters during repair.
Critical Work Area Preparation
Clear a 5-foot radius around the window: remove curtains, blinds, and furniture. Lay canvas drop cloths (not plastic) to absorb glass particles—plastic allows shards to roll dangerously. Position a 1000-lumen work light at 45 degrees to the crack for optimal visibility. Most critical: check weather conditions—never attempt repairs in rain, wind, or temperatures below 40°F (4°C) as moisture and cold compromise adhesives.
Red flag alert: If your double-pane window shows interior fogging or condensation, stop immediately. This indicates seal failure requiring professional IGU replacement—DIY attempts waste time and money.
5-Minute Emergency Fixes for Immediate Protection
Nail Polish Method for Hairline Cracks
For cracks under 3 inches, clean the fracture line with 90% isopropyl alcohol on a microfiber cloth until no residue remains. Apply thin, even layers of crystal-clear nail polish using the brush tip, extending ½ inch beyond crack ends. Let each coat dry 15 minutes before applying the next—three coats provide optimal coverage. This creates a temporary moisture barrier lasting 2-4 weeks.
Reality check: This method only slows crack progression. Monitor weekly for spreading—reapply immediately if you see new fractures.
Precision Super Glue Application
Use glass-specific cyanoacrylate adhesive (not standard super glue) for cracks under 2 inches. After alcohol cleaning, apply one drop per inch along the crack using a toothpick. Immediately press clear packing tape over both sides to hold edges together while curing. Remove tape after 4 hours—full strength develops in 24 hours.
Critical warning: Excess glue creates cloudy patches that permanently obstruct visibility. Wipe spills immediately with acetone on a cotton swab.
Emergency Tape Solutions That Actually Work
Apply UV-resistant window repair tape (not regular packing tape) by first warming the glass with a hairdryer for 30 seconds. Stretch the tape slightly as you apply to eliminate bubbles, overlapping the crack by 1 inch on all sides. For double-pane windows, seal both interior and exterior surfaces to prevent moisture infiltration.
Expected performance: Quality tape maintains integrity for 3-6 weeks in mild climates but fails within days during hail or extreme heat. Check daily for lifting edges.
Permanent Epoxy Repair for Lasting Results
Professional-Grade Epoxy Materials Checklist
For cracks up to 12 inches, gather clear two-part glass epoxy resin (avoid dollar-store kits), razor blades, denatured alcohol, blue painter’s tape, and a 1ml syringe. Skip UV lamps—they accelerate curing but create bubbles. Instead, mix epoxy in a 1:1 ratio on a glass surface, stirring slowly for 90 seconds to avoid air pockets.
Pro tip: Chill the mixed epoxy in the refrigerator for 10 minutes before application. This increases viscosity for deeper crack penetration.
Foolproof Epoxy Application Process
- Mask precisely: Apply painter’s tape ⅛ inch from crack edges on both sides—this creates clean epoxy boundaries
- Inject strategically: Fill the syringe, then inject epoxy at the crack’s lowest point, moving upward to force air out
- Release bubbles: Pass a hairdryer on low heat 6 inches from the glass for 5 seconds—never use direct flame
- Cure undisturbed: Cover with cardboard to block dust, waiting 36 hours before handling (24 hours in humidity over 60%)
- Finish smoothly: Remove tape, then scrape excess epoxy with a razor held at 45 degrees. Polish with cerium oxide compound
Visual success markers: The crack should disappear when viewed head-on, and your fingernail won’t catch any ridge. Test by spraying water—no leakage means a successful seal.
When Window Replacement Becomes Necessary
Single-Pane Glass Replacement Protocol
For cracks exceeding 12 inches or multiple fractures, measure the exact glass thickness using calipers (standard is ⅛” or 3mm). Order replacement glass from a local supplier—tempered glass costs 40% more but is mandatory for doors and windows within 18 inches of doors. During installation, maintain 1/16-inch clearance on all sides for thermal expansion. Bed the glass in glazing compound, then secure with 12-gauge glazing points every 6 inches.
Critical mistake to avoid: Forcing glass into tight frames. This creates stress points that cause new cracks within weeks—always allow expansion gaps.
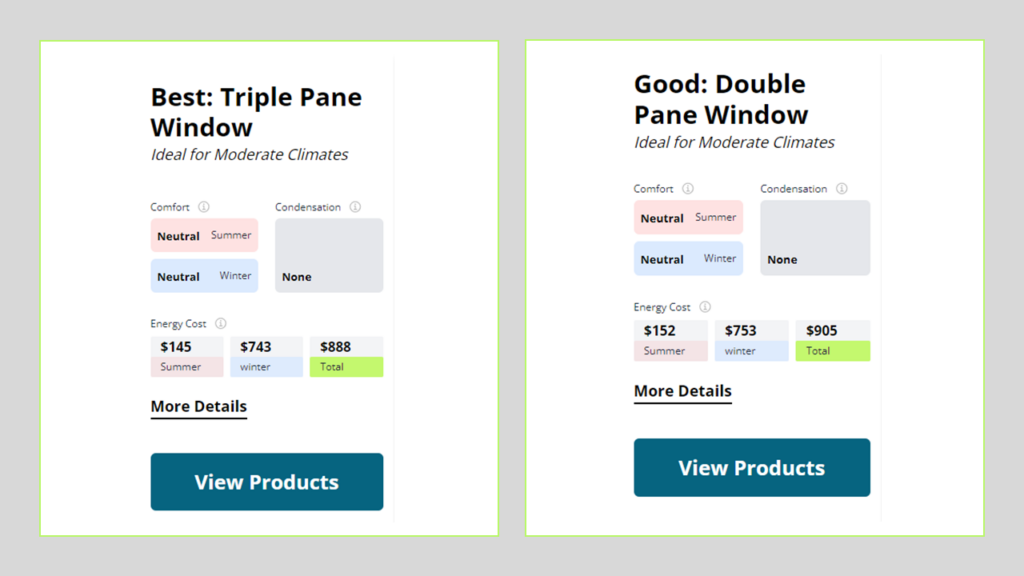
Double-Pane Window Fogging Solutions
Fog between panes means the seal failed—DIY defogging kits are scams. Professional IGU replacement costs $250-$450 but restores energy efficiency. If budget-constrained, temporarily remove moisture by drilling ⅛-inch holes at the bottom corners, inserting silica gel desiccant, and sealing with epoxy. This buys 6-12 months before permanent replacement.
Warning: Never attempt to separate double-pane units—the argon gas filling makes resealing impossible without industrial equipment.
Cost-Saving Strategies for Different Window Types
Tempered and Specialty Glass Requirements
Verify tempered glass by checking for the etched manufacturer logo in the corner. Replacement must match this specification—using standard glass violates safety codes. For laminated windows (common in historic homes), repair surface cracks with epoxy but replace if the interlayer is damaged. Low-E coating repairs require professional assessment—DIY epoxy can scratch the metallic layer, reducing energy efficiency by 15-20%.
Cost breakdown: Tempered glass replacement costs $8-$14/sq.ft versus $4-$6 for standard glass. Specialty coatings add $10-$25 per square foot.
DIY vs Professional Cost Analysis
| Repair Type | DIY Cost | Pro Cost | When DIY Makes Sense |
|---|---|---|---|
| Hairline crack (<3″) | $8-15 | $75-120 | All cases |
| Medium crack (3-12″) | $25-40 | $100-180 | Single cracks on ground floor |
| Full pane replacement | $45-75 | $180-350 | Standard single-pane windows |
| Double-pane IGU | $0 (not feasible) | $250-450 | All cases |
Key insight: DIY saves 60-80% for single-pane repairs but becomes risky for second-story windows or cracks near edges where structural issues may exist.
Prevent Future Cracks With Proactive Maintenance
Seasonal Crack Prevention Tactics
Install thermal curtains during extreme temperature swings—they reduce thermal stress by maintaining consistent glass temperature. Recaulk window perimeters every 3 years using silicone-based sealant, focusing on top and side joints where movement occurs. In hail-prone areas, apply 4-mil clear window film—this absorbs impact energy without altering appearance.
Critical inspection point: Check for foundation settling signs like misaligned window frames. Address these within 30 days to prevent new stress cracks.
Long-Term Window Care Routine
Conduct quarterly “tapping tests”—gently tap the glass 2 inches from the frame with a plastic handle. A dull thud indicates loose glazing needing resealing. Replace worn weatherstripping annually to prevent frame stress during operation. For historic windows, use linseed oil putty instead of modern compounds—it flexes with wood movement.
Pro maintenance tip: After winter, remove interior condensation with a microfiber cloth dipped in vinegar solution—residual moisture accelerates crack formation.
When to Immediately Call a Professional
Critical Red Flags Requiring Expert Help
Edge cracks within 2 inches of the frame often indicate structural movement beyond DIY repair scope. Multiple intersecting cracks suggest underlying installation defects needing professional diagnosis. Historic or specialty windows (stained glass, curved panes) require craftspeople with period-appropriate materials to preserve value.
Warranty warning: Most manufacturers void coverage if DIY repairs damage seals or coatings—always check terms before starting work.
Bottom line: Learning how to fix a cracked window at home saves $200+ for 90% of common fractures. Hairline and stress cracks under 12 inches respond perfectly to epoxy repairs when done correctly, while temporary tape fixes buy crucial time for planning. Remember that edge cracks and double-pane fogging almost always require professional intervention—don’t risk structural compromise. By implementing seasonal maintenance and using the right materials, your repaired window will maintain clarity and energy efficiency for years. Start with today’s 5-minute tape fix, then schedule your permanent epoxy repair before that small crack becomes tomorrow’s costly emergency.


