
Your smart home should know when you’re home, but if your lights don’t automatically turn on when you arrive or your thermostat doesn’t adjust as you leave, you’re missing the critical location tracking setup. This guide shows exactly how to enable tracking in Home Assistant mobile app so your presence-based automations finally work reliably. Without proper configuration, your phone won’t trigger those “welcome home” scenes or “goodbye” routines that make smart homes truly intelligent.
Most tracking issues stem from simple permission oversights during installation. When you correctly enable location tracking in the Home Assistant mobile app, your phone becomes a precise presence sensor that powers automations based on your real-world movements. Follow these steps to transform your mobile device into the cornerstone of your smart home’s awareness system.
Install Companion App With Location Access
Getting tracking working starts with proper installation—skip this step correctly and your automations will fail silently. The Companion App creates the essential device_tracker.<device_name> entity that powers all location-based automations.
Download and Initial Setup
Install the official Home Assistant Companion app from your device’s app store—this isn’t the standard Home Assistant app. During first launch, you’ll enter your Home Assistant URL. Use your external URL (Nabu Casa cloud recommended) for reliable tracking when away from home. Local network addresses only work when connected to your home WiFi.
Grant Location Permissions Immediately
When prompted for location access, iOS users must select “Always” and enable “Precise Location” in device settings. Android users should choose “Allow All the Time” during installation. Denying these permissions blocks tracking entirely—no amount of configuration can overcome this fundamental requirement. Check your device settings: iOS users go to Settings > Privacy & Security > Location Services, while Android users navigate to Settings > Apps > Home Assistant > Permissions.
Verify Device Tracker Creation
After connecting, confirm tracking is active by checking your device tracker entity:
1. Open Home Assistant web interface
2. Navigate to Settings > Devices & Services
3. Select the Mobile App integration
4. Click your device name
5. Confirm device_tracker.<your_device> appears in the entity list
If missing, revoke location permissions and restart the setup process—this often resolves entity creation failures.
Configure Zone-Based Tracking
Zones trigger automations when you cross specific boundaries. Without proper zone setup, your phone won’t distinguish between “home” and “away,” rendering presence detection useless.
Set Up Home Zone
Your home zone was created during initial Home Assistant setup. Verify its accuracy:
1. Go to Settings > Areas & Zones
2. Click Home
3. Adjust radius to 100m for most houses (larger properties may need 200m)
4. Save changes
Pro Tip: Test your zone boundaries by walking to your property line—GPS accuracy varies by location.
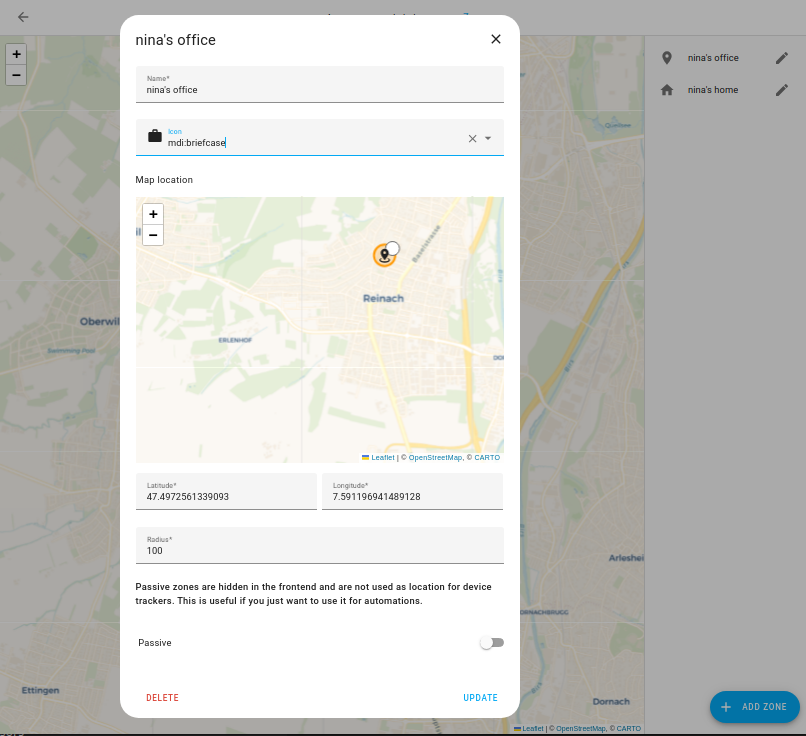
Add Custom Zones
Create zones for frequently visited locations:
1. Settings > Areas & Zones > Add Zone
2. Enter location name and address
3. Set radius between 50-200m
4. Click Create
Critical Note: iOS automatically creates geofences for all zones at app launch. Android users must manually enable Zone Based Tracking in the Companion App Configuration section under Sensors.
Enable Background Location Updates
![]()
Your phone must update location when the app isn’t active. Different platforms handle this differently—configure both to ensure reliable tracking.
iOS Background Tracking
iOS uses cellular tower changes rather than constant GPS:
– Updates every 15 minutes minimum
– Triggers on location changes exceeding 500m
– Minimal battery impact
Enable Properly:
1. Open iPhone Settings > Privacy & Security > Location Services
2. Find Home Assistant
3. Select Always and enable Precise Location
Android Background Tracking
Android offers three configurable sensors:
– Background Location: Updates every 1-3 minutes (enable in App > Settings > Sensors)
– Location Zone: Creates geofences for all zones (battery efficient)
– Single Accurate Location: Provides precise updates when needed
Pro Tip: Disable unnecessary sensors to conserve battery—most users only need Background Location and Location Zone.
Activate High Accuracy Mode (Android Only)
When you need precise tracking for room-level automations, high accuracy mode delivers GPS-level precision at the cost of battery life.
Enable High Accuracy
- Open Companion App > Settings > Sensors > Background Location
- Toggle High Accuracy Mode
- Set update interval between 5-60 seconds
- Configure constraints to limit battery drain
Smart Constraint Setup
Bluetooth Constraint Example:
– Enable only when connected to car Bluetooth
– Saves battery during normal use
– Triggers precise tracking during commutes
Zone Constraint Example:
– Activate within 1km of home
– Provides accurate arrival detection
– Disables automatically when leaving
Configure Tracking Per Server
Running multiple Home Assistant instances? Configure tracking independently for each server.
Server-Specific Settings
- Open Companion App
- Settings > Server Settings > [Server Name] > Privacy
- Choose tracking level:
– Exact location (full GPS coordinates)
– Zone name only (privacy-focused)
– Disable (no tracking)
Fine-Tune Sensor Settings
Adjust accuracy for optimal performance:
1. Settings > Companion App > Manage Sensors
2. Tap Background Location
3. Increase accuracy threshold to 200 (accepts less precise reports)
4. Set minimum time between updates to 1 minute
Test Location Tracking
![]()
Verify tracking works before relying on automations—this prevents frustrating “why isn’t this working?” moments.
Quick Location Test
- Open Home Assistant web interface
- Go to Developer Tools > States
- Search for
device_tracker.your_device - Note current location attributes
- Walk 100 meters away
- Check if attributes update within 5-15 minutes
Check These Attributes: gps_accuracy, latitude, longitude, and source to verify update quality.
Zone Entry/Exit Test
- Create temporary zone near current location
- Set radius to 50 meters
- Walk into the zone
- Monitor entity state changes in real-time
- Walk out of zone
- Verify state returns to “not_home”
Troubleshoot Common Issues
Tracking fails silently—these fixes resolve 90% of problems users encounter when trying to enable tracking in Home Assistant mobile app.
No Location Updates
Check permission status:
– iOS: Settings > Privacy > Location Services > Home Assistant
– Android: Settings > Apps > Home Assistant > Permissions > Location
Verify entity state:
– Ensure device_tracker entity isn’t disabled in entity registry
– Check if entity name matches expected format
Battery Drain Problems
Reduce update frequency:
– Increase background update interval
– Enable constraints for high accuracy mode
– Disable unnecessary sensors
Check for runaway updates:
– Monitor sensor.last_update_trigger
– Look for excessive location reports
– Adjust accuracy threshold higher
Zone Detection Delays
Expand zone radius:
– Increase from 100m to 200m
– Accounts for GPS accuracy variations
– Triggers automations earlier
Enable high accuracy near zones:
– Create expanded zone for activation
– Provides precise entry detection
– Reduces false triggers
Automate With Location Data
Once tracking works, create powerful presence-based automations that respond to your real-world movements.
Basic Home Arrival Automation
automation:

  - alias: "Welcome Home Lights"

    trigger:

      - platform: state

        entity_id: device_tracker.your_phone

        to: "home"

    condition:

      - condition: sun

        after: sunset

    action:

      - action: light.turn_on

        data:

          entity_id: light.entry_lights

          brightness: 255
Multi-Person Presence Setup
- Install Companion app on each person’s phone
- Grant location permissions during setup
- Navigate to Settings > People > [Name]
- Select their device tracker under “Select the devices that belong to this person”
- Create group for “Anyone Home” detection
Smartwatch Integration
Extend tracking to wearable devices:
1. Install Companion app on watch
2. Enable location permissions
3. Ensure watch has cellular or WiFi connection
4. Verify tracker appears in entity list
5. Assign to person profile
Key Takeaway: Location tracking transforms your phone into a powerful presence sensor. Start with basic zone tracking, verify it works through testing, then layer on advanced features like high accuracy mode and smart constraints. Most issues stem from permission problems—double-check your device settings before diving into complex configurations. With proper setup of how to enable tracking in Home Assistant mobile app, your automations will finally respond intelligently to your real-world movements, creating a truly responsive smart home experience.


