
Your steering wheel vibrates at highway speeds, tires wear bald on the inner edges, and your car constantly drifts right on straight roads. Professional alignment costs $100-$200, but you can achieve 90% of that precision in your driveway with basic tools and one afternoon. This guide reveals three field-tested methods—from laser-accurate string alignment to quick visual checks—that deliver factory-spec results without expensive equipment. You’ll learn exactly how to measure camber, adjust toe, and verify caster using fishing line, tape measures, and tire chalk. By the end, you’ll understand which adjustments fix pulling issues, how to spot worn components before they ruin new tires, and when to call a professional.
Why Your Front Tires Wear Unevenly (And How to Fix It)
Camber: The Hidden Tire Killer
Negative camber (top of tire tilting inward) improves cornering grip but accelerates inner tread wear. Positive camber (top tilting outward) causes outer-edge wear and instability. Most daily drivers need 0 to -0.5 degrees. Measure it by running fishing line parallel to your vehicle at hub height. Measure from string to top rim edge, then bottom rim edge. The difference divided by rim height gives your camber angle. Adjust by loosening strut mount bolts and shifting the assembly—1/8″ movement typically changes camber by 0.5 degrees. Warning: Never adjust camber on worn ball joints—this masks underlying damage.
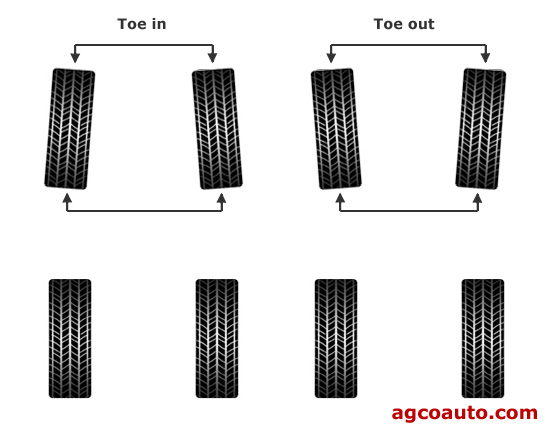
Toe: Your Steering Responsiveness Secret
Toe-in (front tires pointing slightly inward) creates highway stability but makes steering feel heavy. Toe-out improves turn-in response but causes nervous wandering. Factory specs usually require 1/16″ to 1/8″ total toe-in. To measure: Mark tire centers with chalk at frontmost and rearmost points. Measure string-to-tire distance at both marks. Front measurement minus rear measurement equals total toe. Adjust by turning tie rods—clockwise on the right side for more toe-in, counterclockwise for toe-out. Critical: Turn both tie rods equally in opposite directions to keep your steering wheel centered. A single 1/4-turn adjustment changes toe by approximately 1/32″.
Caster: The Highway Stability Factor
Positive caster (steering axis tilting backward) creates heavier steering but prevents highway wander. Most vehicles run 2-8 degrees positive. While front-wheel-drive cars rarely allow caster adjustment, you can check it by measuring camber at 20 degrees left and right wheel turn. The difference reveals caster issues. If your car pulls right despite correct toe, slightly increasing caster on the left side often solves it—but this requires specialized turn plates most DIYers lack.
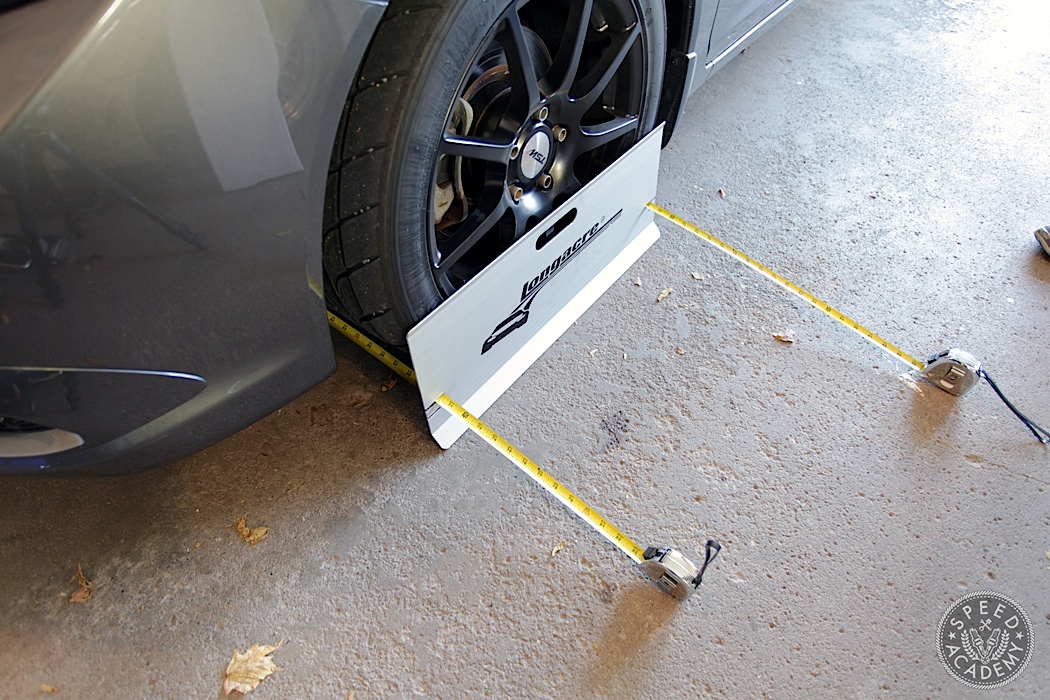
Jack Stands and Fishing Line: Your $15 Alignment Kit

Essential Tools You Already Own
Skip expensive gauges with this proven setup: A 25-foot metal tape measure, lightweight fishing line (won’t stretch like string), four jack stands, white tire chalk, and wheel chocks. Position stands at vehicle centerline, front and rear, exactly 12″ wider than your track width. Run fishing line at hub height to create a perfect rectangle around your car. Verify parallelism by measuring from string to door handles—equal distances confirm accuracy. Pro tip: Sweep your garage floor clean; a single pebble under a tire throws off measurements by 0.2 degrees.
When to Invest in Precision Tools
For under $50, magnetic camber gauges and commercial toe plates boost accuracy. Borrow them free from auto parts stores with loaner programs. DIY turn plates made from furniture sliders let wheels rotate freely during caster checks. But avoid smartphone angle apps—they lack the 0.1-degree precision needed for alignment. Your fishing line method, when executed properly, achieves within 0.15 degrees of professional specs—more than enough for daily driving.
Level Floor or Failed Alignment: Your Setup Checklist
Concrete Floor Calibration Secrets
Drive straight onto your workspace without turning the wheel. Roll forward and back 3 feet to relieve tire stress. Use a 4-foot level across multiple floor points—any slope over 1/8″ per 10 feet invalidates measurements. Mark uneven spots with tape and avoid them during setup. Check tire pressure against door jamb specs (not sidewall numbers), as a 5 PSI difference mimics alignment issues. Critical step: Shake the car vigorously after placing on stands. If it shifts, reposition stands immediately—this prevents dangerous measurement errors.
Safety Checks That Prevent Catastrophe
Chock rear wheels before lifting. Never rely on a jack alone—use stands rated for your vehicle’s gross weight. Place stands under reinforced frame points, not suspension components. Test stability by pushing down hard on the fenders. If you hear creaking, lower the car and reposition. Red flag: If the car drifts during roll-back tests, inspect for brake drag—a sticking caliper causes identical symptoms to misalignment.
String Alignment: Match Shop Precision in Your Driveway
Building Your Measurement Box
Position jack stands 12″ wider than track width at front/rear centerlines. Run fishing line at hub height, creating a rectangle around the car. Verify squareness by measuring from string to identical body points (like mirror mounts) on both sides—differences over 1/16″ require repositioning. Mark tire centers with chalk using a square for perfect perpendicular lines. Measure string-to-tire at front/rear marks—front measurement should be 1/16″ smaller than rear for proper toe-in.
Making Perfect Toe Adjustments
Loosen tie rod lock nuts just enough to rotate. Turn right tie rod clockwise for more toe-in (counterclockwise for toe-out). Mirror this on the left side by turning opposite directions. After each 1/4-turn adjustment, roll the car forward/backward 2 feet to settle suspension before re-measuring. Key insight: Mark original tie rod positions with paint—this creates a safety net if adjustments go wrong. Most vehicles require 3-5 small adjustments to hit spec.
Camber Fixes Without Special Gauges
The Chalk-and-Measure Method
Mark top/bottom rim edges with chalk. Measure vertically between marks to get rim height. Measure string-to-rim at top and bottom. Plug into this formula: Camber = arctan((top-bottom)/rim height) × 57.3. Negative result? Top tilts inward. Adjust by inserting shims between strut and knuckle (common on older trucks) or using eccentric camber bolts (available for most modern cars). Visual shortcut: Sight down the tire from front—if the top leans visibly inward, you have negative camber exceeding -1.0 degrees.
Road Test Protocol: Verify Before Declaring Victory
The 10-Mile Validation Drive
Drive 5-10 miles on a straight, level highway at 55+ mph. Note three critical behaviors: Is the steering wheel centered? Does the car drift on level sections? Is steering feedback smooth? If the wheel is off-center, adjust both tie rods equally in the same direction. If it pulls right, increase caster on the left side or check for radial tire pull (swap front tires side-to-side to test). Never skip this: Alignment specs mean nothing if the car doesn’t track straight.
When Your DIY Alignment Fails: Critical Troubleshooting
The Pulling Car Diagnostic Flow
- Swap front tires side-to-side—if pull reverses, it’s radial tire force variation
- Check brake drag—jack up front, spin wheels; resistance indicates sticking caliper
- Verify tire pressure—even 3 PSI difference creates noticeable pull
- Test on different roads—crowned surfaces cause normal slight right drift
Rapid Tire Wear After Alignment? Check These
- Worn ball joints: Grab tire at 12/6 o’clock and rock—any movement means replacement
- Incorrect specs: Cross-reference with factory service manual, not generic charts
- Bent components: Measure control arm lengths against specs; differences >1/8″ require replacement
Home Alignment Limits: Know When to Call Pros
Don’t attempt these at home: Four-wheel thrust alignment (rear toe affects front readings), steering axis inclination measurement, or Ackerman angle verification. Seek professional help after collisions, if factory specs can’t be achieved, or for performance applications needing corner weighting. Critical rule: If you can’t eliminate pulling after two adjustment attempts, inspect for frame damage—your DIY method can’t compensate for bent subframes.
Final Verification: The 500-Mile Success Test
Torque all fasteners to factory specs before lowering the car. Recheck toe measurements after removing stands—suspension settling often changes readings by 1/64″. Drive cautiously for the first 500 miles while monitoring: Does tire wear remain even? Is highway tracking stable? Document measurements in a simple log with date, toe/camber numbers, and driving notes. Rotate tires every 5,000 miles to confirm alignment effectiveness—uneven wear reappearing in the same pattern means underlying issues remain.
Your home alignment won’t match $20,000 laser systems, but properly executed string method achieves within 0.1 degrees of factory specs—enough to double tire life and eliminate dangerous pulling. Start with toe adjustment (the easiest and most impactful), master camber next, and save caster for when you invest in turn plates. With practice, you’ll complete alignments in under 90 minutes, turning that $150 shop bill into garage upgrade funds. The real victory? Knowing exactly why your tires wear evenly and your steering tracks true—no mystery fees, no guesswork, just precise control over your vehicle’s geometry.


