

That banana peel heading for the trash? It could be transforming into nutrient-rich soil for your tomatoes. Nearly one-third of household waste is compostable, yet most beginners hesitate because they fear smelly bins or complicated science. The truth is, how to compost at home for beginners starts with three simple ingredients and zero special skills. In just minutes, you’ll learn to create “black gold” that boosts plant growth while slashing landfill waste by 30-40%. Forget intimidating jargon—you’ll discover that successful composting happens when you mimic nature’s recycling system in your own backyard or kitchen.
Whether you’re apartment-dwelling or have acres of yard, this guide cuts through the confusion. You’ll choose the right system for your space, master the greens-and-browns balance, and troubleshoot issues before they stink up your patio. Most beginners don’t realize composting isn’t about burying trash—it’s about feeding microbes that turn coffee grounds and fallen leaves into living soil. Let’s transform your waste into garden magic.
Pick Your Perfect Beginner Compost System

Cold Compost Bin: Set-and-Forget Yard Solution
Skip fancy equipment with a simple 3x3x3-foot enclosed bin on bare soil. This beginner-friendly method accepts fruit scraps, dry leaves, and shredded paper without daily fuss. Layer materials as you collect them—no precise ratios needed—and turn monthly with a pitchfork. Expect rich compost in 6-12 months while diverting 13% yard waste and 12% food scraps from landfills. Pro tip: Keep a covered bucket under your sink for daily scraps, then dump it into the bin every 2-3 days to avoid fruit flies. Avoid meat, dairy, or pet waste to prevent odors and pests.
Tumbler Composter: Fast Results on Patios or Balconies
Rotate your way to compost in weeks, not months. These sealed drums (5-10 gallons) sit neatly on concrete patios and eliminate rodent risks since lids lock tight. Just fill with kitchen scraps and browns, then give it 5-10 spins weekly to aerate. The insulated design traps heat, killing weed seeds while producing usable compost in 1-3 months—ideal for impatient beginners. Critical mistake to avoid: Overloading with grass clippings. Add them in thin layers mixed with shredded cardboard to prevent slimy matting. Perfect for small households making 2-3 gallons of scraps weekly.
Worm Composting: Odor-Free Indoor Magic
Red wiggler worms transform coffee grounds and apple cores into nutrient-packed castings right under your kitchen sink. A 5-20 gallon plastic tote (drilled for airflow) houses these hungry helpers who process half their weight in scraps daily. Unlike outdoor bins, worm composters handle citrus and onions in moderation but never accept meat, oils, or glossy paper. Keep it at 55-77°F—under the sink often works perfectly. Harvest liquid “worm tea” weekly to fertilize houseplants, and dig into finished castings every 2-3 months. Apartment dwellers save freezer space by composting 100% of produce scraps.
Master Your Compost Recipe: Greens, Browns, and No-Go Zones
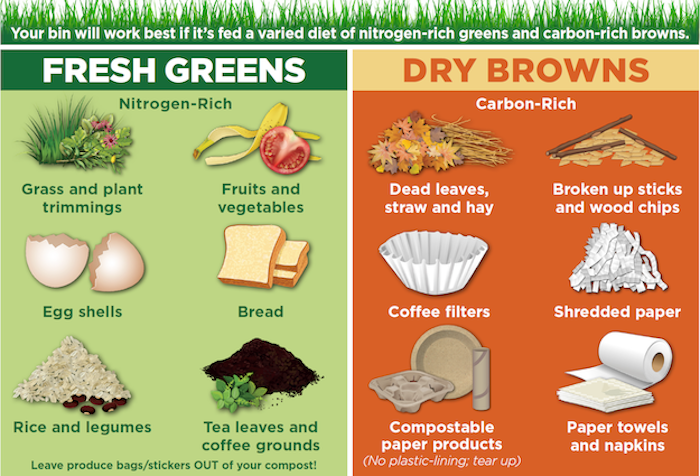
Carbon Powerhouses: Build Your Brown Foundation
Dry, crunchy browns provide structure and carbon microbes need to thrive. Stockpile autumn leaves in breathable bags—they’ll stay usable for months. Shred non-glossy paper (no colored inks) and cardboard into 2-inch strips to prevent clumping. Pro tip: Crush egg cartons—they decompose faster and add calcium. Avoid black walnut leaves (they stunt plant growth) and wood ash (use sparingly as it alters pH). Aim for 3 parts browns to 1 part greens by volume—think “3 handfuls of leaves for every banana peel.”
Nitrogen Boosters: Activate Your Decomposition
Fresh greens deliver moisture and nitrogen that fires up microbial activity. Save coffee grounds (filters included), vegetable trimmings, and fresh grass clippings. Crush eggshells to speed breakdown and add calcium. Critical insight: Chop large items like corn cobs into 1-inch pieces—they decompose 5x faster. Tea bags work only if plastic-free (snip open to check). Never add diseased plants or perennial weeds with seeds—they’ll survive cold composting. If your pile smells rotten, you’ve added too many greens; bury them under extra browns immediately.
Materials That Ruin Compost (Avoid These!)
Meat, fish, bones, and dairy attract rodents in cold systems—save these for specialized hot composters or Bokashi bins. Pet waste carries pathogens unsafe for vegetable gardens. Glossy magazines, produce stickers, and rubber bands won’t break down. Surprising hazard: Banana peels coated in pesticides—rinse thoroughly or skip them. Black walnut leaves release juglone toxin; keep them out entirely. Industrial “compostable” bags rarely decompose at home—chop certified home-compostable items finely if used.
Build Your First Pile: No Guesswork Required
Layer Like a Pro in 3 Steps
Start with a 4-inch base of twigs for drainage—this prevents soggy bottoms. Alternate 2-inch layers: browns (leaves), greens (scrapes), then browns again. Top with a 3-inch “browns blanket” to deter flies. Moisten each layer until damp as a wrung-out sponge—too wet causes rot, too dry stalls decomposition. Space-saving hack: On concrete patios, lay hardware cloth first, then add wood chips before your twig layer to aid drainage and earthworm access.
Perfect Your Moisture and Temperature
Squeeze a handful of mix—it should hold shape without dripping water. During droughts, water lightly while turning; add shredded newspaper if rain soaks your pile. Stick a thermometer in the center: Hot composters need 130-150°F to kill weeds (maintain for 3 days), but beginners can ignore this—cold piles work at ambient temps. Troubleshooting sign: If it’s not heating after 2 weeks, mix in grass clippings or coffee grounds and check moisture.
Daily Maintenance Without Daily Chores
Turning Made Effortless
Tumble your drum 5 rotations weekly, or fork-turn cold piles every 1-4 weeks when adding new scraps. This oxygen boost prevents foul odors and speeds decomposition. Time-saver: Use a corkscrew aerator tool for cold piles—just push and twist to inject air without full turning. In winter, insulate piles with straw bales and turn less frequently; decomposition slows but doesn’t stop.
Winter and Apartment Adjustments
Outdoor piles need insulation—wrap bins in old carpets or pile snow around them. Apartment composters thrive year-round: Freeze scraps to eliminate odors, then drop at community gardens weekly. Worm bins work perfectly indoors at room temperature; reduce feeding in cold months. Critical reminder: Never add hot ashes to piles—they can ignite dry materials.
Fix Smells, Pests, and Slow Breakdown Now
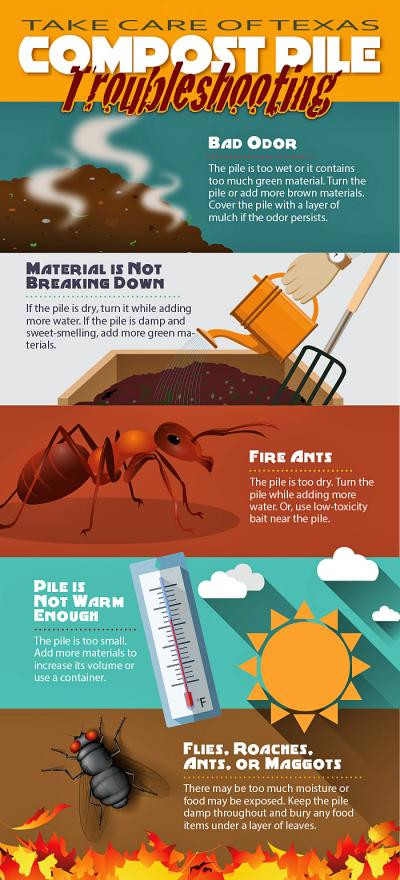
Eliminate Rotten Egg Odors in Minutes
This signals anaerobic conditions. Immediately turn the pile and mix in 2 parts dry leaves or shredded paper. Bury food scraps under 3 inches of browns—think “lasagna layers.” If ammonia smells hit you, add extra browns; too much nitrogen means your pile’s unbalanced. Pro tip: Sprinkle garden lime sparingly to neutralize acidity from excessive fruit scraps.
Stop Flies and Rodents for Good
Fruit flies mean exposed food—always cover scraps with browns or a thin soil layer. Secure bin lids with bungee cords and line bottom edges with 1/4-inch hardware cloth to block rodents. Emergency fix: If pests invade, remove meat/dairy immediately (they don’t belong in cold piles anyway) and top-dress with finished compost to introduce beneficial microbes.
Harvest and Use Your Black Gold Correctly
Identify Ready-to-Use Compost
Finished compost is dark, crumbly, and smells like a forest floor—no recognizable scraps except tiny eggshell bits. It won’t heat when turned and has shrunk to half its original size. Don’t rush: Sifting through 1/2-inch hardware cloth separates unfinished chunks (return these to the pile) from fine, ready-to-use material.
Boost Plants With 4 Proven Methods
- Seed starting: Mix 30% compost with potting soil (pure compost is too strong for sprouts).
- Garden beds: Blend 4 inches into soil before planting or spread 1 inch as top-dressing.
- Lawn revival: Top-dress turf with 1/4 inch sifted compost in spring/fall.
- Liquid fertilizer: Steep 1 part compost in 5 parts water for 3 days; strain and use weekly.
Critical warning: Always wash vegetables grown in compost-amended soil—pathogens can linger from non-hot systems.
Apartment and Balcony Composting Hacks
Space-Smart Solutions for Zero-Yard Dwellers
Worm bins fit under sinks and handle 5+ lbs of scraps weekly. Bokashi buckets ferment ALL food waste (including meat!) in 2 weeks—just drain the nutrient-rich “tea” for plants and bury the pickled scraps in a community garden. Game-changer: Store scraps in the freezer to eliminate odors; empty into your system weekly. Many cities offer free drop-off sites—search “municipal composting near me.”
Balcony Bin Success Secrets
Use decorative planters to disguise tumblers. Drill extra drainage holes in the bottom and elevate bins on bricks to prevent waterlogging. Neighbor-proofing: Choose enclosed systems (like tumblers) and bury food scraps deep—no odors mean no complaints. Add citrus peels sparingly to deter pests naturally.
Safety Steps Every Beginner Must Know
Protect Yourself and Your Garden
Wear gloves when handling compost and wash hands thoroughly—especially before eating. Use a dust mask when turning dry piles to avoid inhaling fungal spores. Critical rule: Never compost pet waste, diseased plants, or chemically treated materials—they introduce hazards to your garden. Store finished compost covered to prevent bird contamination.
Starting how to compost at home for beginners takes less effort than caring for a houseplant. Grab a $30 tumbler or build a leaf-lined pile this weekend—your first batch of soil-enriching compost will be ready before next planting season. Remember: imperfect compost still beats landfill. Every coffee ground you save cuts methane emissions (21x worse than CO₂) while building living soil. Your garden—and the planet—will thank you for hitting “start” on this simple, transformative habit. Now go turn that avocado pit into tomorrow’s tomatoes.


