
Your leather sofa anchors your living space, but daily life leaves its mark—coffee rings, body oils, and food crumbs that threaten to degrade the material over time. Without proper care, these seemingly minor issues can cause permanent damage, fading, and cracking that diminishes both beauty and value. The good news? Professional cleaning costs hundreds, yet most maintenance can be handled effectively at home. This guide delivers battle-tested techniques for how to clean leather sofa at home, saving you money while extending your furniture’s lifespan by years. You’ll learn precise methods to tackle stains, prevent damage, and maintain that luxurious feel—all with supplies already in your pantry or local store.
Identify Your Leather Type Before Cleaning

Using the wrong method on delicate leather causes irreversible damage. Always verify your sofa’s type first through these critical steps:
Check Manufacturer Labels
Examine tags under cushions or on the frame bottom for terms like “aniline,” “semi-aniline,” or “protected.” Protected leather tolerates more aggressive cleaning, while aniline requires extreme caution.
Hidden Area Testing Protocol
Apply any solution to a concealed spot (back panel base or cushion underside) with a white microfiber cloth. Wait 24 hours to check for color bleeding, texture changes, or residue. Document results before proceeding.
Surface Texture Assessment
Note whether your leather is smooth, pebbled, or has natural grain variations. Protected leather often feels slightly waxy; aniline feels soft and porous. This determines your cleaning intensity.
Essential Supplies for Effective Leather Sofa Cleaning

Skip harsh chemicals—professional results require specific, gentle tools:
Core Cleaning Products
– pH-balanced leather cleaner (never saddle soap)
– Distilled white vinegar for organic stains
– Clear unscented dish soap
– Baking soda for oil absorption
– Lanolin-based leather conditioner
Critical Application Tools
– Six lint-free microfiber cloths (color-coded for tasks)
– Natural horsehair brush for crevices
– Two spray bottles (one for solution, one for distilled water)
– Cotton swabs for stitching details
Safety Must-Haves
Nitrile gloves, eye protection for vinegar solutions, and floor coverings. Never mix cleaning agents—this creates dangerous fumes.
Daily and Weekly Maintenance That Prevents Damage
Consistent care avoids deep cleaning emergencies:
2-Minute Daily Dusting
Use a dry microfiber cloth in circular motions from top to bottom. This removes abrasive particles that scratch leather over time. Focus on armrests and headrests where body oils accumulate.
Weekly Deep Maintenance
– Vacuum crevices and seams using low suction with a brush attachment
– Rotate and flip cushions to prevent permanent indentations
– Blot spills immediately by pressing inward from stain edges (never rub)
This routine extends time between deep cleanings by 60% and maintains leather’s natural oils.
Monthly Deep Cleaning Process for Longevity
Surface Prep (10 Minutes)
Remove cushions and vacuum thoroughly. Wipe entire surface with barely damp microfiber cloth. Air dry 30 minutes—leather must be completely dry before cleaning.
Cleaning Application (15 Minutes)
Dilute pH-balanced cleaner per instructions (usually 1 part cleaner to 10 water). Apply to cloth—not directly to sofa—and work in 2-foot sections using circular motions. Immediately wipe residue with clean damp cloth. Dry each section with a separate towel.
Conditioning Critical Step (20 Minutes)
Apply conditioner to cloth, then massage into high-use areas (seat cushions, armrests). Let absorb 30-60 minutes, then buff gently. Skipping this causes drying and cracking—never clean without conditioning afterward.
Remove Coffee and Wine Stains in 5 Minutes
Fresh Stains
Blot excess liquid within 30 seconds. Mix 1 tsp dish soap with 8 oz distilled water. Dab solution onto stain with white cloth, rinsing cloth frequently. Finish with cool hair dryer 6 inches away. Never use heat—this sets stains permanently.
Set-In Stains
Create soap lather and apply foam only to avoid moisture saturation. Work in 1-inch circles for 60 seconds, then wipe with barely damp cloth. Condition immediately after drying to replace lost oils.
Eliminate Oil Stains Without Spreading
Fresh Grease Spills
Blot without rubbing. Cover stain with ¼-inch baking soda layer. Let sit 4-6 hours for full absorption. Vacuum with brush attachment. Repeat if oil remains visible.
Older Oil Stains
Mix equal parts vinegar and water. Apply only to stain with cotton swab, wait 3 minutes, then blot. Condition immediately—vinegar dries leather. Test first on hidden areas as vinegar may affect some dyes.
DIY Leather Cleaning Solutions That Work
Homemade pH-Balanced Cleaner
Combine ½ cup distilled water, ¼ cup white vinegar, ½ tsp castile soap, and 3 drops tea tree oil. Shake gently in spray bottle. Use within 30 days. Discard if cloudy.
Natural Conditioning Balm
Melt 2 tbsp beeswax with ¼ cup coconut oil and ¼ cup sweet almond oil. Add 5 vitamin E drops. Cool completely before use. Apply sparingly—excess causes sticky residue.
Fix Sun Damage and Cracking Now
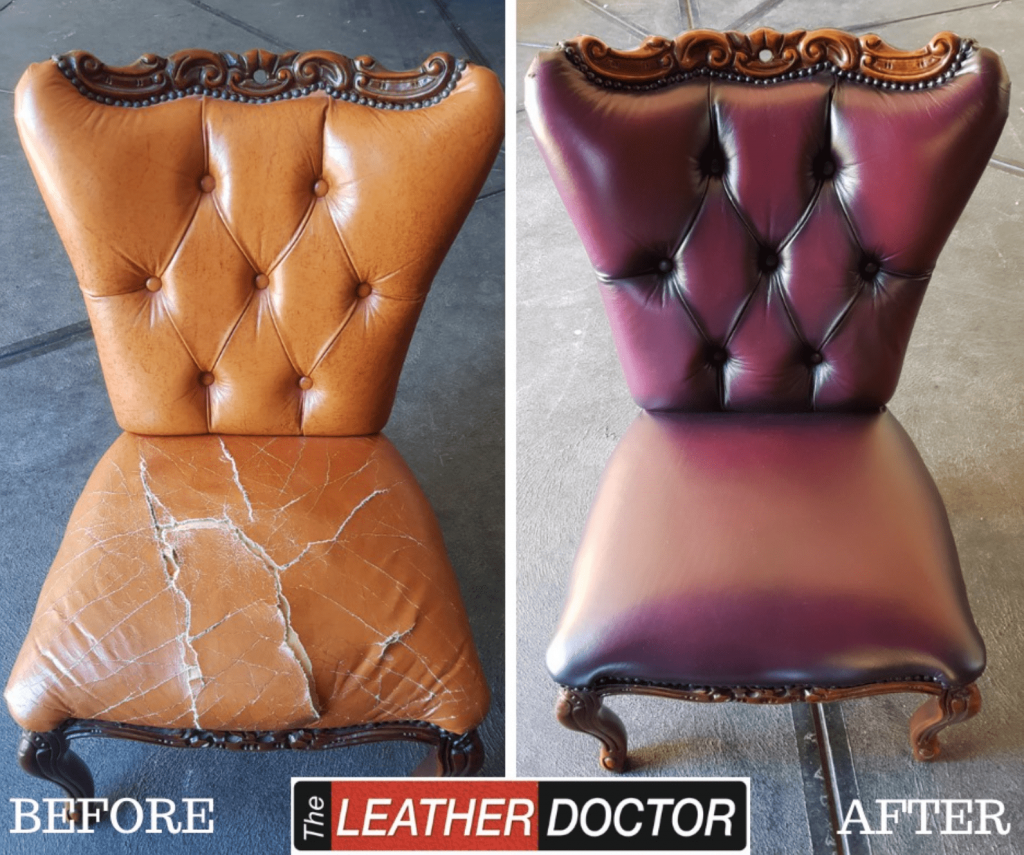
Fading Restoration
For minor fading, apply matching leather color restorer in thin coats with a sponge. Allow drying between layers. Two light coats beat one thick coat that creates streaks.
Crack Repair Protocol
Clean area and dry 48 hours. Apply mink oil conditioner in circular motions. Let absorb overnight. Repeat for severe cracks. Never sand cracks—this removes protective layers.
Mold and Mildew Emergency Treatment
Immediate Action Steps
Wear mask and gloves. Vacuum mold with brush attachment (dispose bag immediately). Mix equal parts water and rubbing alcohol. Apply only to affected areas. Air dry with fans for 24 hours. Condition afterward to restore moisture balance.
Prevention Must-Dos
Keep humidity below 50%. Position sofa 6+ inches from walls for airflow. Never use steam cleaners—they encourage mold growth.
When to Skip DIY and Call Professionals
DIY-Safe Scenarios
– Routine monthly cleaning
– Fresh stains under 2 inches
– General conditioning
– Minor color fading
Professional Required
– Ink stains larger than a quarter
– Oil saturation through multiple layers
– Deep cracks or tears
– Antique or unlabeled leather
– Previous cleaning failures
Attempting complex repairs on valuable pieces risks irreversible damage.
Troubleshooting Common Cleaning Mistakes
White Residue Fix
Caused by soap residue or hard water. Re-clean with distilled water only. Prevent by using distilled water in all solutions.
Dark Spots After Conditioning
Blot excess with dry cloth. Clean spot with diluted leather cleaner. Re-apply conditioner evenly over entire section.
Sticky Leather Surface
Buff vigorously with dry microfiber. If persistent, wipe with 1:10 alcohol-water mix. Condition lightly afterward.
Safety Best Practices for Home Cleaning
Non-Negotiable Rules
– Always test solutions in hidden areas first
– Never saturate leather—damp cloths only
– Avoid direct sunlight or heaters during drying
– Work in sections under 15 minutes to prevent drying
Critical Warning
Never use ammonia, bleach, or vinegar on aniline leather—this strips color permanently. Protected leather tolerates mild vinegar solutions only after spot testing.
Your leather sofa represents a lasting investment that rewards consistent care. By implementing these how to clean leather sofa at home techniques, you’ll preserve its luxury for decades while avoiding costly professional services. Start with daily dusting and immediate spill response—these prevent 80% of damage. When deep cleaning, remember the golden rule: gentle, minimal moisture, and always condition. Within weeks, you’ll notice restored luster and suppleness that makes your sofa feel new again. The key isn’t perfection—it’s consistent, informed care that matches your specific leather type. Keep this guide handy for your next cleaning session, and your sofa will thank you for years to come.


