
Your area rug has been slowly transforming from a beautiful focal point to a repository for crumbs, coffee rings, and muddy footprints. Before you consider expensive professional cleaning or replacement, know that most household rugs can be restored to their former glory with the right home cleaning approach. Whether you’re dealing with a delicate Persian rug in your living room or a high-traffic synthetic mat in the hallway, this guide provides practical techniques to safely refresh your floor covering without damaging fibers or breaking the bank.
Most homeowners don’t realize that improper cleaning causes more rug damage than everyday wear and tear. By understanding your specific rug type and applying targeted cleaning methods, you can extend its life by decades while maintaining that just-bought vibrancy. This comprehensive guide walks you through professional-grade techniques that deliver results without requiring special equipment or chemical expertise.
Identify Your Rug Type Before Cleaning
Decode Hidden Care Instructions
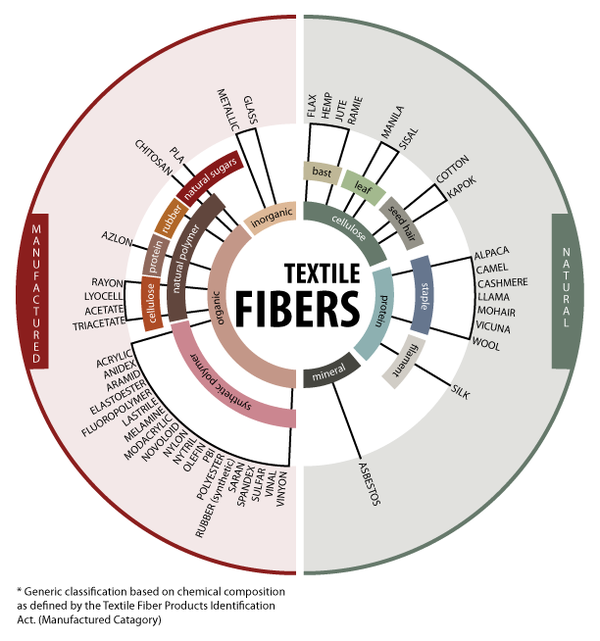
Flip your rug over and locate the manufacturer’s care tag—typically stitched into the underside corner. This small label contains critical information about fiber composition, cleaning codes, and specific warnings that prevent costly mistakes. Natural fibers like wool, silk, and cotton demand completely different approaches than synthetic materials such as nylon or polyester.
Rug material cheat sheet:
– Wool: Durable but shrink-prone, avoid alkaline cleaners
– Silk: Water causes permanent damage, requires dry methods
– Cotton: Tolerates moisture well but may bleed colors
– Synthetic: Forgiving and stain-resistant, handles most methods
– Jute/Sisal: Absorbs water like a sponge, develops permanent stains
Test Dye Stability Immediately
Before applying any cleaning solution, test your rug’s colorfastness. Dampen a white cloth with your intended cleaner and press firmly on each colored section for 30 seconds. If dye transfers to the cloth, stop immediately—your rug needs professional care. This critical 2-minute test prevents the heartbreak of watching vibrant patterns turn into muddy messes after cleaning.
Set Up Your Rug Cleaning Station Properly
:strip_icc()/utility-closet-storage-supplies-cleaning-8d9bcb7d-2000-7dbac580438c41e9a846b2d5cf7601e0.jpg)
Select the Optimal Cleaning Location
Weather permitting, clean rugs outdoors on a clean driveway or patio where fresh air accelerates drying and prevents moisture damage to floors. For indoor cleaning, choose rooms with hard flooring and open windows—kitchen, bathroom, or garage work best. Avoid carpeted areas entirely, as moisture can seep through and create mold problems underneath your rug.
Gather These Essential Cleaning Supplies
Assemble these tools before beginning:
– Vacuum with upholstery attachment and adjustable height
– Soft-bristled brush or specialized rug rake
– Mild dish soap or pH-neutral rug shampoo
– White vinegar and baking soda for natural solutions
– Clean white towels (avoid colors that could transfer)
– Two buckets (one for clean water, one for dirty)
– Rubber gloves and knee pads for comfort
Master the Weekly Vacuuming Technique
Avoid Common Vacuuming Mistakes
Most rug damage happens during routine vacuuming, not deep cleaning. Adjust your vacuum’s height setting—lower for flat-weave rugs, higher for plush piles. Start by flipping the rug and vacuuming the underside first; this loosens embedded dirt that would otherwise grind deeper during surface cleaning. When vacuuming the top, use slow, overlapping passes in multiple directions, especially along edges where debris accumulates most heavily.
Pro tip: Turn off your vacuum’s beater bar for delicate or antique rugs. The rotating brush can snag fibers and cause permanent damage that becomes visible within weeks.
Implement Strategic Rotation
Mark your calendar—rug rotation isn’t optional if you want even wear. High-traffic areas need 180-degree rotation every 3-4 months, while sun-exposed rugs benefit from monthly rotation. Use seasonal changes as your reminder: when you adjust clocks for daylight saving time, rotate your rugs. This simple habit prevents permanent traffic patterns and extends your rug’s life by 30-50%.
Handle Spills Within 60 Seconds
Apply the Blotting Technique Correctly
The golden rule of spill response: blot from outside edges toward the center using clean white towels. Never rub—that spreads the stain and damages fibers. Replace towels as they become saturated, applying steady pressure to wick up liquid. For solid spills, use a spoon edge to lift material without grinding it deeper. Immediate action prevents 90% of permanent stains.
Create the Emergency Spot Solution
Mix one teaspoon of mild dish soap with one cup of cold water—this simple solution handles most fresh spills. Apply sparingly with a clean cloth, working in gentle circular motions. Rinse by blotting with plain water, then dry thoroughly with towels. Always test solutions on hidden areas first, especially with valuable or antique rugs where chemical reactions can cause irreversible damage.
Deep Clean Without Causing Damage
Use Dry Powder for Delicate Rugs
Perfect for silk, antique, or moisture-sensitive rugs, dry cleaning powder absorbs oils and dirt without water. Sprinkle 2-3 ounces per 10 square feet, then use a soft brush to work the powder into fibers. Let it sit for 30 minutes (up to 2 hours for heavily soiled areas), then vacuum repeatedly using different directions to remove all residue. This method safely cleans rugs that would be ruined by water exposure.
Follow the Shampooing Protocol for Washable Rugs
For washable rugs, create a gentle solution: 1/4 cup mild detergent per gallon of lukewarm water. Work in small sections using circular motions with a soft brush. Avoid over-wetting—damp, not soaked, prevents backing damage. Rinse thoroughly with clean water until no soap residue remains; this usually takes 2-3 rinse cycles. Warning: Never use hot water—it causes shrinkage and sets stains permanently.
Remove Stubborn Stains Safely
Eliminate Organic Stains Naturally
Food, wine, and pet accidents surrender to this enzymatic mixture: equal parts white vinegar and water plus a few drops of dish soap. Apply, wait 5-10 minutes, then blot repeatedly. For persistent odors, cover the area with baking soda after treatment, let dry completely (4-6 hours), then vacuum. This combination neutralizes odors and lifts remaining stain particles without harsh chemicals.
Address Grease and Oil Stains Effectively
Cornstarch or baking soda acts as a natural absorbent for oil stains. Cover the area for 15-30 minutes, then vacuum thoroughly. Follow with a small amount of rubbing alcohol on a clean cloth, blotting gently from edges toward center. Rinse sparingly and dry completely between treatments. This two-step process removes most grease stains without damaging fibers.
Dry Thoroughly to Prevent Mildew
Implement Proper Drying Techniques
Proper drying separates successful cleaning from mildew nightmares. Lay rugs flat on elevated surfaces like sawhorses or patio furniture, allowing air circulation underneath. Position fans for cross-ventilation, flipping thick rugs every few hours for even drying. Never hang wet rugs—gravity stretches and distorts the backing permanently.
Drying timeline expectations:
– Thin cotton rugs: 6-8 hours
– Thick wool rugs: 24-48 hours
– Synthetic shag: 12-18 hours
– Outdoor conditions: 30-50% faster drying
Restore Fiber Texture After Drying
Once completely dry, use a rug rake or soft brush to restore fiber direction and softness. Work with the nap, not against it. For shag rugs, use your fingers to separate matted fibers. Trim any loose threads carefully with scissors—never pull them, as this unravels the backing. This final step makes the difference between a professionally cleaned appearance and amateur results.
Create Your Rug Maintenance Calendar
Schedule Cleaning Based on Traffic Levels
Build a cleaning rhythm that matches your household:
– High-traffic areas: Deep clean every 3-6 months
– Medium-traffic spaces: Annual deep cleaning
– Rarely-used rooms: Every 2-3 years
– Pet owners: Increase frequency by 50%
Set smartphone reminders with photo documentation to track progress and identify recurring problem areas before they become permanent.
Implement Preventive Protection Strategies
Rug pads aren’t optional—they prevent slipping, reduce wear, and allow air circulation. Rotate rugs seasonally and implement a no-shoes policy to dramatically reduce tracked-in dirt. Strategic doormat placement at every entrance captures debris before it reaches your beautiful rugs. These simple habits reduce deep cleaning frequency by up to 70%.
Final Takeaway: Your area rug tells the story of your home’s life—spills, celebrations, and daily foot traffic. With these professional techniques adapted for home use, you can keep that story vibrant and beautiful for decades. Start with the gentlest method for your rug type, and remember: when in doubt about valuable or antique rugs, professional consultation costs far less than replacement. The key to how to clean area rugs at home successfully lies in understanding your specific rug material first, then applying the right technique with patience and precision. By following this guide, you’ve gained the knowledge to handle most cleaning challenges while preserving your rug’s beauty and value for years to come.


