
Radon silently invades homes across America—colorless, odorless, and potentially deadly. With one out of every two Colorado homes showing elevated levels, this radioactive gas has earned its reputation as the second leading cause of lung cancer after smoking. The terrifying reality? You’ll never know it’s poisoning your family without proper testing. But here’s the empowering truth: learning how to check for radon in home is surprisingly straightforward, and fixing elevated levels becomes simple once you have accurate results.
Whether you’re a new homeowner, concerned parent, or simply seeking peace of mind, this guide delivers everything you need to test your home for radon with confidence. You’ll discover exactly where to place test kits, which method suits your situation best, and how to interpret results without confusion.
Choose Your Radon Testing Method Wisely
Professional Testing vs. DIY Radon Detection
Professional testing delivers immediate, certified results using Continuous Radon Monitors operated by licensed technicians. This approach costs more ($150-$300) but provides detailed hourly data—essential for real estate transactions or when you need results quickly.
DIY testing offers reliable results at a fraction of the cost. Charcoal canisters, alpha-track detectors, and electronic devices range from $10-$50 at home improvement stores. These kits meet EPA standards and provide accurate readings when used correctly, making them perfect for initial screening.
When Professional Testing Becomes Non-Negotiable
- Real estate transactions (buyers often require certified results)
- Complex property layouts with multiple foundations
- Previous DIY tests showed borderline results (2-4 pCi/L)
- You need results in under 48 hours
Select the Right DIY Radon Test Kit
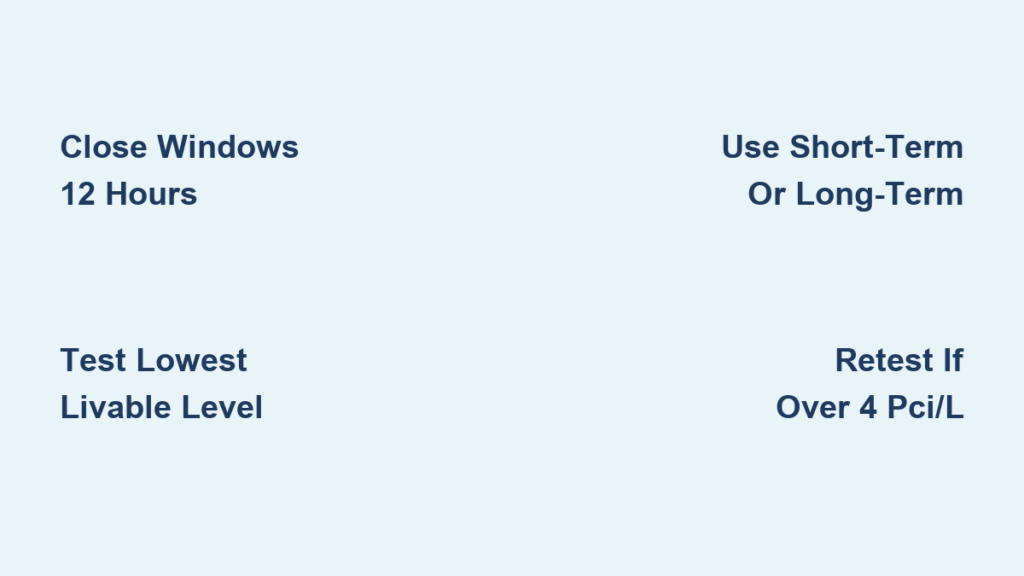
Short-Term vs. Long-Term Testing Solutions
Short-term tests (48-120 hours) serve as your first line of defense. Charcoal canisters remain the most popular choice, absorbing radon for laboratory analysis. Electronic instruments provide digital readings but cost significantly more.
Long-term tests (91 days to 1 year) eliminate seasonal variations. Alpha-track detectors use specialized film that records radon exposure over extended periods, delivering your true year-round average—critical for basements or homes with fluctuating ventilation patterns.
Which Test Type Matches Your Situation
Choose short-term when:
– Performing initial screening
– Testing before/after home improvements
– Checking mitigation system effectiveness
– Needed for real estate transactions
Choose long-term when:
– Living in home long-term
– Previous short-term tests showed levels near 4 pCi/L
– Want most accurate annual average
– Home has variable occupancy patterns
Short-Term Test Setup: Avoid Costly Mistakes

Pre-Test Preparation Checklist
Close all exterior windows and doors 12 hours minimum before starting. This creates the “closed building conditions” necessary for accurate results. Normal entry and exit is fine—just don’t prop doors open or run whole-house fans during the test period.
Critical preparation steps:
– Turn off attic fans and window AC units
– Keep HVAC systems running normally
– Avoid basement ventilation fans
– Postpone major cleaning that might disturb air
Optimal Test Placement Rules
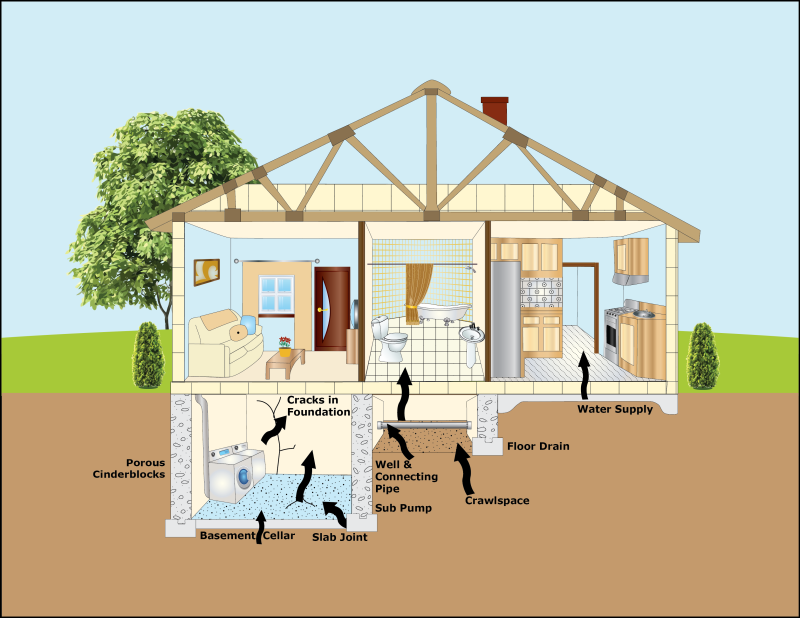
Location: Lowest inhabitable level—ground floor or basement, even if unfinished. Skip crawl spaces entirely.
Height: Position kit 2-7 feet above floor on stable surface. Coffee tables work perfectly; avoid placing directly on carpet.
Area selection: Central, open spaces where family spends time. Living rooms beat laundry rooms every time.
Safety: Keep kits away from children and pets. Close bedroom doors if necessary.
Document Everything Precisely
Photograph your kit’s serial number (white barcoded sticker) before placement—you’ll need this for online registration and result retrieval. Record exact start and end times, including date, hour, and minute. Many labs reject tests with incomplete documentation.
Test Location Guidelines by Home Type
Standard Single-Family Homes
Test the lowest living area—typically basement recreation rooms or ground-floor bedrooms. Unfinished basements count if family uses them for storage, laundry, or workshop activities.
Real Estate Transactions
Colorado regulations require testing in the lowest area that could become living space. This often means unfinished basements, since buyers frequently finish these areas post-purchase.
Rental Properties: Know Your Rights
Colorado’s SB23-206a (effective August 7, 2023) grants tenants specific radon rights:
– Test your own unit without landlord permission
– Receive radon disclosures before signing leases
– Void lease agreements if landlords fail mitigation after 180 days of elevated results
Action steps for renters:
– Purchase DIY test kit (landlord cannot prevent testing)
– Document results and notify landlord in writing
– Allow 180 days for mitigation response
– Retain all correspondence
Professional Testing Services Made Simple
Finding Certified Technicians
Colorado maintains strict licensing requirements for radon professionals. Verify credentials through:
– National Radon Proficiency Program (NRPP)
– National Radon Safety Board (NRSB)
– Colorado Department of Regulatory Agencies (DORA)
Red flags to avoid:
– No certification displayed
– Prices significantly below market rate
– Pressure for immediate mitigation
– Cannot provide recent client references
Filing Complaints Against Unethical Contractors
NRPP-certified contractors: File complaints directly with National Radon Proficiency Program
NRSB-certified contractors: Contact National Radon Safety Board
Colorado-licensed contractors: Submit complaints to DORA
When Water Testing Becomes Necessary
Private Well Considerations
Test your water only if:
– You use a private well
– Air radon levels exceed 4 pCi/L
– Well water shows other contamination issues
Water testing kits cost $30-$100 and require specific collection procedures. Contact certified labs—avoid general water testing companies without radon specialization.
Decode Your Radon Test Results
Understanding pCi/L Measurements
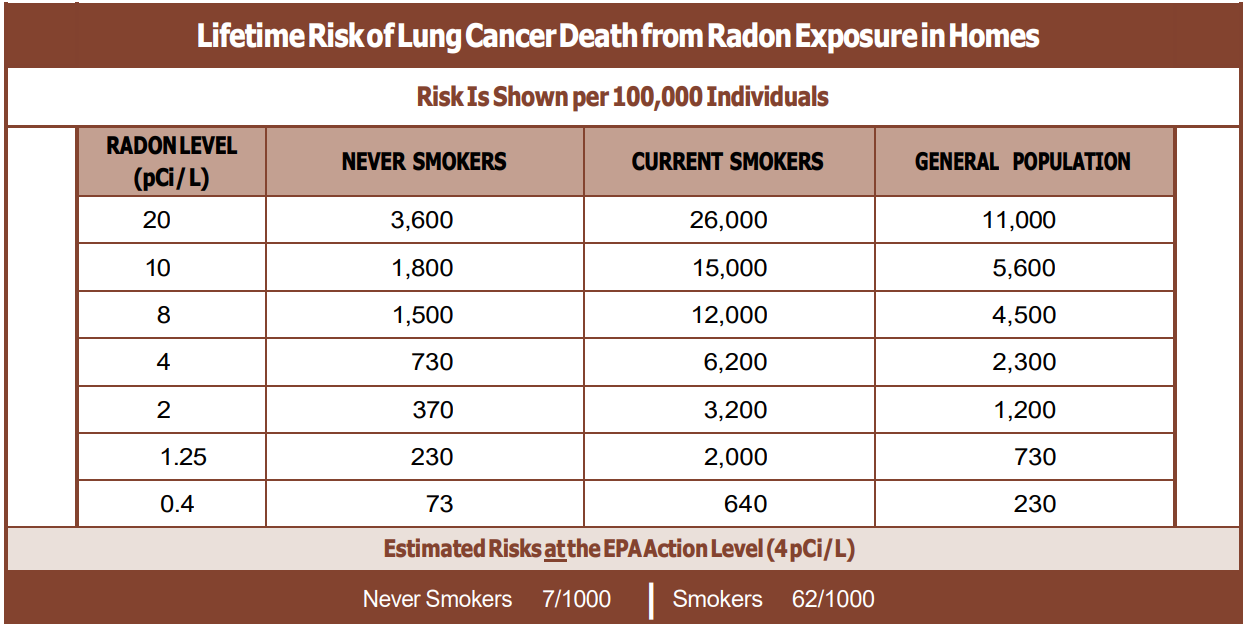
Results arrive in picocuries per liter (pCi/L). The EPA uses these guidelines:
– Under 2 pCi/L: Acceptable—consider retesting every 2 years
– 2-3.9 pCi/L: Moderate—retest to confirm, consider mitigation
– 4+ pCi/L: Take action—confirm with second test, plan mitigation
Next Steps After Elevated Results
Immediate actions:
– Retest using different method or location
– Contact certified mitigation contractors for quotes
– Research mitigation system options
Colorado mitigation costs typically range $1,000-$2,000 for standard systems. Complex designs (multiple foundations, crawl spaces) may exceed $3,000.
Post-Mitigation Testing
Always retest within 30 days of mitigation system installation. Annual retesting ensures continued effectiveness—schedule alongside smoke detector battery changes.
Common Radon Testing Mistakes to Avoid
Never test in:
– Kitchens (cooking affects airflow)
– Bathrooms (humidity interferes)
– Laundry rooms (detergent odors)
– Near exterior walls or doors
Timing errors:
– Testing during severe weather
– Starting during home renovations
– Interrupting closed conditions for parties
– Placing kits in direct sunlight
Year-Round Testing Strategy
Seasonal Considerations
Winter testing often proves easiest—homes naturally maintain closed conditions. Summer testing works if you can keep windows closed for the full period. Avoid testing during major weather events or when HVAC systems undergo maintenance.
Create Your Testing Schedule
Initial test: Within first year of occupancy
Follow-up: Every 2 years for homes under 4 pCi/L
Annual: For homes with mitigation systems
Before/after: Major renovations or foundation work
Radon testing isn’t just another home maintenance task—it’s a potentially life-saving decision that takes minimal effort and cost. Whether you choose a $15 DIY kit or professional testing services, the process remains straightforward. With half of Colorado homes affected, testing isn’t paranoid—it’s prudent. Your family’s health deserves this simple precaution, and your peace of mind is worth the small investment of time and money. By knowing how to check for radon in home properly, you’ve taken the most critical step toward protecting your loved ones from this invisible threat.


