
Your Google Home device suddenly stops responding after your internet provider upgrade, leaving you unable to play music or control smart lights. This common frustration strikes thousands of users monthly when switching routers, moving homes, or updating network configurations. The good news? Changing your Google Home’s Wi-Fi connection is simpler than you think when you follow the right procedure.
This guide delivers the exact steps to successfully update your Google Home’s network connection, whether you’re using a Nest Mini, Nest Hub, or any Google Home speaker. You’ll discover the fastest methods, avoid common pitfalls that cause connection failures, and get your entire smart home ecosystem working seamlessly on your new network—all without losing your personalized settings.
Google Home App Wi-Fi Change Process
The Google Home app provides the most reliable method for updating your device’s network connection across all Google Home models. This approach preserves your existing settings while establishing a fresh connection to your new Wi-Fi network.
Access Device Configuration Menu
Launch the Google Home app on your smartphone or tablet. Locate your device’s tile on the main screen and press and hold it for 2-3 seconds until additional options appear. Tap the gear icon labeled Settings that emerges from the bottom menu. This takes you directly to your device’s configuration panel where network changes occur.
Remove Current Network Connection
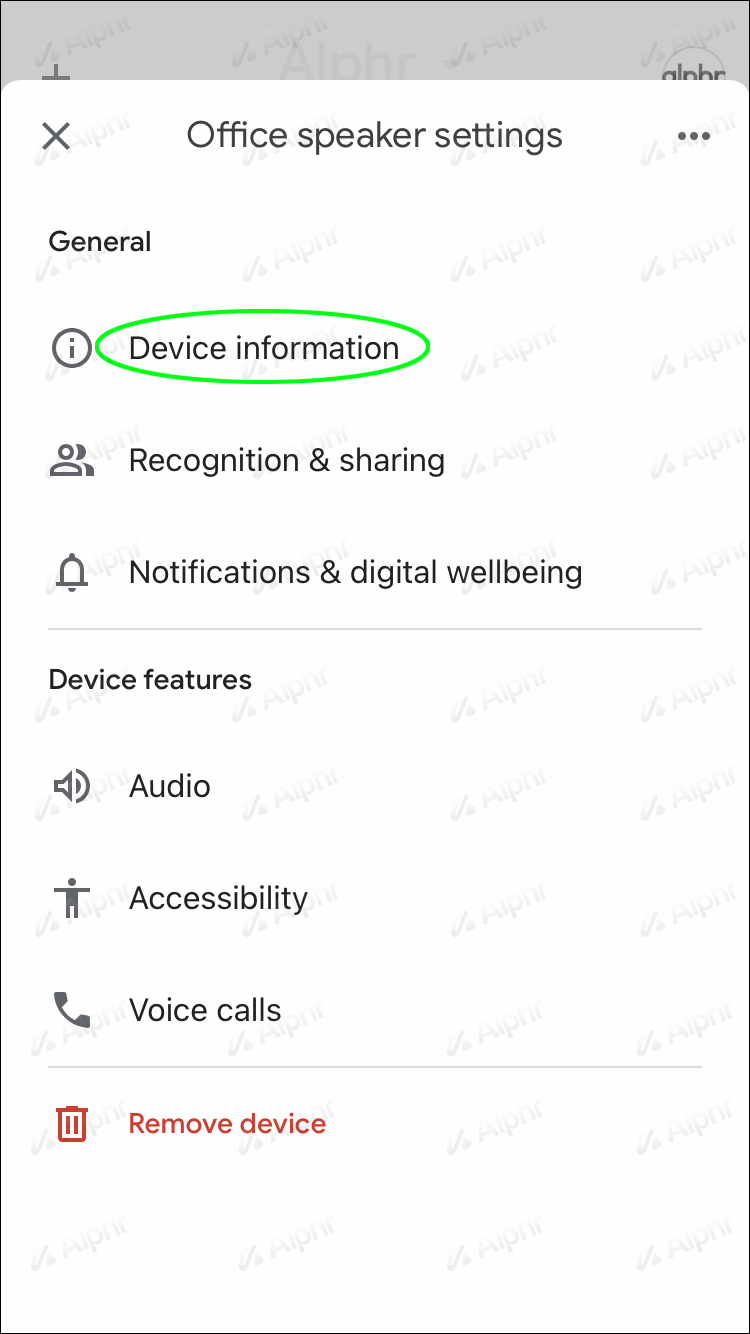
Scroll down to the Device information section and select Wi-Fi. Your current network name appears prominently at the top of the screen. Tap the Forget button positioned next to your network name. Your device will immediately disconnect from the existing network and enter setup mode, indicated by a brief pulsing white light pattern.
Connect to New Wi-Fi Network
After forgetting the previous network, your device automatically searches for available networks. Tap Add network and select your new Wi-Fi from the list of detected networks. Carefully enter your Wi-Fi password using the on-screen keyboard, paying close attention to uppercase letters and special characters. Tap Connect and wait 30-60 seconds while your device establishes the new connection, signaled by a solid white light.
Pro tip: Keep your smartphone within 3 feet of your Google Home device during the entire process to maintain optimal Bluetooth communication between devices.
Alternative Method Using Google Home Setup Flow
When the standard approach fails, restarting the initial setup process often resolves stubborn connection issues without requiring a full factory reset.
Initiate Setup Mode
Unplug your Google Home device from power for 10 seconds, then reconnect it. Wait until you see the welcome screen or hear the setup tone. Open the Google Home app and tap the + icon in the top-left corner, then select Set up device followed by New devices.
Complete Network Configuration
Follow the on-screen prompts until you reach the Wi-Fi network selection screen. Choose your new network from the available options and enter the password when prompted. The app will transfer the network credentials to your device using Bluetooth, so keep your phone close throughout this process. Your device will reboot automatically once connected.
Warning: This method may temporarily remove your device from speaker groups or routines, requiring you to re-add it to these configurations after network setup completes.
Factory Reset When Standard Methods Fail
:max_bytes(150000):strip_icc()/GoogleHomemini_resetbutton-5b7df5f3c9e77c0024a87feb.jpg)
When your Google Home device refuses to connect to the new network, a factory reset clears all network configurations and returns your device to its original state. This solution resolves persistent connection issues but requires rebuilding some preferences.
Nest Mini Reset Procedure
Turn your Nest Mini upside down and locate the small factory reset button near the power cord port. Using a paperclip or similar tool, press and hold this button for exactly 15 seconds until you hear a confirmation chime. The device lights will transition from solid white to pulsing orange, indicating reset progress. Release the button and wait 2-3 minutes for the device to fully reset and enter setup mode.
Nest Hub Reset Process
On your Nest Hub, press and hold both volume buttons simultaneously for 10 seconds. The screen will display a countdown timer followed by a reset confirmation message. Release the buttons when the Google logo appears. The device will restart automatically and begin the initial setup process.
Critical note: A factory reset removes all personalized settings, speaker groups, and linked services. Document your routines and preferences before proceeding to streamline the reconfiguration process.
Reconnect Smart Home Ecosystem After Network Change
Once your Google Home connects to the new network, several verification steps ensure complete functionality across your smart home system.
Verify Core Device Functions
Test basic connectivity by asking your Google Home, “Hey Google, what’s the weather today?” to confirm internet access. Check music streaming capability by saying, “Play relaxing jazz.” Verify smart home control by requesting, “Turn on the living room lights.” These quick tests identify any remaining connection issues before proceeding.
Reestablish Device Groups and Routines
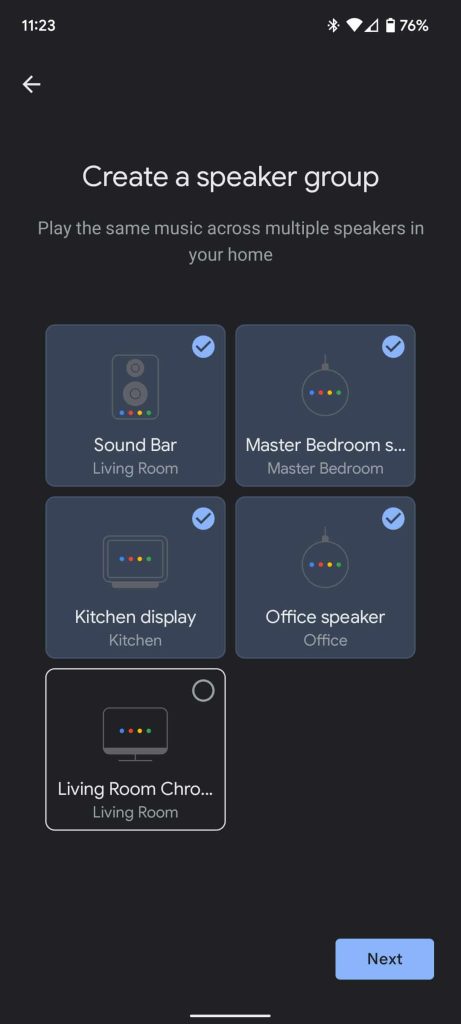
If you use multiple Google Home devices in speaker groups, recreate these configurations in the app. Tap the Add button, select Create speaker group, and choose your devices. Name your group and test audio synchronization by playing music throughout your home. Rebuild custom routines through the Routines section, ensuring triggers and actions function correctly on the new network.
Troubleshooting Common Connection Problems
Even when following proper procedures, users frequently encounter specific issues during Wi-Fi transitions. These solutions address the most common problems reported.
Device Not Detected During Setup
Your Google Home may not appear in the app if it’s too far from your smartphone during setup. Move your device within 6 feet of both your smartphone and router. Ensure your phone connects to the 2.4GHz network band, as Google Home devices cannot initially connect to 5GHz networks during setup.
Password Authentication Failures
Repeated password rejection typically indicates incorrect entry or router compatibility issues. Double-check your password for uppercase letters, numbers, and special characters. Temporarily disable 5GHz broadcasting on your router to force connection to the compatible 2.4GHz band during setup.
Partial Smart Home Integration
Some smart devices may disconnect from Google Home after network changes. Open the Google Home app and navigate to Settings > Works with Google. Re-link each service showing as disconnected to refresh authentication tokens for your new network environment.
Network Requirements for Google Home Devices
Understanding your network’s specifications prevents compatibility issues before they disrupt your setup process.
Bandwidth and Security Requirements
Google Home requires minimum 2 Mbps upload and download speeds for basic functionality. Streaming music needs 5-10 Mbps, while video features require 25+ Mbps. Ensure your router supports WPA2 or WPA3 security protocols, as Google Home devices cannot connect to networks using outdated WEP security.
Dual-Band Router Configuration Tips
Modern routers often broadcast combined 2.4GHz and 5GHz networks under one name. Google Home devices sometimes struggle with this setup. Create separate network names (like “HomeNetwork-2.4” and “HomeNetwork-5”) to ensure your device connects to the compatible 2.4GHz band during setup.
Prevent Future Connection Issues
Implement these preventive measures during your network change to avoid future router-related disruptions.
Document Current Settings Before Changes
Before modifying your network, screenshot your Google Home app settings including routines, speaker groups, and linked services. This documentation significantly speeds up restoration if issues occur. Export your routines to Google Drive through the app’s backup feature for safekeeping.
Create Dedicated Smart Home Network
Establish a separate guest network specifically for smart home devices. This isolates your Google Home devices from main network changes and provides flexibility for future updates. Most modern routers allow creating guest networks without additional hardware investment.
Configure Router Settings for Optimal Performance
Access your router settings and enable Universal Plug and Play (UPnP) for automatic device discovery. Ensure ports 5228, 5229, and 5230 remain open for Google services. These configurations prevent common connectivity issues after network infrastructure changes.
Successfully changing your Google Home’s Wi-Fi network requires careful attention to detail, but following these verified steps ensures a smooth transition with minimal disruption. Remember to test each function after reconnecting and keep your network password readily available for future reference. If issues persist beyond these troubleshooting steps, Google’s official support channels provide device-specific assistance to get your smart home fully operational again. Your voice-controlled convenience will be restored within minutes, allowing you to seamlessly continue enjoying all the benefits of your connected home ecosystem.


