
Your living room lights flicker and die while the microwave abruptly stops mid-cycle. Half your kitchen outlets go cold, and you realize—you’ve blown a fuse again. Before panic sets in, understand that changing a fuse at home is a manageable 10-minute fix when you follow the right steps. This isn’t some complex electrical surgery; it’s a straightforward task homeowners handle daily. You’ll avoid unnecessary electrician fees and restore power faster than waiting for professional help—provided you prioritize safety and match specifications exactly. In this guide, you’ll learn to identify blown fuses, select perfect replacements, and complete the swap without risking shocks or fire hazards.
Most homeowners waste precious time hunting for their fuse box during an outage. Stop circling your basement like a lost raccoon—your fuse box lives in predictable spots. Head straight to your basement or utility room where power enters the home, scanning for a metal box the size of a hardcover novel. It’s typically gray or black, mounted on a concrete or utility wall near your water heater or furnace. Don’t overlook garages or closets in older homes; these often hide the box behind stored holiday decorations. Once found, open the cover to confirm it contains fuses (not modern breakers). You’ll see either screw-in types resembling lightbulb bases or cartridge fuses like small silver batteries. Each should have handwritten or printed labels—”Kitchen,” “Bathroom,” “Refrigerator”—mapping circuits. If labels are missing, flip a light switch on the affected circuit while inspecting the box; the dead fuse will correspond to that zone.
Spot a Blown Fuse Instantly Without Guesswork
Visual Clues That Never Lie
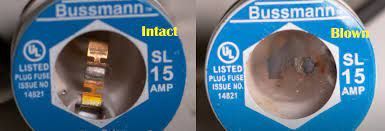
Hold a flashlight perpendicular to the fuse glass for instant diagnosis. A blown fuse reveals a snapped filament wire visible through the glass window—like a broken thread in a lightbulb. Never ignore secondary signs: blackened glass from internal arcing or cloudy discoloration where the metal cap meets the glass. Good fuses show crisp, unbroken wires with clean glass. If your fuse lacks a viewing window (common with cartridge types), gently wiggle it; blown units often feel loose or rattle due to internal damage. Always compare suspect fuses against known working ones—any difference in color or clarity confirms failure.
Physical Verification Techniques
Twist screw-in fuses counterclockwise with your fingers only—never tools yet. A blown fuse rotates freely with almost no resistance, while functional units require firm pressure. For cartridge fuses, press the release lever (if present) and slide the unit out. A failed cartridge often shows scorch marks on its metal ends. If you detect melted plastic, burning smells, or visible charring on the fuse or socket, stop immediately—these indicate dangerous overheating requiring professional help. Never assume; always verify through multiple checks before proceeding.
Essential Safety Steps That Prevent Disasters
Power Down Like a Pro
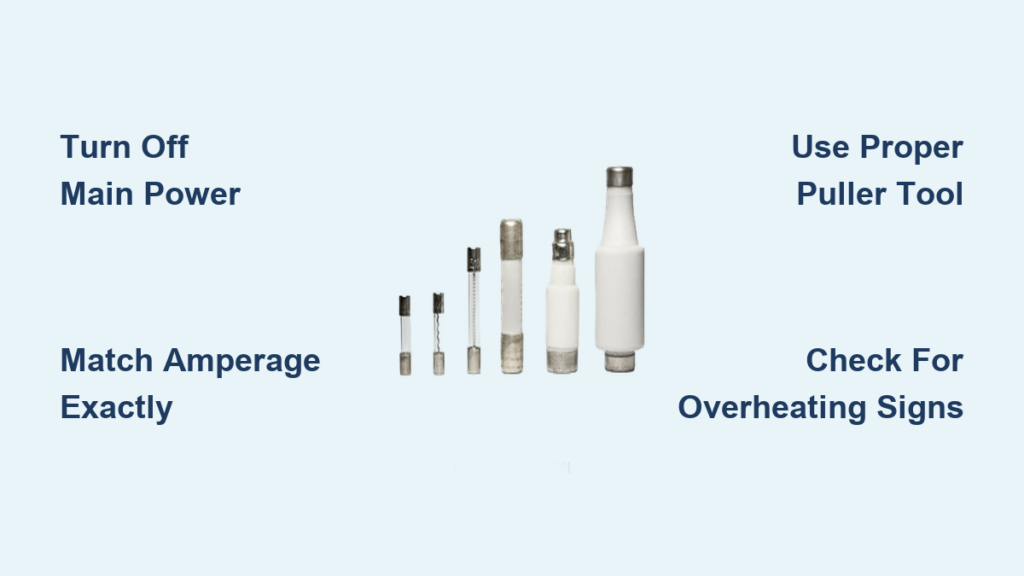
Your main power switch is the large lever or breaker at the top of the fuse box—often labeled “MAIN.” Flip it firmly to “OFF” and wait 30 seconds for residual current to dissipate. This isn’t optional; skipping this step risks lethal shocks. Confirm power is off by testing an affected outlet with a non-contact voltage tester (it shouldn’t beep). Never work in dim conditions; position a headlamp or clamp light to illuminate every angle of the box. Clear all tools, boxes, or debris within a 3-foot radius—clutter causes accidental contact with live components.
Gear Up for Zero Risk
Wear dry rubber-soled shoes and stand on a rubber mat if possible. Keep one hand behind your back while working to prevent current from crossing your heart. Have a fire extinguisher rated for electrical fires (Class C) within arm’s reach. Never use metal ladders near the box—wood or fiberglass only. If your fuse box shows rust, water damage, or frayed wires, abort the mission and call an electrician. Safety isn’t just about the fuse swap; it’s about controlling your environment completely.
Select the Right Replacement Fuse in 60 Seconds
Match Amperage Like Your House Depends on It
Examine the blown fuse’s metal end cap—you’ll see stamped numbers like “15A” or “20A.” This amperage rating is non-negotiable; installing a 20A fuse in a 15A circuit creates fire hazards, while a lower-rated fuse blows instantly. Standard homes use 15A for lighting circuits, 20A for outlets, and 30A for major appliances like dryers. Voltage must match too—residential fuses are typically 120V or 240V. When in doubt, take the blown fuse to a hardware store; hold replacements side-by-side to verify identical size, shape, and contact points. Never force a mismatched fuse into the socket.
Identify Your Exact Fuse Type
Screw-in (Edison base) fuses twist like lightbulbs into threaded sockets, while cartridge fuses slide straight into clips. Measure the blown fuse: Edison bases range from 1 to 1.5 inches tall, cartridges are 0.5 to 1 inch long cylinders. Check for subtle differences—some cartridge fuses have ceramic bodies instead of glass. If your home uses older “rejection base” fuses (with offset slots), standard replacements won’t fit; these require specialty parts. When purchasing spares, buy name-brand fuses (Cooper Bussmann, Littelfuse) rather than generics for reliability.
Remove the Blown Fuse Without Damaging the Socket
Tool Selection for Flawless Extraction
A $3 fuse puller is ideal—it grips the fuse’s metal rim without crushing glass. No puller? Use needle-nose pliers, but only pinch the threaded base—not the glass body. Position your tool fully around the rim to distribute pressure evenly. Never use screwdrivers or pliers on the glass; one slip cracks the fuse, leaving dangerous shards in the socket. For stubborn cartridge fuses, press the release lever firmly while sliding the unit straight out.
The Pull Technique That Prevents Mishaps
Apply steady outward pressure in a straight line—no twisting or wiggling. Screw-in fuses turn counterclockwise until loose, then pull straight out. If resistance exceeds what you’d use to unscrew a tight jar lid, stop. Forcing it strips socket threads, creating a costly repair. If the fuse won’t budge after gentle attempts, it’s likely welded from overheating; call an electrician. After removal, inspect the socket for blackening or melted plastic—clean minor residue with a dry toothbrush, but never use liquids.
Install New Fuse Correctly on Your First Try
Alignment and Seating Secrets
Hold the new fuse against the empty socket. For screw-in types, align the wider threaded base with the socket’s opening—misalignment causes cross-threading. Cartridge fuses should slide in smoothly; resistance means wrong size or orientation. Push firmly until fully seated: screw-in fuses turn clockwise until snug (stop at “hand-tight”—overtightening cracks glass), while cartridges click into place. The fuse must sit perfectly level; any tilt indicates improper installation.
Critical Final Checks
Gently wiggle the installed fuse—it shouldn’t move. Verify no gaps between the fuse base and socket. For screw-in types, the glass should be visible above the socket rim. Never install a fuse that feels loose or wobbly; this causes arcing and repeated failures. Double-check that you’ve restored the main power switch to “OFF” before proceeding. One last glance: confirm no tools or debris remain inside the fuse box.
Restore Power Safely Without Re-Blowing the Fuse
The 3-Step Power-Up Sequence
First, flip the main power switch to “ON” and wait 60 seconds for the system to stabilize—rushing this step causes instant re-blows. Second, turn on only the appliance or light that originally tripped the circuit (e.g., your microwave). Third, test other outlets on that circuit one by one. If power returns smoothly, monitor for 5 minutes; flickering lights or buzzing sounds mean stop immediately.
Troubleshooting Immediate Failures
If the new fuse blows instantly, unplug all devices on that circuit and retry. If it holds, plug devices back in one by one to find the faulty appliance. Never reset more than once—if it blows again, a serious short circuit exists. Check for overloaded circuits (too many high-wattage devices) or damaged cords. If outlets feel warm or smell like burning plastic, shut off main power and call an electrician.
Warning Signs After Replacement That Demand Action
Red Flags Within the First 24 Hours
A properly installed fuse lasts months or years. If it blows within hours, you’ve got an underlying issue: check for overloaded circuits (e.g., space heaters on lighting circuits), damaged appliance cords, or rodent-chewed wiring in walls. Persistent blowing with no obvious cause often indicates deteriorating wiring insulation—a fire hazard. Never ignore a warm fuse box cover or buzzing sounds; these signal dangerous overheating.
When to Document and Escalate
Note exactly which appliance was running when the fuse blew and how many devices shared the circuit. Take photos of discolored sockets or melted fuses for your electrician. If fuses blow randomly (e.g., during rain), moisture intrusion may be the culprit. Keep a log of failures—you’ll need it for professional diagnosis.
Build Your Emergency Kit to Handle Future Outages
Must-Have Supplies Within Arm’s Reach
Store spare fuses in a labeled container inside your fuse box: two 15A (lighting), two 20A (outlets), and one 30A (appliances). Include a fuse puller, non-contact voltage tester, and headlamp—all checked quarterly. Tape a circuit map inside the box cover showing which fuse controls each room; update it whenever you discover new circuit relationships (e.g., “Fuse #7 = Living Room Outlets + Hallway Lights”).
Proactive Maintenance Habits
Monthly, open the fuse box and scan for discoloration or loose fuses. Annually, tighten all fuse connections—screw-in types get a quarter-turn clockwise. Never ignore flickering lights on multiple circuits; this indicates main service issues. Consider upgrading to a breaker panel if you replace fuses more than twice yearly—modern breakers reset in seconds and prevent 80% of common fuse-related hazards.
When Professional Help Becomes Non-Negotiable
Emergency Scenarios Requiring Immediate Calls
Call a licensed electrician if: fuses blow repeatedly with identical loads, you smell burning plastic near the box, multiple fuses fail simultaneously, or outlets feel hot to the touch. Homes built before 1960 often have outdated wiring that can’t handle modern appliances—fuses blowing routinely signal urgent upgrade needs. Never attempt repairs if you see charred wires, rust inside the box, or hear persistent buzzing.
Smart Upgrade Paths for Peace of Mind
Homes still using fuses benefit significantly from breaker panel conversions ($1,500-$3,000). Breakers reset instantly during overloads and trip faster during faults, reducing fire risks by 40%. During outages, use battery-powered lights—not candles—to avoid fire hazards while you work. Bookmark your electrician’s number in your phone and keep it on your fuse box map.
Changing a fuse at home takes under 15 minutes and costs less than $5 in parts when done right. The critical keys are matching amperage exactly, following the power-down sequence religiously, and never ignoring repeated failures. Keep your emergency kit stocked, memorize your circuit map, and you’ll handle outages confidently—until it’s time to call a professional for deeper issues. Remember: if uncertainty creeps in at any step, flipping the main switch off and calling an expert isn’t defeat—it’s the smartest electrical safety move you’ll ever make.


