
Your tires are developing uneven wear patterns and your car pulls slightly when cornering—classic signs your camber is off. Professional alignment shops charge $80-150 per visit, but with the right approach, you can dial in perfect camber from your own garage. This guide walks you through the complete process using basic tools and proven techniques. Learn how to adjust camber at home safely and effectively while saving hundreds in alignment costs over time.
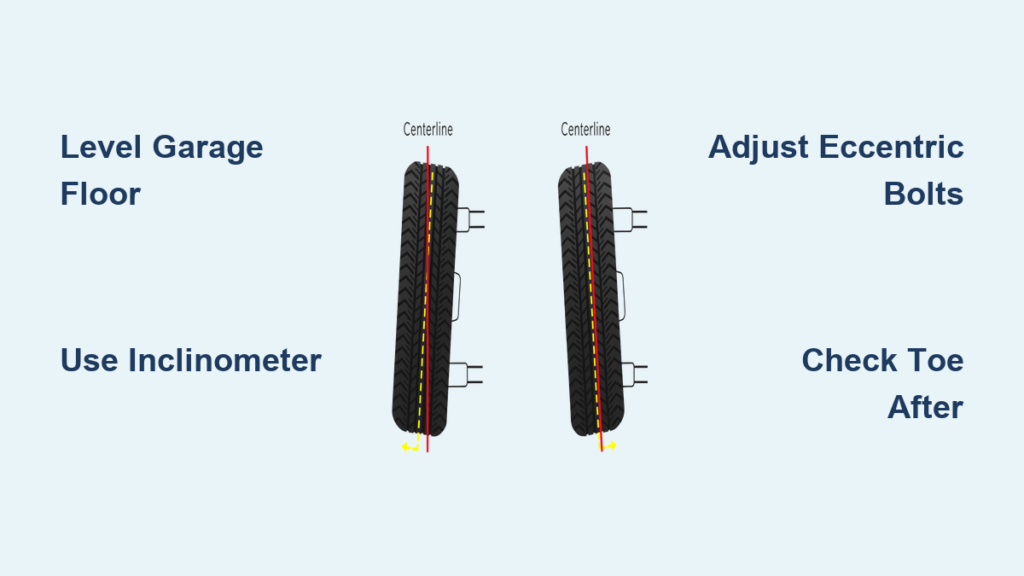
Camber refers to your wheel’s vertical tilt when viewed head-on. Too much negative camber (top tilted inward) destroys inner tire edges, while excessive positive camber wears outer edges. Most street cars need 0.5-1.5 degrees of negative camber for optimal grip and tire life. By mastering this adjustment yourself, you gain precise control over your vehicle’s handling characteristics without relying on expensive shop visits.
Why Your Camber Settings Affect Tire Wear and Handling
Camber directly impacts your tire contact patch during cornering. When your vehicle leans in turns, slight negative camber keeps more tire surface gripping the road. But get this angle wrong, and you’ll see rapid, uneven tire wear—inner edge wear means too much negative camber, while outer edge wear indicates excessive positive camber. These wear patterns don’t just cost you premature tire replacements; they compromise braking performance and cornering stability.
Critical measurement insight: Always verify camber with your vehicle at normal ride height. Suspension geometry changes dramatically when lifted, so measurements taken with wheels off the ground are useless. Your goal is to match factory specifications (typically found in service manuals) within 0.2 degrees for street driving. Track cars might run more aggressive settings, but street vehicles demand precision to prevent dangerous handling characteristics.
Essential Tools for Accurate Home Camber Adjustment

Skip expensive professional gauges—your $35 digital inclinometer delivers 0.1-degree accuracy, perfect for street use. Pair it with a magnetic bubble gauge ($15-20) as a backup. You’ll also need quality jack stands (never rely on hydraulic jacks alone), a torque wrench for proper bolt tension, and a paint pen to mark original bolt positions.
Must-have tool checklist:
– Digital inclinometer (smartphone apps lack required precision)
– 1/2″ aluminum bar stock straightedge (24-36 inches long)
– Quality jack stands rated for your vehicle weight
– Torque wrench with 10-100 ft-lb range
– Paint pen for marking adjustment points
Pro tip: Skip the $250 professional gauges unless you’re building a race car. Your basic inclinometer will get you within 0.2 degrees—close enough to prevent tire wear while saving significant money.
Preparing Your Garage Floor for Precision Measurements
Your garage floor must be level within 0.2 degrees or measurements become meaningless. Test this by placing your inclinometer on a known level surface, then checking multiple spots where tires will sit. Uneven floors cause false readings that lead to incorrect adjustments.
Floor leveling protocol:
1. Measure slope at all four tire positions using your inclinometer
2. Place thin MDF shims under low spots (mark locations for future use)
3. Recheck level after shimming until variation is under 0.2 degrees
4. Remove all excess weight—passengers, cargo, and even your trunk toolbox
Critical reminder: Fuel level matters too. A full tank adds 100+ pounds that affects ride height and suspension geometry. Measure camber with a consistent fuel level (half-tank is ideal) for reliable comparisons.
Measuring Current Camber with Professional Accuracy
Direct Hub Method for True Readings
Remove wheels to place your inclinometer directly on the brake rotor’s machined surface. This eliminates wheel variables and gives true hub angle—essential for precise adjustments.
Step-by-step measurement:
1. Jack up and secure car on stands at normal ride height
2. Remove wheel exposing clean rotor/hub surface
3. Position inclinometer parallel to wheel axis
4. Record measurements for both sides
5. Compare left-right differences (should be within 0.2 degrees)
Through-Wheel Quick Check Technique
When wheels stay mounted, use your aluminum straightedge across the wheel lip at 6 and 12 o’clock. Mount the gauge to the straightedge center, ensuring it contacts only the rim—not the tire.
Accuracy note: This method adds 0.2-0.3 degrees potential error due to wheel runout, but works fine for quick checks between full adjustments. Always clean wheel lips thoroughly before measurement to avoid debris-induced errors.
Understanding Your Vehicle’s Adjustment Options

Factory Camber Adjustment Systems
Most modern cars offer built-in adjustment through:
– Eccentric camber bolts at strut-to-knuckle interfaces
– Slotted strut towers allowing top strut movement
– Control arm shims on older vehicles
Check your service manual first—many cars provide 1-1.5 degrees of factory adjustment range. This covers most street needs without aftermarket parts. For strut-based systems, eccentric bolts typically deliver 0.5 degrees of change per 90-degree rotation.
When Aftermarket Parts Become Necessary
Lowered vehicles often exceed factory limits—each inch of drop typically adds 1-2 degrees negative camber. Solutions include:
– Adjustable camber plates ($80-150) for MacPherson struts
– Offset control arm bushings ($40-80) for pivot points
– Aftermarket adjustable arms ($200-400) for extreme modifications
Warning: Never force adjustments beyond factory limits with existing hardware—this stresses components and creates dangerous failure points.
Step-by-Step Camber Adjustment Process
Phase 1: Establish Your Baseline
- Measure all four wheels with direct hub method
- Compare readings to factory specifications
- Calculate needed changes per wheel (e.g., “-0.8° to reach spec”)
- Mark current bolt positions with paint pen
Phase 2: Front Wheel Adjustments
For eccentric camber bolts:
1. Loosen strut-to-knuckle bolts slightly while supporting suspension
2. Rotate eccentric bolt using alignment marks (90° ≈ 0.5° change)
3. Recheck measurement after each adjustment
4. Torque bolts to specification once correct
For control arm systems:
1. Loosen upper control arm pivot bolts (do not remove)
2. Thread adjustment mechanism incrementally
3. Verify movement with camber gauge during adjustment
4. Ensure both sides match within 0.2 degrees
Phase 3: Rear Wheel Adjustments
Rear setups vary significantly:
– Beam axles: Usually non-adjustable without shims (measure carefully)
– Independent rear: Often use eccentric bolts like front systems
– Multi-link systems: May require professional help for complex adjustments
Critical Safety Protocols for Home Alignment
Non-negotiable safety steps:
– Use jack stands rated for 1.5x your vehicle weight
– Torque all bolts to factory specifications (never “eyeball” tightness)
– Test drive at 25 mph on safe roads before highway speeds
– Recheck torque after 100 miles of driving
Immediate warning signs:
– Car pulls to one side during straight-line driving
– Steering wheel remains off-center after adjustment
– Unusual tire noise or vibration at cruising speeds
– Rapid inner/outer edge wear appears within 500 miles
Fine-Tuning After Camber Adjustment
Toe Measurement Reality Check
Camber changes directly affect toe settings. After final camber adjustment:
– Drive slowly on flat, straight road—car should track straight
– If pulling occurs, toe needs correction (beyond DIY scope for most)
– Professional alignment may be needed if significant toe error exists
Temperature and Settling Effects
Cold weather stiffens suspension bushings, altering readings. Always:
– Take final measurements with car at operating temperature
– Recheck after first 50 miles of driving
– Expect 0.1-0.2 degree settling as bushings compress
DIY vs Professional: When to Call a Shop
Your DIY investment:
– Basic tools: $40-60 (one-time)
– Time: 2-4 hours initial setup, 30 minutes per adjustment
– Break-even: After 2-3 alignments, you’ve saved money
See a professional when:
– Complex multi-link rear suspensions require specialized tools
– Aftermarket parts installation is needed
– Toe adjustment exceeds your comfort zone
– Measurements remain inconsistent after multiple attempts
Long-Term Maintenance Plan for Perfect Alignment
Monthly Camber Checks
- Perform through-wheel measurement with straightedge
- Inspect tires for new wear patterns
- Verify bolt torque on adjustment points
- Document measurements for trend analysis
Critical Re-measurement Triggers
Immediate action required after:
– Hitting potholes or curbs at speed
– Any suspension component replacement
– Tire rotations revealing new wear patterns
– Noticeable handling changes during normal driving
Troubleshooting Common Home Adjustment Issues
Inconsistent Measurement Results
- Check wheel bearing play before measuring (excess movement invalidates readings)
- Verify wheel trueness if using rim-based methods
- Clean all measurement surfaces thoroughly
- Ensure consistent tire pressure (±1 PSI)
Stuck Adjustment Mechanisms
- Frozen bolts: Soak with penetrating oil 24 hours prior
- Insufficient range: Aftermarket components may be required
- Cross-interaction: Adjust camber → check toe → readjust as needed cycle
Final Note: Mastering how to adjust camber at home puts precise vehicle control in your hands while saving significant money. Start with accurate measurements on a level surface, make small incremental changes, and always verify with test drives. Document your baseline settings before first adjustment—this creates your reference point for all future tuning. Remember, perfect camber isn’t just about tire longevity; it’s the foundation of safe, predictable handling. Check your current settings this weekend using the direct hub method, and take the first step toward professional-grade alignment from your garage.


