
Nothing beats the satisfaction of holding a professionally bound book you created yourself—especially when it’s your family’s photo history, a self-published novel, or a custom gift. With modern home printers and smart techniques, how to print a book at home is no longer a pipe dream reserved for publishing houses. You can achieve bookstore-quality results without leaving your living room, saving hundreds compared to professional services. This guide cuts through the confusion, giving you battle-tested methods for paper selection, precise printing, and professional binding—all using equipment you likely already own or can affordably acquire. Skip the guesswork and start creating heirloom-quality books today.
Laser Printer Requirements for Book Projects
Avoid Paper Jams with Professional-Grade Hardware
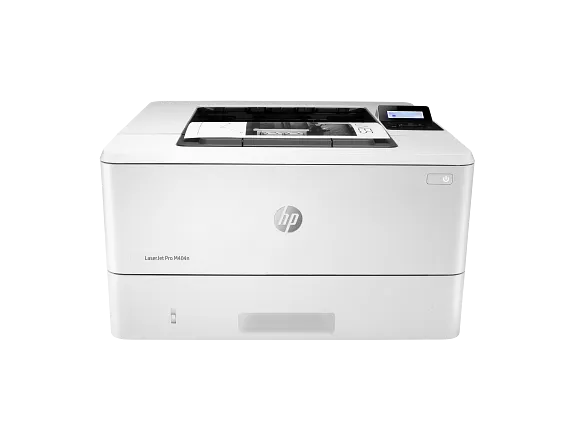
Your printer is the foundation of home book production. Standard inkjets often fail on long jobs, so invest in a laser printer like the HP LaserJet Pro M404n that handles 200+ pages without overheating. Crucially, verify it has a manual feed tray for thick cover stocks and automatic duplex printing to eliminate tedious page-flipping. Before printing your entire manuscript, run a 50-page test document to expose registration issues or paper path weaknesses. If pages curl excessively during testing, your paper needs 24 hours to acclimate to your room’s humidity—never skip this step for clean folds.
Precision Cutting Tools for Clean Edges
Skip flimsy guillotine cutters that cause uneven edges. A 12-inch rotary paper trimmer delivers surgical precision for trimming book blocks, while a craft knife with metal ruler handles intricate cover adjustments. For instant professional polish, use a corner rounder punch on all four corners—this prevents dog-earing and signals quality. Create a reusable cardboard jig to maintain identical trim sizes across multiple copies. Always trim the fore edge (front edge opposite the spine) first, then carefully align pages for final sizing. One pro trick: Apply light pressure when cutting thick stacks to avoid paper shifting.
Paper Selection That Makes or Breaks Your Book
Interior Pages: Weight and Texture Secrets
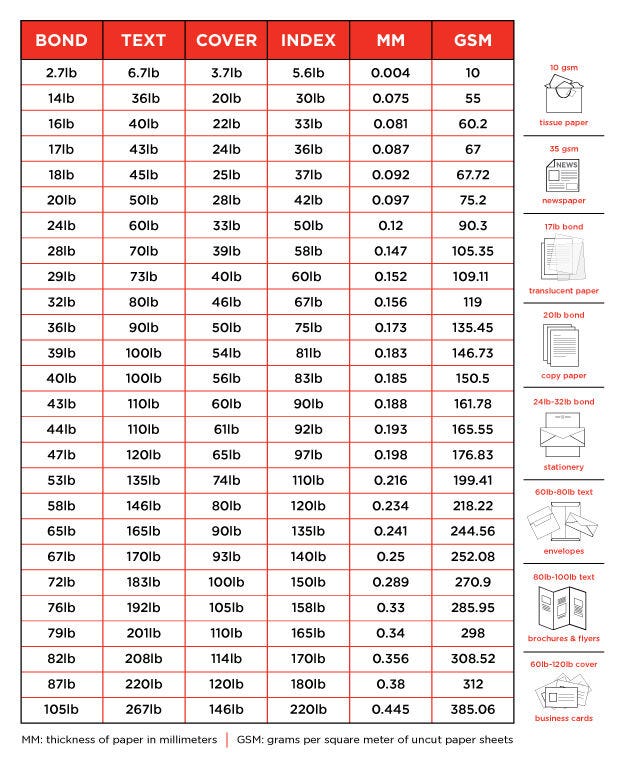
Choose paper weight based on content type: 60-80 GSM uncoated stock prevents ink bleed-through for novels or manuals, while 100-120 GSM is essential for photo books to showcase color depth without show-through. Glossy finishes create vibrant images but cause glare under lights—opt for matte finishes for readable text-heavy books. Never use standard 20lb copy paper; it yellows quickly and feels cheap. Test your chosen paper with a single-page print to verify ink absorption—streaking means the paper’s too smooth for your printer.
Cover Stock That Screams Quality
Your cover is the handshake of your book—make it count. 200-250 GSM cardstock provides sturdy yet flexible protection, while premium photo paper delivers stunning visuals for coffee table books. For eco-conscious projects, 30-100% recycled stock now rivals virgin fiber in quality. Budget $0.25-$1.00 per cover; skimping here undermines your entire project. Pre-score spine folds with a bone folder before binding to prevent cracking—this simple step elevates DIY books to professional standards.
Document Formatting: Avoid Costly Reprints
Page Setup and Bleed Essentials
Finalize your trim size before formatting: 5.5″x8.5″ for pocket novels, 6″x9″ for standard paperbacks, or 8.5″x11″ for workbooks. Set 0.5″ inner margins (gutter) to prevent text loss in binding, and 0.75″ outer margins for readability. For full-bleed photos, add 0.125″ bleed on all edges. Always export as PDF/X-1a:2001—this prevents font substitutions and color shifts. Convert all images to 300 DPI; anything lower looks pixelated in print.
Typography and Registration Fixes
Body text must be 11pt minimum serif fonts (Garamond or Times New Roman) for comfortable reading. Add 0.25″ registration crosshairs at page corners to catch misalignment during duplex printing. Print one test signature first—if page numbers don’t align perfectly when folded, adjust your printer’s manual feed settings. Never skip this step; fixing misregistered pages after binding requires starting over.
Duplex Printing Without Headaches
Automatic vs. Manual Duplex Methods
If your printer supports automatic duplex, verify it handles your paper weight (most fail above 100 GSM). For manual duplex:
1. Print all odd-numbered pages
2. Flip the stack using your printer’s paper guide marks
3. Print even-numbered pages
Place alignment tabs on your printer tray to maintain consistent orientation. Print calibration sheets every 50 pages—streaking means toner is low (replace at 20% remaining). Let pages cool 30 seconds before stacking to prevent smearing. Humid climates? Store paper in sealed bags with silica gel before printing.
Binding Methods Compared: Glue, Thermal, Comb
Perfect Binding for Professional Paperbacks
For bookstore-style paperbacks:
1. Clamp signatures with spring clamps
2. Sand spine lightly with 120-grit paper
3. Apply thin PVA glue coat with brush
4. Attach pre-scored cover using alignment jig
5. Press under 10+ lbs weight for 2-4 hours
Warm glue slightly for better penetration—but never hot! Pages falling out? Extend drying time to 8 hours and apply glue to both spine and signature edges.
Thermal Binding for Quick Results
Thermal binding machines (like Fellowes Helios 60) deliver library-quality books in minutes:
1. Insert pages into 3-16mm thermal spine
2. Heat in machine 1-3 minutes (thicker = longer)
3. Cool on rack 5 minutes before handling
Test binding strength by tugging first page—weak holds mean insufficient heating. This method works best for 20-150 page books.
Cost Breakdown: Is Home Printing Worth It?
Printing a 100-page book costs $10.75-$30.00 at home:
– Paper: $6-$16 (200 sheets at $0.03-$0.08)
– Toner: $4-$10 ($0.02-$0.05/page)
– Binding: $0.50-$3.00
– Cover: $0.25-$1.00
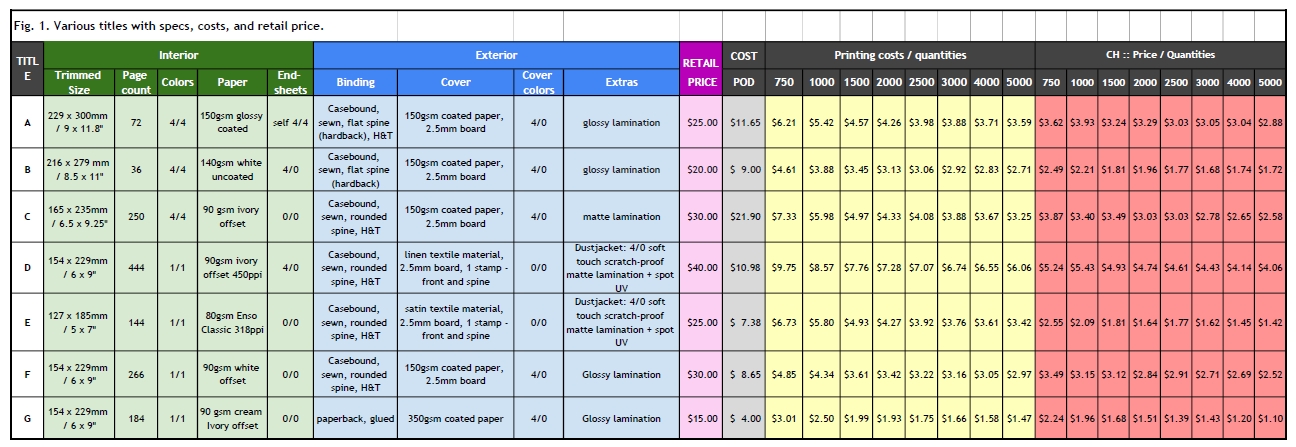
Your $200-$400 printer pays for itself after 20-50 books. For under 20 copies, home printing beats print-on-demand services like Amazon KDP ($2.57+ per book). But if you need 50+ identical copies, hybrid approaches win—print interiors at home and take PDFs to a local shop for binding.
Troubleshooting Critical Failures
Fixing Print Quality Disasters
Streaking pages? Clean printer drums with a lint-free cloth—low toner causes this 80% of the time. Misaligned text? Recalibrate your printer using its maintenance menu. Color shifts? Verify all images are converted to CMYK (not RGB) in your PDF settings. Always store paper at 45-55% humidity—damp paper causes jams and poor registration.
Binding Recovery Tactics
Pages falling out? Sand the spine again and apply a second glue coat. Warped covers mean too much glue—use a credit card to spread thin, even layers. Create a spine jig from scrap cardboard to position covers identically every time. For thermal binding, weak holds indicate insufficient heating time—add 15-second increments until pages stay secure.
Advanced Finishes That Impress
Add personalized names using Word’s mail merge function for wedding guest books. Create limited editions with sequential numbering in the footer. For luxury effects:
– Spot UV: Apply clear adhesive sheets to specific cover areas
– Foil stamping: Use heat-transfer foil with a laminating machine
– Embossing: Press raised titles with embossing folders and a manual press
These techniques transform basic books into premium keepsakes—perfect for client gifts or special occasions.
Maintenance and Legal Must-Knows
Clean paper paths weekly with compressed air to prevent jams. Store finished books upright at 60-70°F in archival bags to prevent yellowing. Legally, printing copyrighted material is only permitted for personal reference—never distribute without permission. Self-publishing commercially requires an ISBN from Bowker, but personal gifts don’t. When in doubt, stick to your original content.
When Home Printing Isn’t Right
For photo books needing lay-flat pages, Blurb‘s professional printing outperforms home methods. University maker spaces often offer free binding equipment access—check local libraries. If your first book takes 6+ hours, don’t get discouraged; with practice, you’ll cut production to 2-3 hours while gaining complete creative control. Start with a single signature test print today—your perfect homemade book is closer than you think.


