
Your Tesla integration in Home Assistant just became significantly more powerful. The Tesla card transforms your smart home dashboard into a comprehensive vehicle command center, letting you monitor battery levels, activate climate control, and track charging progress—all from one beautifully designed interface. Forget switching between apps; with this custom card properly configured, you’ll have instant access to your vehicle’s status and controls right alongside your home automation.
Whether you’re a Home Assistant beginner or an experienced user looking to enhance your Tesla integration, this guide delivers everything you need to know. You’ll discover exactly how to install the Tesla card, configure essential entities, customize the display to match your preferences, and troubleshoot common issues that might prevent you from accessing your vehicle data. By the end, you’ll have a seamless Tesla experience that rivals—and in some ways surpasses—the official mobile app.
Install Tesla Card Through HACS Without Errors
Adding the Tesla card to your Home Assistant setup requires proper installation through HACS to ensure future updates work smoothly.
Add Official Tesla Card Repository to HACS
Navigate to HACS in your Home Assistant sidebar, then select Frontend from the menu. Click the three vertical dots in the top-right corner and choose “Custom repositories.” In the popup window, enter https://github.com/alandtse/tesla as the repository URL and select “Lovelace” as the category type. Click “Add” to register the repository with HACS. If you receive an error about repository validation, double-check that you’ve entered the URL exactly as shown with no extra spaces.
Complete Tesla Card Installation Process
After adding the repository, find “Tesla” in your HACS Frontend list and click the install button. Select the latest stable version from the dropdown menu and confirm installation. HACS automatically places the necessary files in your Home Assistant configuration directory—no manual file transfers required. For the changes to take effect, refresh your browser cache completely (Ctrl+F5 or Cmd+Shift+R) rather than just reloading the page.
Verify Tesla Card Installation Success
Test your installation by entering dashboard edit mode and clicking “Add Card.” Type “tesla” in the search field—if the “Tesla Card” appears in the results, your installation succeeded. If not, check your browser’s developer console (F12) for JavaScript errors that might indicate incomplete installation. The card won’t function properly until you’ve also configured the official Tesla integration, which provides the necessary vehicle data.
Configure Tesla Integration for Real-Time Vehicle Data

Your Home Assistant needs proper authentication with Tesla’s servers before the card can display any vehicle information.
Connect Home Assistant to Your Tesla Account
Go to Settings > Devices & Services > + Add Integration and search for “Tesla.” Select the official integration and enter your Tesla account email and password. When prompted, open your Tesla mobile app and approve the verification request that appears in your notifications. This two-factor authentication step ensures only authorized devices access your vehicle data.
Enable Critical Tesla Entities for Card Functionality
After successful authentication, click “Configure” next to your Tesla integration. Scroll through the entity list and enable these essential options:
– Binary sensor.tesla_charge_port_door_open (for charge port status)
– Sensor.tesla_battery (battery percentage)
– Switch.tesla_charge_port_door_open (remote charge port control)
– Climate.tesla_climate (HVAC control)
– Device tracker.tesla_location (parking location)
Disabling these entities creates gaps in your Tesla card display, so verify they’re all active before proceeding.
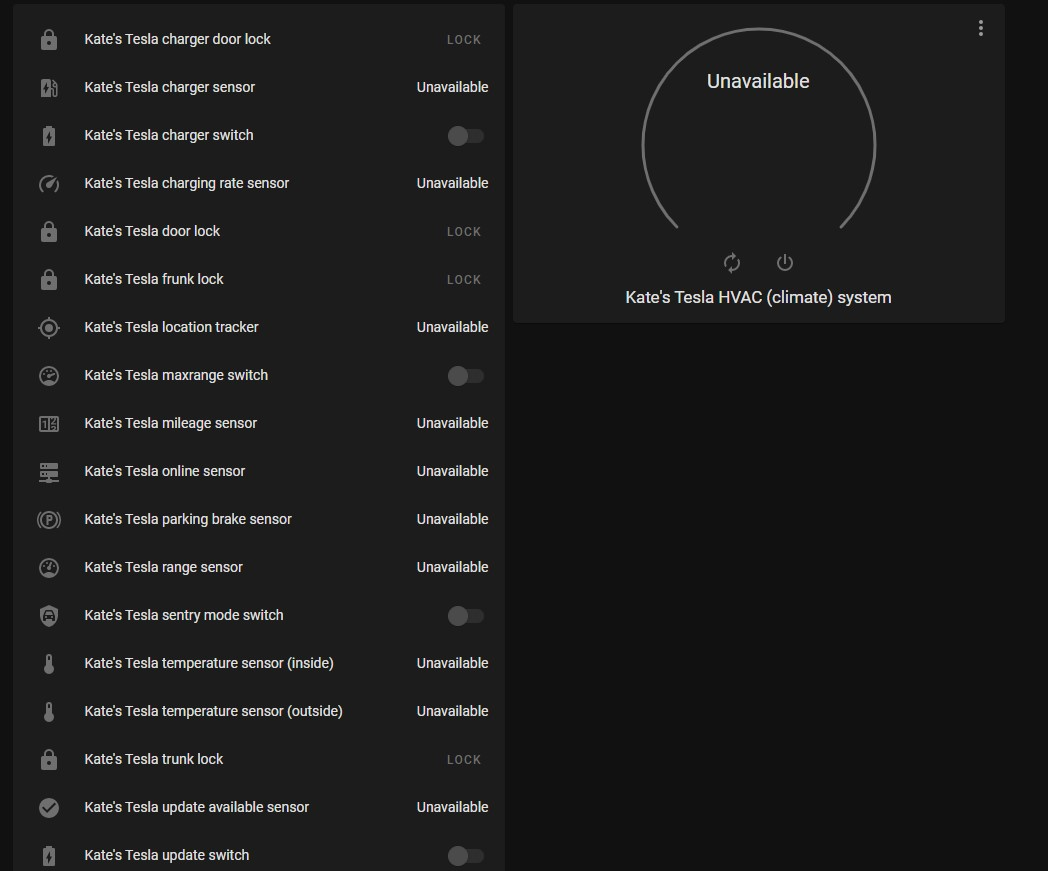
Confirm Entity Data Flow Before Card Setup
Create a temporary entities card showing your battery level to verify data is flowing correctly. If the percentage updates every 30 seconds, your integration works properly. If values remain static or show “unavailable,” restart the Tesla integration by clicking the three dots next to it in Devices & Services and selecting “Restart.” Persistent issues typically indicate authentication problems requiring reconfiguration.
Build Your Tesla Control Dashboard in Minutes
With the integration active, create a dedicated vehicle control panel that puts all critical functions at your fingertips.
Add and Configure Your First Tesla Card
Enter dashboard edit mode, click “Add Card,” and select “Tesla Card” from the list. In the configuration panel that appears, choose your vehicle from the “Vehicle” dropdown—Home Assistant automatically detects all vehicles associated with your account. The card immediately populates with your car’s name, current battery percentage, and charging state if applicable.
Optimize Card Placement for Daily Use
Position your Tesla card prominently on your main dashboard if you check vehicle status multiple times daily. For desktop users, give the card full width for optimal display of all controls. Mobile users should enable “Compact mode” in card settings to fit more information on smaller screens. Consider placing the card above related controls like your EV charger switch or garage door opener for logical grouping.
Customize Initial Card View for Quick Information
Set the card to display your most frequently checked information by default. Most users prefer seeing battery percentage and charging status immediately, with climate controls accessible via a single tap. Configure this in card settings by moving “Battery info” to the top position in the display order and enabling “Show battery percentage” for at-a-glance status.
Fix Missing Data and Authentication Failures Immediately
When your Tesla card shows errors instead of vehicle data, these targeted solutions resolve 95% of common issues.
Resolve “Login Required” Authentication Errors
If your card suddenly displays “Login required,” your Tesla session token has expired. Go to Settings > Devices & Services, find the Tesla integration, and click the three dots > “Reconfigure.” Re-enter your Tesla credentials and approve the new verification request in your mobile app. This refreshes the authentication token without requiring full integration reinstallation.
Restore Missing Entities After Tesla Updates
Tesla’s frequent API changes sometimes cause entities to disappear from Home Assistant. Check Settings > Devices & Services > Tesla > Entities to see if any critical entities appear grayed out. If so, disable and re-enable the Tesla integration completely—this forces Home Assistant to rediscover all available entities based on Tesla’s current API structure.
Troubleshoot “No Vehicle Data” Display Issues
When the card appears but shows empty fields, verify your vehicle name in card configuration matches exactly what appears in the Tesla integration. Sometimes spaces or special characters differ slightly. Also confirm your vehicle appears online in the Tesla mobile app—Home Assistant can’t retrieve data from asleep vehicles until they wake via remote command or physical interaction.
Enhance Your Tesla Card with Advanced Features
Move beyond basic monitoring to create a truly integrated smart home and vehicle experience.
Create Multiple Cards for Multi-Vehicle Households
For homes with multiple Teslas, add separate cards for each vehicle and arrange them side-by-side on your dashboard. Each card maintains independent settings, allowing you to customize displays based on vehicle type—show more charging details for your Model 3 Standard Range while emphasizing range estimates for your long-range Model S.
Integrate Voice Commands for Hands-Free Control
Connect your Tesla card to Google Assistant or Alexa for voice-activated controls. Create Home Assistant scripts that trigger climate preconditioning with phrases like “Hey Google, warm up my Tesla.” The key is configuring proper script triggers that authenticate with Tesla’s API without requiring manual confirmation for routine commands.
Set Up Intelligent Charging Notifications
Create automations that send notifications when your battery reaches specific thresholds. For daily driving, trigger alerts at 80% charge to preserve battery health. For road trips, set notifications at 95% when maximum range is critical. Use Home Assistant’s notification templates to include current charging speed and estimated completion time in each alert.
Your Home Assistant Tesla card now delivers comprehensive vehicle control without constantly checking your phone. Start with basic monitoring and climate control, then gradually implement advanced features like scheduled preconditioning and charging automation as you become comfortable with the interface. The card automatically updates through HACS, ensuring compatibility with both Home Assistant upgrades and Tesla’s evolving API. When Tesla pushes changes that temporarily break functionality, check the HACS repository for community-patched updates—most issues get resolved within 48 hours by the active developer community. With your vehicle now fully integrated into your smart home ecosystem, you’ve eliminated app switching and gained valuable insights that help optimize both your driving experience and home energy usage.


