
Hearing frantic scratching inside walls at 2 AM. Finding greasy rub marks along your baseboards. Smelling that sharp ammonia odor in your pantry. If these nightmares are real for you, immediate rat elimination is non-negotiable. Rats reproduce rapidly, chew through wiring (causing 25% of unexplained household fires), and transmit dangerous diseases like leptospirosis through their urine. Knowing how to kill rats at home requires more than setting a few traps—it demands strategic lethal methods combined with ironclad safety protocols. This guide reveals exactly which rodenticides work fastest, how to deploy traps that guarantee kills, and why sealing entry points is your only permanent solution. You’ll learn to eliminate current infestations while preventing costly re-invasions.
Spot Active Rat Infestations Before Acting
Confirm Rats vs. Mice by Physical Evidence
Don’t confuse mice with rats—treatment differs critically. Norway rats leave dark, capsule-shaped droppings measuring 1-2 cm (about the size of a raisin) near food sources, while roof rats favor attics with slightly smaller pellets. Look for greasy rub marks along walls where their oily fur leaves smudges, or fresh gnaw marks on plastic pipes and wood. Critical mistake: Mistaking mouse droppings (rice-grain sized) for rat evidence leads to underestimating infestation size. If you see droppings larger than 1 cm or hear heavy scurrying at night, you’re dealing with rats requiring aggressive action.
Pinpoint Species to Target Correctly
Norway rats (7-10 inches long) nest in basements and ground floors, creating burrows under foundations. Their presence means focusing on lower-level bait stations. Roof rats (6-8 inches with sleek black/brown fur) climb walls and nest in attics—they’ll ignore ground-level traps. Action step: Place non-toxic tracking powder along suspected routes for 24 hours. Norway rat footprints show larger hind feet (3-4 cm), while roof rats leave narrower prints (2-3 cm). This determines whether to prioritize attic traps or basement bait stations.
Deploy Fast-Acting Chemical Rodenticides Safely

Use Single-Feed Anticoagulants for Guaranteed Kills
Brodifacoum (0.005% concentration) kills within 2-4 days after one feeding—the most reliable DIY option. Place tamper-resistant bait stations (like Tomcat Protecta) every 15-30 feet along walls where droppings appear. Start with 20-40 grams per station, replenishing daily until consumption stops. Pro tip: Rotate bait types weekly (peanut butter, bacon, or fruit-flavored blocks) to prevent bait shyness. Maintain stations for 15-21 days after the last feeding to catch stragglers. Warning: Never use loose pellets—bait blocks in EPA-approved stations prevent accidental pet exposure.
Apply Non-Anticoagulants Only for Extreme Cases
When rats resist anticoagulants, bromethalin (0.01%) causes fatal brain swelling within 24-48 hours but has no antidote. Reserve it for severe infestations where pets/kids can’t access bait stations. Cholecalciferol (0.075%) induces organ failure through calcium overload—place stations behind appliances or in crawl spaces. Critical safety step: Wear nitrile gloves when handling, and monitor stations daily. These carry high secondary poisoning risks to wildlife and pets if carcasses are consumed.
Set Mechanical Traps That Deliver Instant Results
Optimize Snap Trap Placement for Maximum Catches
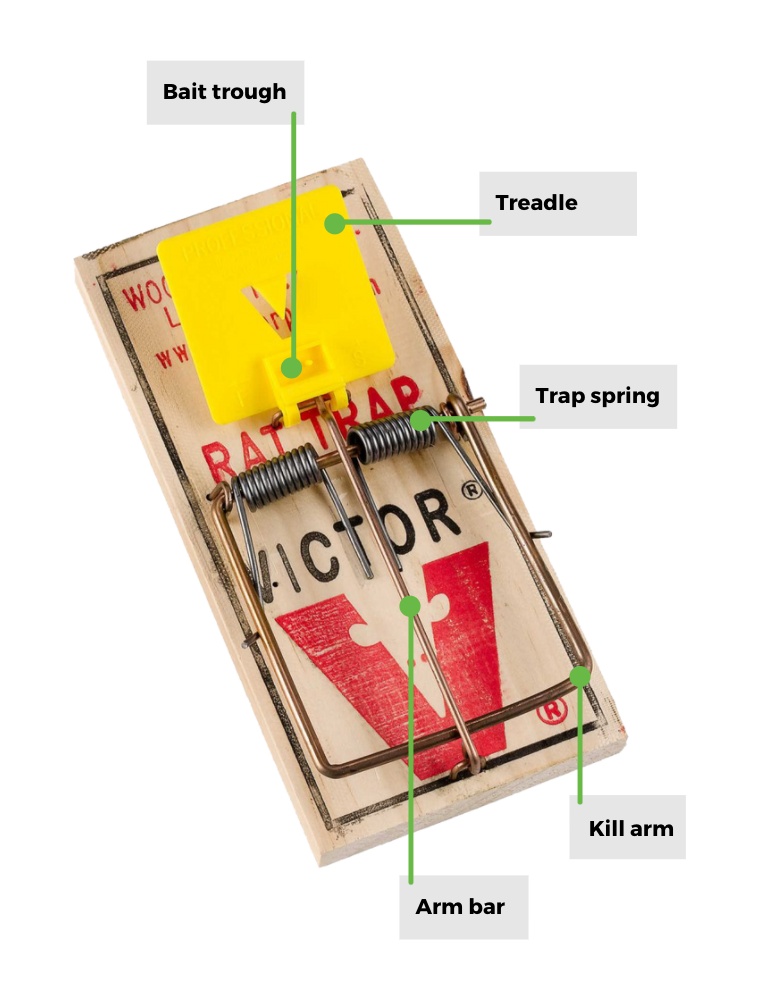
Position 5-10 Victor wooden snap traps per active room, perpendicular to walls with triggers against baseboards. Bait with peanut butter smeared inside the trigger groove (rats lick it off, activating the trap). Common mistake: Placing traps too far from walls—rats hug edges, so move them within 2 inches. For Norway rats, use expanded trigger models (30% higher success rate). Check traps at dawn and dusk when rats are most active. Pro tip: Dust flour around traps to reveal footprints showing travel direction—reposition traps facing the main route.
Leverage Electronic Traps for Hands-Off Elimination
Victor Electronic Rat Traps deliver 8,500v shocks for instant kills using AA batteries (50 kills per set). Position them along walls near entry points like pipe chases. The LED indicator confirms kills without opening the unit—critical for avoiding disease exposure. Time-saving shortcut: Clean metal plates with rubbing alcohol between uses to maintain conductivity. These work best in enclosed spaces like cabinets where rats feel secure. Expect 90% effectiveness when placed in high-traffic zones identified by tracking powder.
Seal Entry Points to Prevent Re-Infestation
Block All Access Routes Permanently
Rats squeeze through quarter-inch gaps—seal these immediately:
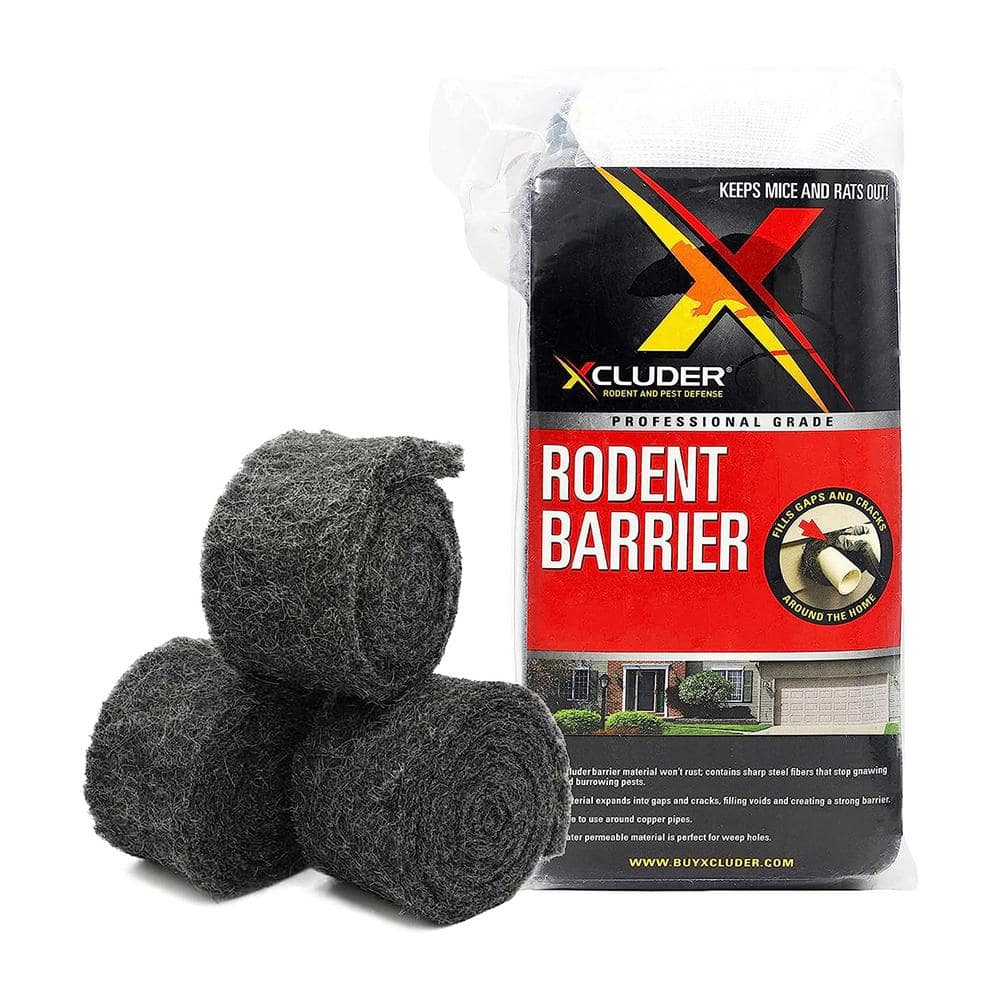
– Holes 1/4″–1/2″: Pack steel wool tightly, then seal with silicone caulk
– Openings >1/2″: Cut hardware cloth (1/4″ mesh) 2 inches larger than the hole, staple securely
– Door gaps: Install 3/4-inch door sweeps
– Pipe penetrations: Wrap copper mesh (Stuf-Fit) around pipes before sealing
Critical mistake: Using expanding foam alone—it’s temporary. Rats chew through it within days. Pro tip: Back foam with sheet metal (26-gauge minimum) for true gnaw-proofing. Focus on foundation vents, attic vents, and utility line entries—these account for 80% of rat invasions.
Execute Safe Carcass Removal and Cleanup
Follow CDC-Approved Decontamination Steps
Never sweep droppings—this aerosolizes hantavirus. Spray contaminated areas with 1:10 bleach solution and let sit 10 minutes before wiping. For carcasses:
1. Spray with disinfectant while wearing N95 mask and nitrile gloves
2. Scoop into double-sealed plastic bags using tongs
3. Dispose per local guidelines (usually household trash)
4. Clean surfaces with enzymatic cleaner like Nature’s Miracle
Time estimate: Allow 2-3 hours for ventilation after cleanup before re-entering the space. Urgent note: If rats nested near HVAC systems, shut off vents immediately to prevent airborne pathogen spread.
Monitor Progress and Prevent Comebacks
Track Elimination Success with Metrics
Measure effectiveness by these benchmarks:
– 90% droppings reduction within 14 days
– Zero bait consumption for 72 consecutive hours
– No sightings for 7 straight days
Use non-toxic talc powder to identify remaining travel routes. Pro tip: Place fresh bait in stations weekly for 3 months—rats may return if exclusion isn’t perfect. Critical maintenance: Inspect sealed entry points quarterly with a flashlight; rats weaken barriers over time.
Switch to Long-Term Prevention Immediately
Starve rats by eliminating attractants:
– Store all food in metal/glass containers (plastic is chewable)
– Remove pet food bowls after meals
– Fix dripping faucets—they need only 1 oz of water daily
Seasonal urgency: Increase monitoring in September/October when rats seek winter shelter. Elevate woodpiles 18 inches off ground and trim tree branches 3 feet from your roof. Final note: If you see 5+ rats or find them in kitchens within 2 weeks of starting treatment, call professionals—DIY methods fail in 40% of severe infestations.
Final Elimination Strategy: Combine snap traps and anticoagulant bait stations for the first 14 days. Simultaneously seal every entry point larger than a quarter. By day 21, reduce bait stations but intensify exclusion checks. Continue monthly inspections for 6 months—rats test barriers relentlessly. Remember, how to kill rats at home isn’t just about lethal methods; it’s about removing their reason to stay. With proper sealing and sanitation, you’ll achieve permanent results while protecting your family from disease and fire risks. Start tonight—every hour counts when rats are in your walls.


