
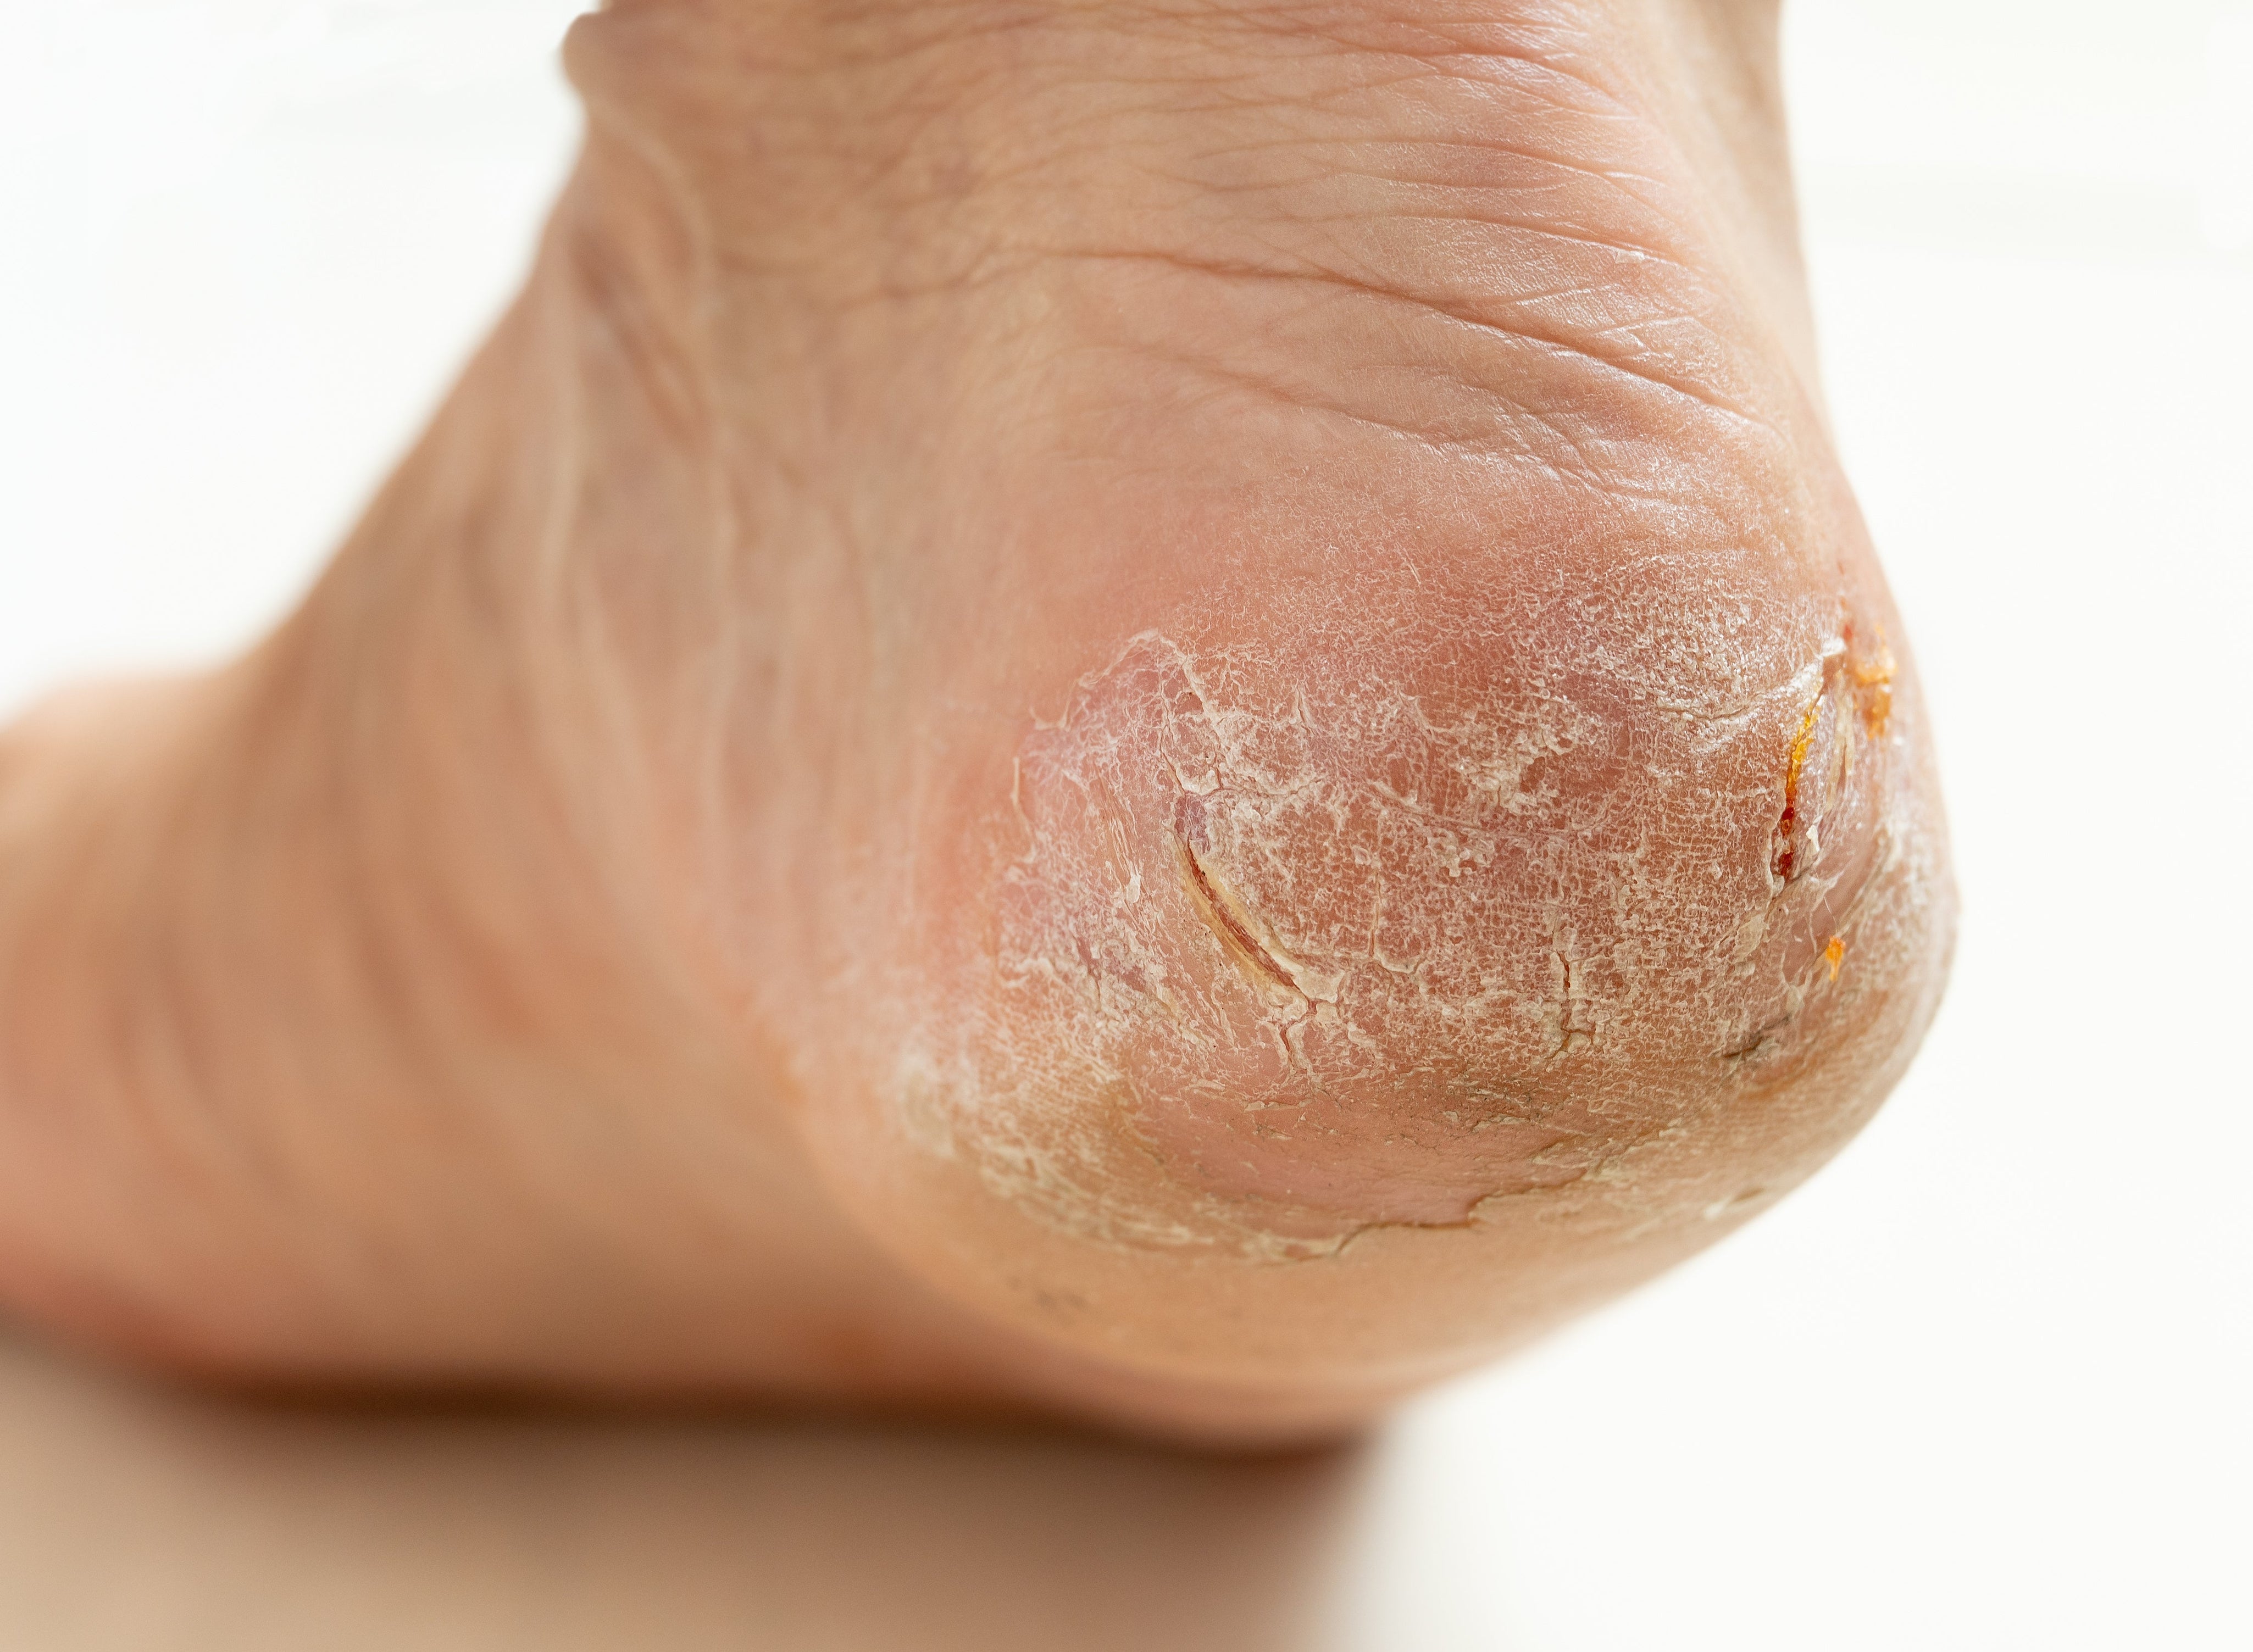
That uncomfortable, rough patch on your heel or the ball of your foot isn’t just unsightly—it’s your body’s SOS signal. Foot calluses develop when skin repeatedly rubs against shoes or the ground, creating thick, hardened layers that protect against pressure. Left untreated, these rough patches can crack painfully, making every step feel like walking on gravel. What’s worse? Many people accidentally worsen their calluses with improper home treatments that damage healthy skin.
The good news is you can safely remove foot calluses at home with the right approach—no expensive salon visits needed. This guide reveals the exact methods podiatrists recommend for effective callus removal using affordable, drugstore tools. You’ll discover precisely how to soften, exfoliate, and protect your feet without risking cuts or infections. Most importantly, you’ll learn the prevention strategies that stop calluses from returning.
Essential Tools for Safe Callus Removal at Home

Skip the guesswork with these proven supplies that make all the difference between success and skin damage.
Critical Exfoliation Tools You Need
– Pumice stone (natural volcanic rock with medium grit)
– Metal foot file with replaceable blades
– Professional-grade callus shaver (for extreme cases only)
– Deep foot basin for therapeutic soaking
– Microfiber towels for gentle drying
Must-Have Treatment Products
– Epsom salts for deep softening
– Medical-grade foot cream with 40% urea
– Salicylic acid treatment (10-20% concentration)
– Pure petroleum jelly for overnight sealing
– Tea tree oil (3-4 drops for antibacterial protection)
Protective Supplies for Healing
– Gel cushioning pads for pressure points
– Bamboo fiber socks that wick moisture
– Plastic wrap for intensive overnight treatments
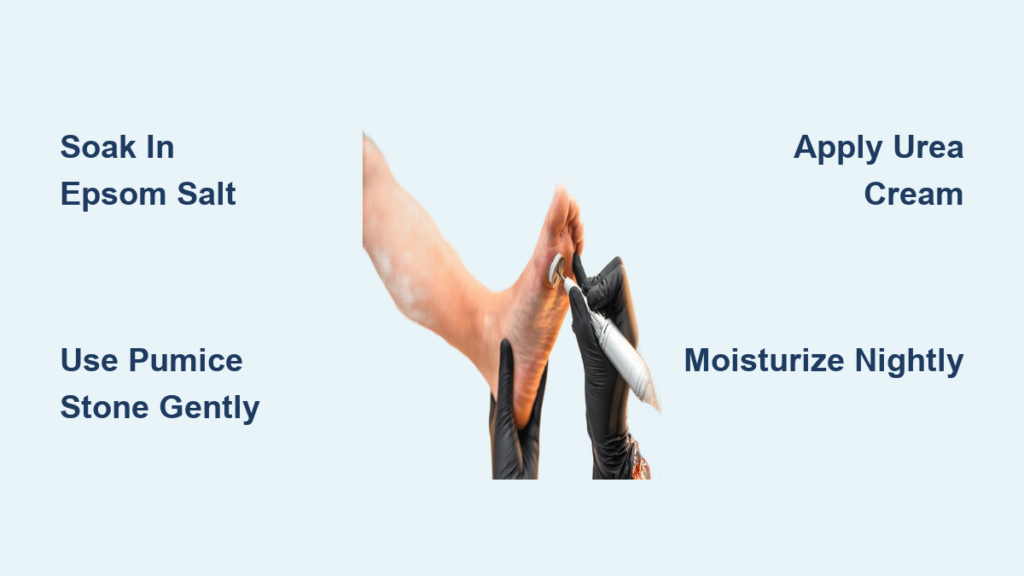
4-Step Process to Remove Foot Calluses Without Injury
Soften Calluses Properly Before Touching Them
Never attempt to remove dry calluses—that’s how you damage healthy skin. Start with a strategic 20-minute soak:
Fill your basin with comfortably warm water (test with your wrist). Add 2 tablespoons Epsom salt and 3-4 drops tea tree oil. Keep water temperature consistent by adding hot water as needed. During soaking, massage your feet to boost circulation and identify exactly where the callus ends and normal skin begins—this prevents over-exfoliation.
Pro tip: Add 1 tablespoon of baking soda to the soak for extra softening power, especially for stubborn heel calluses.
Exfoliate Using the Right Technique for Your Callus Type
After soaking, pat feet dry but leave skin slightly damp for easier exfoliation.
For moderate calluses: Use a wet pumice stone in gentle circular motions for 2-3 minutes. Apply light pressure—think “buffing” not “scrubbing.” Rinse the stone every 30 seconds to maintain effectiveness.
For thick calluses: Hold a metal foot file at a 45-degree angle and use long, single-direction strokes. Check progress every few strokes and stop immediately when you see healthy pink skin.
Warning: Only use a callus shaver on extremely thick calluses after professional consultation. Stretch skin taut and use feather-light strokes in the direction of hair growth. Never attempt to remove the entire callus in one session.
Apply Chemical Treatments That Actually Work
After mechanical exfoliation, enhance results with targeted chemical treatments:
- Salicylic acid: Apply 20% gel directly to remaining callus. Leave for 10-15 minutes, then rinse. This breaks down keratin bonds between dead skin cells.
- Urea cream: Massage 40% urea cream into treated areas. This medical-grade treatment both exfoliates and deeply moisturizes.
- Lactic acid: Use 15% lactic acid lotion for gentle daily maintenance between intensive treatments.
Important: Always patch test new chemical treatments on a small area first to check for sensitivity.
Lock in Moisture with Professional-Grade Sealing
Immediately after treatment, apply a thick layer of moisturizer while skin is still slightly damp:
- Use generous amounts of foot cream (don’t skimp)
- Massage in circular motions for 2-3 minutes
- Apply petroleum jelly over cream for extra sealing
- Put on clean bamboo fiber socks immediately
- For overnight treatment, wear socks to bed
Pro tip: For extreme dryness, wrap treated areas in plastic wrap for 30 minutes before putting on socks—this creates a greenhouse effect for deeper penetration.
Prevent Callus Recurrence with Daily Foot Care Habits
Morning Routine (Under 2 Minutes)
Apply lightweight foot cream with SPF before shoes. Always check shoe fit—tight footwear causes new calluses within hours. Rotate shoes daily to prevent consistent pressure on the same spots.
Evening Recovery Protocol
Wash feet thoroughly with mild soap, dry completely (especially between toes), and apply intensive moisturizer. Use this time to inspect for early callus formation—catching it early prevents major problems.
Weekly Maintenance Schedule
- Day 1: Long soak (20 minutes) + gentle pumice treatment
- Day 3: Apply urea cream or salicylic acid treatment
- Day 5: Intensive overnight moisturizing session
- Day 7: Light maintenance exfoliation
When to Stop Home Treatment and See a Professional
Immediate Warning Signs
Stop all home treatment and consult a podiatrist if you notice:
- Bleeding or open wounds from exfoliation
- Redness, warmth, or pus indicating infection
- Severe pain that affects normal walking
- Diabetes with any foot changes
- Numbness or tingling in affected areas
Professional Solutions for Stubborn Cases
When home methods fail, podiatrists offer:
- Sterile debridement (professional callus removal)
- Prescription-strength chemical treatments
- Custom orthotics to address pressure points
- Gait analysis to correct underlying causes
Equipment Safety Rules You’re Probably Ignoring
Tool Maintenance Checklist
– Disinfect all tools weekly with 70% isopropyl alcohol
– Never share foot care tools with household members
– Replace pumice stones every 2-3 months (when surface smooths)
– Store tools in a dry place to prevent bacterial growth
Critical Safety Steps
– Always test water temperature with your wrist first
– Stop immediately at the first sign of pain or blood
– Start with gentlest methods before progressing
– Skip aggressive treatments if you have diabetes or poor circulation
Troubleshooting Common Callus Removal Problems
Over-Exfoliation Recovery Plan
Made skin too sensitive? Stop all exfoliation immediately. Apply healing ointment like Aquaphor, protect with non-stick bandages, and wear cushioned socks. Resume treatment only after complete healing—usually 1-2 weeks.
Stubborn Callus Solution
If calluses persist after 2 weeks of consistent treatment:
– Re-evaluate your footwear—poor fit is the #1 cause
– Increase moisturizing frequency to twice daily
– Alternate between pumice stone and foot file
– Consult a podiatrist for underlying structural issues
Long-Term Callus Prevention Strategy
The real secret to permanently removing foot calluses isn’t just treatment—it’s prevention. Invest in properly fitting shoes with adequate cushioning and arch support. Perform daily foot stretches to maintain flexibility. Most importantly, maintain your weekly maintenance routine even after calluses disappear.
Consistent home care delivers visible improvement within 2-4 weeks, but maintaining results requires ongoing attention. Healthy feet support your entire body—don’t sacrifice comfort for style. With these proven methods, you’ll walk comfortably through every season without dreading your next step.
Final Tip: Take monthly photos of problem areas to track progress. This visual feedback keeps you motivated and helps adjust your treatment plan as needed. Your feet carry you through life—give them the care they deserve.


