
Water stains spreading across your ceiling? You’re not alone—mobile home roofs face unique challenges from weather extremes, age, and structural limitations. Whether you’re battling persistent leaks or planning a complete overhaul, knowing how to fix a mobile home roof properly can save you thousands in repair costs and prevent catastrophic interior damage. This guide delivers professional-grade solutions without the professional price tag.
You’ll learn to diagnose problems like a pro, execute repairs safely, and make smart decisions about when to patch versus replace. Let’s transform your roof from liability to fortress with proven techniques that stand up to real-world conditions.
Pinpointing Your Mobile Home Roof’s Weak Spots
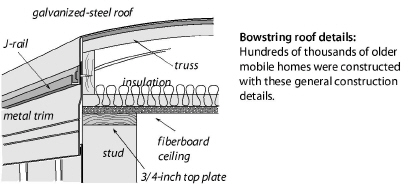
Flat vs Peaked Roof Failure Patterns
Mobile homes typically feature either low-slope (flat) roofs or peaked designs, each with distinct failure patterns. Flat roofs collect water and debris, leading to ponding issues that accelerate deterioration within months. Peaked roofs handle drainage better but face wind uplift problems at seams and edges—especially where panels meet walls.
Critical structural differences:
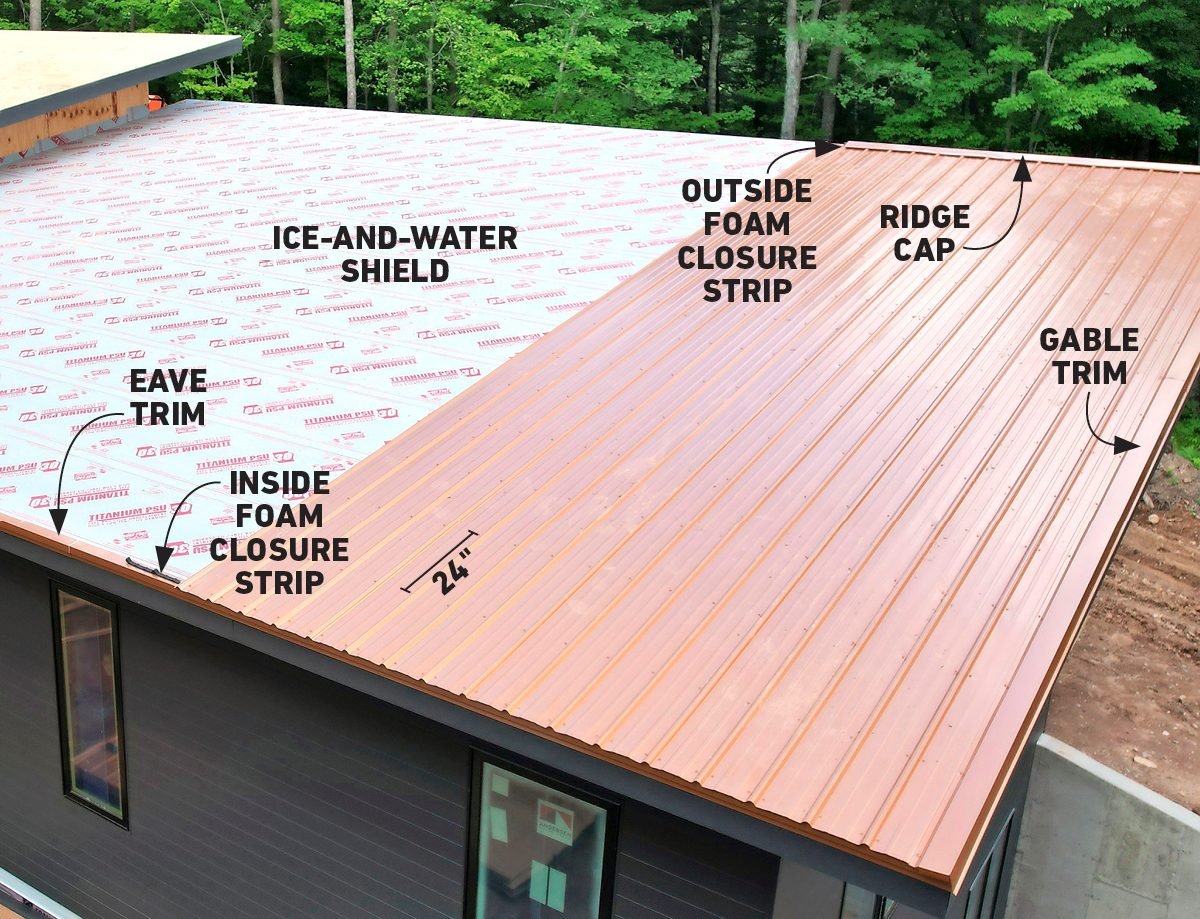
– Flat roofs: Use membrane systems (EPDM/TPO) with minimal pitch—requires perfect drainage
– Peaked roofs: Utilize manufactured truss systems with 2×2 or 2×4 lumber—vulnerable to wind damage
– Metal panels: Corrugated steel or aluminum—rust at fasteners is inevitable without maintenance
– Asphalt shingles: 3-tab or architectural—prone to blow-offs during high winds
Leak Hotspots That Demand Immediate Attention
Focus your inspection on these high-risk areas where 80% of mobile home leaks originate:
Emergency inspection targets:
– Vent pipes and skylights (failed rubber boots cause mysterious stains)
– Roof-to-wall intersections (step flashing failures create hidden damage)
– Ridge caps and hip joints (wind-driven rain exploits weak seams)
– Chimney flashing (often improperly installed on factory-built homes)
– Roof seams on metal systems (deteriorating sealant invites moisture)
Structural red flags requiring professional evaluation:
– Sagging between trusses (indicates rot or structural compromise)
– Soft spots when walking (water damage weakening decking)
– Rust bleeding through metal panels (advanced corrosion)
– Missing or loose fasteners (accelerates wind damage)
Emergency Leak Repair Tactics That Buy Time
Shingle Roof Emergency Patch Sequence
Small leaks turn catastrophic fast. Here’s the proven 5-step patch sequence that works:
- Locate precisely: Follow water stains to source during active rain
- Remove damaged area: Pry up 2-3 shingles above leak with flat bar
- Cut replacement: Size new shingle 1/2″ smaller all around for proper fit
- Slide and secure: Work new shingle under existing courses using roofing nails
- Seal permanently: Cover nail heads and edges with roofing cement
Critical mistake to avoid: Never patch over wet surfaces. Trapped moisture accelerates rot within weeks. Allow 48 hours drying time after rain before applying repairs.
Metal Roof Rust Hole Fix in Under 20 Minutes
Rust holes smaller than 2 inches demand immediate attention before they spread:
- Wire brush area to bare metal (remove all loose rust)
- Apply rust converter (phosphoric acid-based formula)
- Cut aluminum patch 3 inches larger than damage on all sides
- Seal perimeter with butyl tape before screwing every 2 inches
- Cover with matching paint within 24 hours for invisible repair
Pro tip: Keep a metal repair kit in your shed—most mobile home leaks happen during storms when stores are closed.
Structural Repair Essentials for Long-Term Fixes
Rotten Decking Replacement Protocol
Sagging or soft spots indicate serious decking damage requiring immediate action:
Step-by-step replacement:
1. Expose damage: Remove roofing 2 feet beyond visible soft spots
2. Mark carefully: Chalk lines must align with truss positions below
3. Cut clean: Use circular saw set to 5/8″ depth (standard roof deck thickness)
4. Support properly: Install 2×4 blocking between trusses for solid attachment
5. Install new deck: Use exterior-grade plywood, stagger seams for strength
Weight warning: New plywood adds 3 pounds per square foot. Verify existing truss capacity matches original design specs—overloading causes collapse.
Membrane Roof Patching That Won’t Fail
EPDM and TPO systems require specialized techniques for lasting repairs:
Critical success factors:
– Clean with manufacturer-approved cleaner (isopropyl alcohol works for most)
– Apply primer to both surfaces (wait 5-10 minutes for proper adhesion)
– Use 6″ wide seam tape, roll firmly with steel roller for complete contact
– Apply additional bead of lap sealant on edges for weatherproofing
– Test with soapy water spray—no bubbles means perfect seal
Sealant Secrets Professionals Won’t Tell You
Elastomeric Coating Application Process
Transform your roof’s lifespan with reflective coatings using this pro method:
Preparation sequence:
– Power wash at 1500 PSI minimum (remove all debris and loose particles)
– Allow 48-hour drying time (critical for adhesion—no shortcuts)
– Repair all cracks larger than 1/8 inch with roofing cement
– Mask edges with painter’s tape for clean, professional lines
Application mastery:
– Use 3/4″ nap roller for even coverage (avoid thick globs)
– Work in 4×4 foot sections maintaining wet edge
– Apply 2-3 thin coats (total coverage: 100 square feet per gallon)
– Temperature range: 50°F to 90°F only (check forecast!)
Performance specs: Quality coatings reflect 85% solar heat and stretch 300% without breaking—ideal for mobile home roof movement.
Ventilation Fixes That Stop Ceiling Stains
Vent Boot Replacement in 6 Minutes
Failed vent boots cause mysterious ceiling stains that spread rapidly:
Standard installation:
1. Remove 3 shingles surrounding vent pipe (use flat bar)
2. Cut away old boot completely with utility knife
3. Slide new rubber boot over pipe (lubricate with soapy water)
4. Position base flange under upper shingles (critical for water shedding)
5. Nail every 3 inches through flange with galvanized nails
6. Apply sealant bead around pipe/boot junction
Metal roof adaptation: Use neoprene boots with aluminum bases. Install storm collar above boot for weather protection—prevents 90% of vent leaks.
Emergency Tarp Installation That Survives Storms
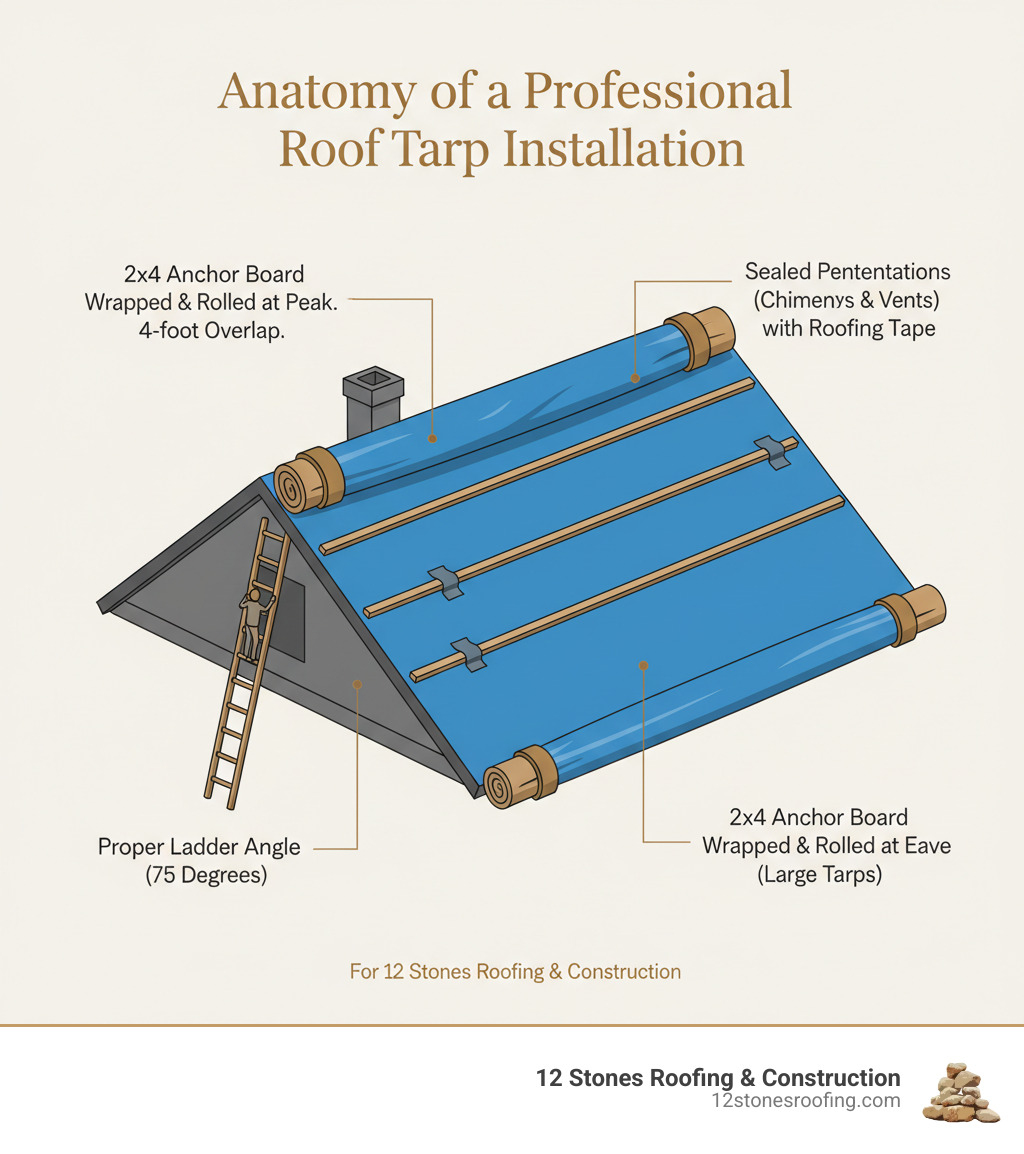
Pro Tarp Technique for Mobile Home Roofs
When leaks threaten your interior, proper tarp installation prevents disaster:
Step-by-step emergency fix:
1. Use 6-mil polyethylene minimum (blue tarps fail within days)
2. Extend 4 feet past damage in all directions (minimum coverage)
3. Secure with 2×4 battens screwed through tarp into roof structure
4. Create water-shedding overlaps (like shingles—never flat seams)
5. Seal edges with roofing cement where possible
Critical warning: Never rely on nails alone—wind lifts tarps secured only with nails. Battens screwed directly into roof structure provide 10x more holding power.
Preventative Maintenance That Cuts Repair Costs
Seasonal Inspection Checklist
Prevent expensive fixes with systematic maintenance:
Monthly checks (spring through fall):
– Visual scan from ground level (binoculars help spot early damage)
– Clear gutters and downspouts (clogs cause ice dams in winter)
– Check for loose or damaged material (especially after storms)
– Trim branches touching roof (prevents abrasion and debris)
Quarterly deep inspection:
– Walk roof carefully during dry conditions (test soft spots first)
– Check all sealants and caulk joints (replace cracked material)
– Tighten loose screws and fasteners (prevents progressive damage)
– Clean debris from valleys and low spots (trapped moisture rots decking)
Pro tip: Schedule inspections after major storms—small fixes prevent big problems when caught early.
Budget-Smart Repair Decisions
When to Patch vs Replace Your Mobile Home Roof
Repair if:
– Damage covers less than 15% of roof surface
– Underlying structure remains sound
– Roof is less than 10 years old
– You can address problem within 48 hours of discovery
Replace if:
– Multiple leaks across different roof areas
– Visible sagging between trusses
– Widespread rust on metal roofs
– Previous repairs failed within 6 months
Cost reality check: Minor repairs save 60-70% versus professional service. But complex structural work requires licensed contractors—your safety isn’t worth risking.
Final Leak-Proofing Strategy
Your mobile home roof protects everything beneath it. When learning how to fix a mobile home roof, remember that 80% of leaks require only basic repairs when caught early. Start with the simplest solution first—patch small leaks immediately before they cause structural damage.
When structural integrity is questionable, professional consultation isn’t optional—it’s essential. Your safety and your home’s longevity depend on knowing when to call in experts.
Plan repairs during favorable weather, gather materials beforehand, and work systematically. A well-maintained mobile home roof provides decades of protection and significantly impacts resale value. Implement these proven techniques and you’ll transform your roof from a constant worry to a reliable shield against the elements.


