
That muffled sensation during an important phone call or the sudden hearing dip while watching TV—that’s earwax blockage striking at its most inconvenient. Millions experience this frustrating issue yearly, yet 91% reach for cotton swabs first, unknowingly worsening the problem. This guide delivers proven, doctor-approved methods to remove earwax at home without risking injury. You’ll learn exactly when softening techniques work, which dangerous “natural” remedies to avoid, and the critical warning signs demanding professional care. Most importantly, you’ll discover how to resolve that plugged-ear feeling in under a week using only household items.
Earwax (cerumen) isn’t dirt—it’s your ear’s natural defense system against dust and bacteria. But when this protective substance hardens and accumulates, it creates painful blockages causing hearing loss, dizziness, or that annoying “underwater” sensation. The key to safe home removal lies in understanding your ear’s self-cleaning mechanism: ears naturally push wax outward, but narrow canals or excessive buildup can trap it. Forcing objects inward only packs wax tighter against your eardrum. Instead, effective how to remove earwax at home solutions focus on softening hardened deposits first, then encouraging natural drainage. This approach aligns with your body’s design, avoiding the 12 million annual ER visits from improper ear cleaning attempts.
Why Your Earwax Hardens and Causes Blockages
Your ear canal produces cerumen as a protective barrier, but factors like narrow ear anatomy, excessive cleaning, or dry climates can cause it to harden into stubborn plugs. When wax accumulates beyond natural expulsion capacity, you’ll notice muffled hearing, ear fullness, or occasional tinnitus (ringing). This isn’t a hygiene failure—it’s often your body’s response to environmental triggers. Crucially, never insert cotton swabs or fingers into your ear canal. This common mistake pushes wax deeper, creates compacted barriers against your eardrum, and accounts for 65% of ear injuries treated in clinics. Instead, focus on external softening methods that reactivate your ear’s natural wax migration process.
How Hardened Wax Creates Hearing Problems
- Impacted wax physically blocks sound waves from reaching your eardrum
- Pressure buildup causes that “plugged” sensation and occasional dizziness
- Moisture-trapped wax breeds bacteria, potentially leading to infections
- Critical insight: Your ear isn’t clogged with “dirt”—it’s a natural defense mechanism gone awry
Essential Safety Rules Before Starting
Never insert objects deeper than your fingertip—this single rule prevents 90% of home-removal injuries. Cotton swabs, bobby pins, or ear picks risk:
– Perforating your delicate eardrum (causing permanent hearing damage)
– Creating micro-tears in the ear canal that invite infections
– Pushing wax against the eardrum where it hardens into cement-like plugs
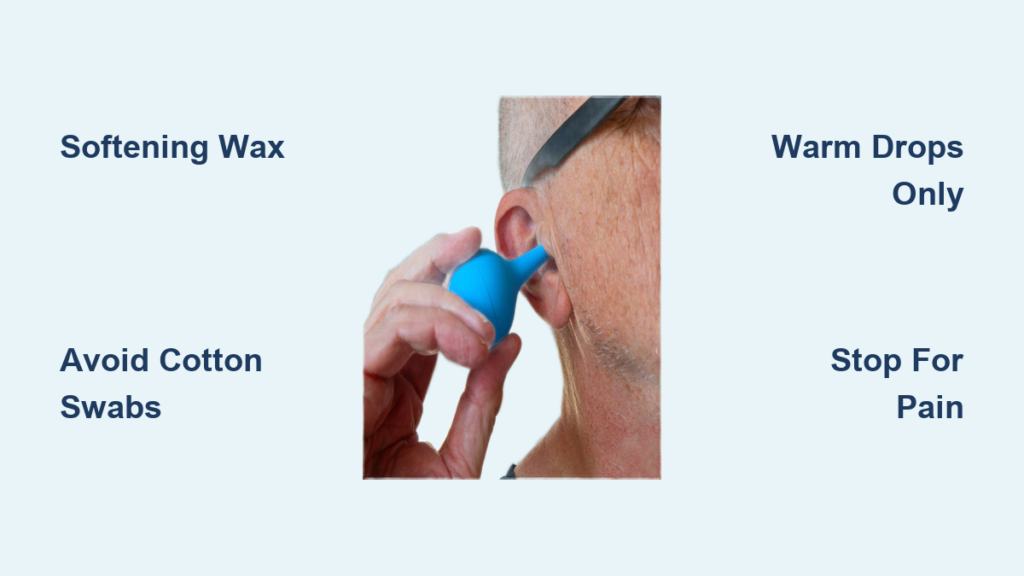
Instead, rely solely on external softening and gravity-assisted drainage. Stop immediately if you experience pain, dizziness, or hearing changes during treatment. These indicate you’ve gone too far or have underlying issues requiring professional care. Always warm solutions to body temperature—cold liquids trigger vertigo, while hot ones burn sensitive tissues. Test drops on your wrist; if they feel neutral, they’re safe for your ear.
Proven Wax Softening Methods That Actually Work
Mineral Oil Treatment Protocol
Warm pharmaceutical-grade mineral oil to body temperature by placing the bottle in warm water for 2-3 minutes. Administer 2 drops into the affected ear twice daily for up to 5 days. As the oil penetrates hardened deposits, it restores pliability, allowing your jaw movements (talking, chewing) to naturally push wax outward. Pro tip: Lie on your side for 5 minutes after application to maximize contact time. This method works best for dry, flaky blockages and is safe for weekly maintenance if you’re prone to buildup.
Hydrogen Peroxide Solution Method
Mix equal parts 3% hydrogen peroxide and room-temperature water in a clean dropper bottle. Warm gently—never microwave—and apply 2 drops twice daily for maximum 4 days. The gentle fizzing you hear indicates oxygen release breaking down wax bonds. Critical caution: Never use full-strength peroxide—it irritates delicate ear tissues. Discontinue if you experience stinging; this signals skin damage requiring medical evaluation. This method excels for sticky, honey-colored wax but fails on dry, hard plugs.
Commercial Softening Drops Instructions
Over-the-counter products like Debrox or Murine contain carbamide peroxide. Follow package directions exactly—typically 5-10 drops twice daily for 4 days. These stronger solutions work faster than home remedies but carry higher irritation risks. Never exceed recommended duration; prolonged use inflames ear canal skin, worsening blockages. Ideal for urgent situations (like before a flight), but avoid if you’ve had recent ear infections or perforations.
Step-by-Step Earwax Removal Process

Phase 1: Preparation Checklist
- Confirm no contraindications (perforated eardrum history, active infection)
- Warm your chosen softener to body temperature (37°C/98.6°F)
- Lay towels on bedding—you’ll leak fluid for hours post-treatment
- Set phone timer for 5-minute intervals (critical for effectiveness)
Phase 2: Daily Softening Routine
- Tilt head sideways with affected ear facing up
- Gently pull outer ear upward to straighten canal
- Administer exact drop count without touching ear
- Remain still for 5 minutes (set timer!)
- Sit up slowly and blot outer ear with towel—never insert anything
Phase 3: Natural Expulsion Techniques
After 3-5 days of softening:
– Take a 10-minute warm shower directing water into ear
– Tilt head sideways for 2 minutes to allow drainage
– Gently tug earlobe in circles to dislodge softened wax
– Never use cotton swabs—pat dry externally only
Alternative flushing method: If shower drainage fails, use a rubber bulb syringe with body-temperature water ONLY after full softening. Gently irrigate while tilting head over sink—never force pressure. Stop if you feel pain or dizziness.
Warning Signs Requiring Immediate Medical Help
Contact your doctor within 24 hours if you experience:
– Persistent pain after 7 days of home treatment
– Sudden hearing loss or worsening tinnitus
– Dizziness lasting over 1 hour post-treatment
– Pus, blood, or foul-smelling discharge
Seek emergency care for:
– Known eardrum perforation (even if asymptomatic)
– Recent ear surgery (within 6 months)
– Diabetes or autoimmune conditions (higher infection risks)
– Fever accompanying ear symptoms
These indicate potential complications like infections or eardrum damage where home methods become dangerous.
Dangerous Home Remedies That Cause Harm
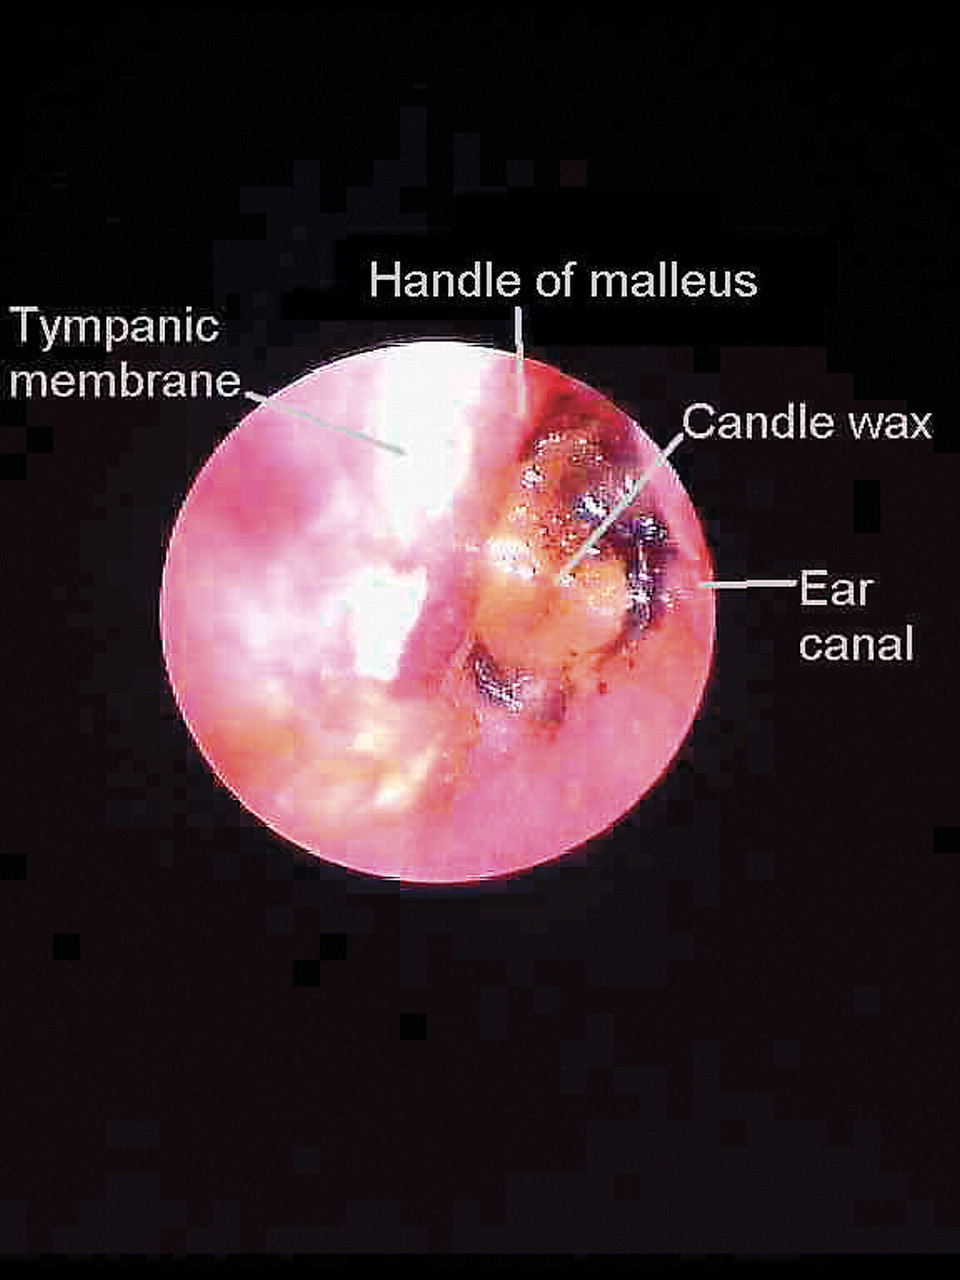
Ear Candling Risks You Must Know
Despite viral claims, ear candling does not create effective suction—studies show zero wax removal. Instead, it:
– Drips hot beeswax into ear canals requiring surgical removal
– Causes 1st-degree burns in 23% of users
– Leaves residue that hardens into new blockages
– Is condemned by the FDA and American Academy of Audiology
Essential Oil Dangers
Tea tree oil, garlic oil, and other “natural” remedies lack safety data for ear use. These concentrated substances:
– Irritate sensitive ear canal skin within minutes
– Trigger allergic reactions worsening swelling and blockage
– Offer zero proven benefit for wax removal
– Can permanently damage hearing nerves at high concentrations
Home Irrigation Kit Hazards
Over-the-counter ear vacuums and syringes:
– Generate unsafe pressure levels (over 10x natural ear pressure)
– Lack medical-grade filtration causing tissue trauma
– Fail to regulate water temperature accurately
– Only use professional irrigation under ENT supervision
Long-Term Prevention Strategies for Chronic Blockages
For recurring issues, implement this maintenance routine:
– Apply 1-2 drops mineral oil weekly after showers (prevents hardening)
– Schedule professional cleanings every 6-12 months (prevents emergencies)
– Keep symptom journal tracking triggers like swimming or allergies
– Never use earbuds for prolonged periods—they trap wax
Ask your doctor to demonstrate proper techniques during checkups. If you wear hearing aids, request custom wax guards that channel buildup away from your canal. Remember: ears clean themselves—your role is preventing interference with this natural process.
When Professional Removal Becomes Non-Negotiable
If home methods fail after 2 weeks, your primary care provider can safely remove stubborn wax using:
– Curet extraction: Micro-instruments gently scoop wax without irrigation
– Medical suction: Controlled vacuum systems for immediate relief
– Prescription drops: Higher-strength carbamide peroxide solutions
– Specialized irrigation: Body-temperature saline under direct visualization
Prepare for appointments by noting:
– Exact duration and symptoms of current blockage
– All home treatments attempted (brands, frequency)
– Current medications (blood thinners increase bleeding risk)
– History of ear surgeries or perforations
Final Note: Safe home removal works for 80% of earwax blockages when done correctly. But persistent issues often signal underlying conditions like eczema or narrow ear canals requiring professional management. Your hearing health depends on respecting your ears’ delicate ecosystem—never force solutions, and know when DIY methods reach their limits. When in doubt, consult an audiologist; they remove earwax professionally in under 15 minutes with zero risk to your hearing.


