
Your mobile home’s skirting isn’t just cosmetic—it’s your first line of defense against pests, weather damage, and costly energy loss. When your skirting fails, you face frozen pipes in winter, rodent invasions, and dramatically reduced property value. This guide delivers exactly what you need to know about how to install mobile home skirting properly the first time, whether you’re replacing damaged panels or installing skirting on a new setup.
Most homeowners save $1,500-$3,000 by tackling this project themselves instead of hiring professionals. By following these proven steps, you’ll create a weather-tight, code-compliant barrier that enhances curb appeal while protecting your investment for years to come.
Measure Your Mobile Home Perimeter with Precision
Calculate Total Linear Footage Correctly
Start by measuring each side of your mobile home with a 25-foot tape measure, writing down each dimension separately. Don’t assume symmetry—even factory-built homes develop slight variations as they settle. Add these measurements together, then increase the total by 10% to cover cutting mistakes and complex corners. For a standard 14×70 mobile home, you’ll need approximately 168 linear feet of skirting material.
Pro tip: Measure at multiple points along each wall since settling often creates height differences of several inches. Mark these variations on a simple sketch of your home’s footprint.
Determine Exact Height Requirements
Measure from ground level to your home’s bottom edge every 4-6 feet around the entire perimeter. Record both your highest and lowest measurements—this range determines your panel height strategy. Most installations require panels between 24-36 inches tall, but don’t guess; your specific terrain might need panels as short as 18 inches or as tall as 48 inches in problem areas.
Critical note: Never cut all panels to your tallest measurement—this creates unsightly gaps at lower points that invite pests. Custom-cut each panel to its specific location.
Select the Right Skirting Material for Your Climate
Vinyl vs. Metal Performance Comparison

Vinyl skirting costs $1-3 per square foot for basic panels, making it the most budget-friendly DIY option. Premium foam-backed vinyl runs $5-8 per square foot and dramatically improves winter insulation but becomes brittle below 20°F. Metal skirting (steel or aluminum) costs $3-12 per square foot and withstands extreme weather but requires specialized cutting tools and more complex installation.
Real-world insight: In hurricane-prone areas, metal skirting with reinforced fasteners maintains integrity during 100+ mph winds where vinyl would fail.
Climate-Specific Installation Requirements
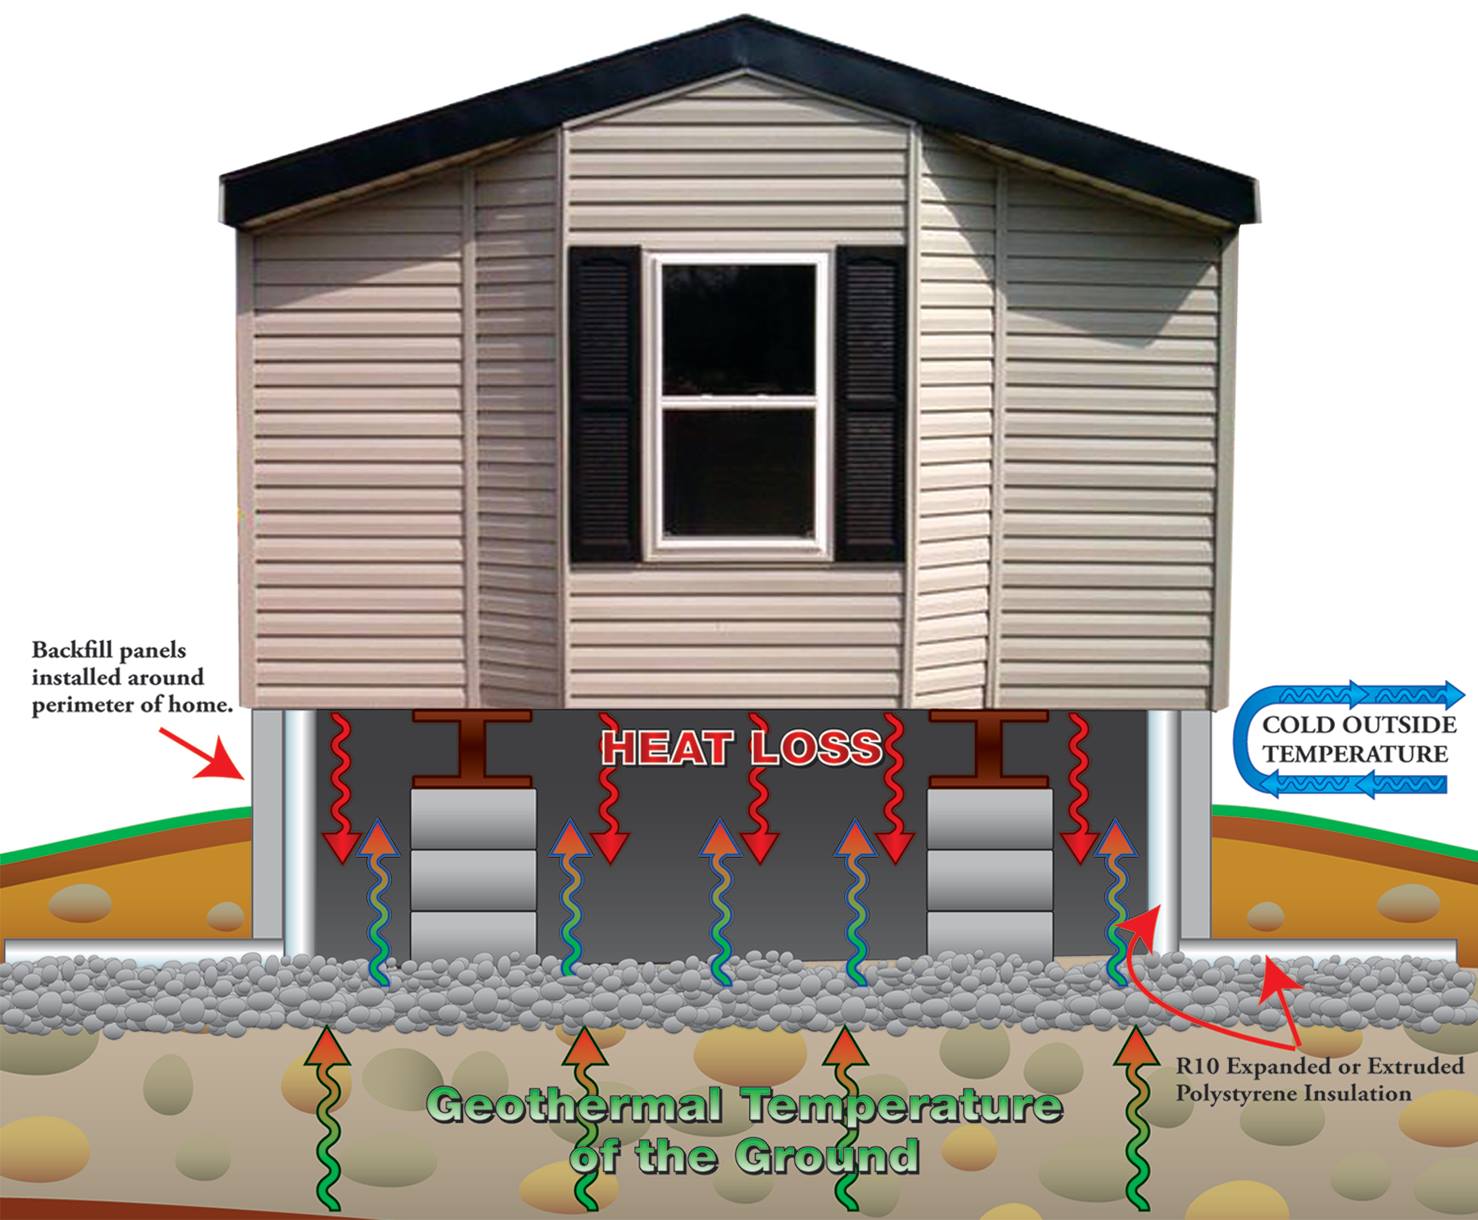
Cold climates demand foam-backed vinyl or metal with thermal breaks to prevent heat loss through the skirting. Standard vinyl panels become dangerously brittle when temperatures drop below freezing. Hot climates benefit from metal’s heat-reflective properties but require expansion gaps to prevent buckling. High-wind regions need metal skirting with fasteners every 8-12 inches—not the standard 16-24 inches—to meet local building codes.
Code alert: Many municipalities now require R-5 insulation value for mobile home skirting in zones with freezing temperatures—check your local requirements before purchasing materials.
Prepare Your Installation Site Properly
Create a Stable Foundation Base
Remove all vegetation, rocks, and debris within 12 inches of your installation line. Excavate 2-4 inches of topsoil along the entire perimeter, laying landscape fabric to prevent future weed growth. Add 2-3 inches of compacted gravel for drainage and stability—this base prevents panels from shifting during freeze-thaw cycles. For sloped areas exceeding 4 inches over 10 feet, install pressure-treated lumber retaining walls before proceeding.
Time-saver: Rent a plate compactor for $50/day to properly compact your gravel base—this prevents future sinking that creates gaps in your skirting.
Establish Your Height Reference Line
Use a water level or laser level to create a consistent height reference from your home’s base to the ground. Mark this line with spray paint every 4 feet—this becomes your visual guide for panel placement. The top of your skirting should sit 1-2 inches below your home’s bottom edge to allow for expansion and drainage.
Visual cue: Look for consistent shadow lines along your home’s underside—these indicate natural settling points that should align with your skirting height.
Install Top Back Rails for Secure Panel Attachment
Mount Rails to Structural Components Only
Position top back rails 1-2 inches below your home’s bottom siding edge, ensuring they’re level across all sections. Drill pilot holes and fasten rails every 16 inches directly into wall studs—not just the siding—for maximum holding power. Use corrosion-resistant screws appropriate for your wall material: #8 x 1-1/2″ wood screws for wood siding, self-tapping metal screws for steel siding.
Warning: Never attach rails to insulation board or thin siding alone—this creates weak points that will pull out during high winds.
Create Seamless Corner Connections
At corners, miter-cut rails at 45-degree angles for clean joints. Pre-drill all fastener holes to prevent splitting, especially with vinyl components. Install corner brackets over joints for added strength—these prevent wind from working panels loose at vulnerable corners.
Cut and Install Panels with Professional Results
Customize Each Panel for Perfect Fit
Measure and mark each panel individually at its installation location—don’t rely on “average” heights. For vinyl panels, score deeply with a utility knife then snap along the score line. Metal panels require tin snips or a circular saw with metal-cutting blade. Always wear safety glasses when cutting to protect against flying debris.
Pro technique: Cut panels slightly short (1/8 inch) rather than too long—this allows for thermal expansion without buckling.
Follow the Correct Installation Sequence
Begin at the least visible corner to perfect your technique before working on prominent sides. Insert each panel’s top edge fully into the back rail channel, then flex the bottom slightly to engage with the ground channel. Work clockwise around your home, staggering vertical seams by at least 6 inches between adjacent panels. Install vent panels every 8-10 feet and within 3 feet of all corners to meet ventilation code requirements.
Troubleshooting tip: If panels won’t engage with ground channels, check for debris in the channel or slight misalignment—you may need to adjust channel position before proceeding.
Complete Your Installation with Weatherproofing Details
Seal All Vulnerable Joints
Apply color-matched silicone caulk at all panel joints, corners, and around access points. For gaps wider than 1/4 inch, insert foam backer rod before caulking. Focus special attention on utility penetrations—these are prime entry points for pests. Smooth caulk beads immediately with a wet finger for professional results.
Install Essential Access Components
Place access doors at all utility connections and crawl space entries—standard sizes are 24×36 inches for main access and 16×16 inches for utility panels. Ensure doors have secure latches and weatherstripping to maintain the weather barrier when closed. Position vents to create cross-ventilation beneath your home, preventing moisture buildup that leads to mold and rot.
Maintain Your Skirting for Long-Term Performance
Implement a Quarterly Inspection Routine
Check your skirting every three months for loose panels, damaged fasteners, or failed sealant. Pay special attention after major storms—wind often works panels loose at corners first. Look for chew marks or burrows indicating pest activity. Tighten loose screws immediately before damage escalates.
Seasonal adjustment: In spring, check for winter damage and reseal failed caulk joints. Before winter, verify all panels are secure and ventilation remains unobstructed.
Fix Common Installation Problems Immediately
Correct Panel Alignment Issues
Bowing panels indicate ground channel misalignment or improper panel engagement. Recheck channel positioning and ensure panels are fully seated at top and bottom. Height discrepancies between adjacent panels require ground preparation adjustments—don’t force panels into position as this creates stress points that lead to future failures.
Prevent Moisture Accumulation
Condensation beneath your home signals inadequate ventilation. Add more vent panels or upgrade to larger models to improve airflow. Ensure proper grading directs water away from skirting—standing water against panels causes premature deterioration. In humid climates, consider adding a vapor barrier beneath your skirting for added protection.
Final note: A properly installed mobile home skirting system pays for itself in energy savings within 2-3 years while dramatically improving your home’s appearance and value. Most DIY installations complete successfully over a weekend with proper planning—follow these steps carefully and you’ll create professional results that stand up to the elements for years to come. Remember that local building codes vary significantly, so always verify specific requirements in your area before purchasing materials.


