
Your garage workshop can handle professional aluminium welding—if you master the unique challenges. Unlike steel, aluminium demands specific techniques that most DIYers overlook, leading to weak joints and frustrating failures. You’ll learn how to weld aluminium at home safely while avoiding the top mistakes that cause porosity, cracks, and burn-through. This guide reveals the exact equipment setup, preparation steps, and welding parameters that produce strong, clean welds on everything from automotive parts to boat repairs—without breaking the bank on professional services.
Essential Safety Gear for Aluminium Welding

Required PPE for Home Welding
Aluminium welding emits intense UV radiation that causes severe burns faster than steel welding. Your safety setup must include these non-negotiable items:
Core Protection Kit:
– Auto-darkening helmet (shade #10-13 specifically for aluminium)
– Flame-resistant jacket or leather sleeves (denim burns through instantly)
– TIG-specific leather gloves (thinner than MIG gloves for precision)
– Safety glasses worn under helmet at all times
– P100 respirator for aluminium oxide fumes
– Steel-toed boots with electrical insulation
Fire Safety Equipment:
– Class D extinguisher for aluminium fires (ABC extinguishers won’t work)
– Fire-resistant welding blanket covering minimum 35 square feet
– ABC extinguisher as secondary backup
Workshop Safety Setup
Create a dedicated welding zone by removing all combustibles within 35 feet. Install exhaust fans pulling minimum 2000 CFM to eliminate dangerous fumes. Test all gas connections with soapy water before each session—aluminium welding requires perfect gas coverage to prevent porosity.
Critical Safety Checklist:
– Verify ventilation fans operate correctly before striking an arc
– Remove flammable liquids and rags from your workspace
– Check ground clamp connections for solid metal contact
– Position fire extinguisher within immediate arm’s reach
Understanding Aluminium Welding Challenges
Why Aluminium Behaves Differently
Aluminium’s unique properties create specific welding challenges you must address:
- Thermal conductivity: 4× higher than steel—heat dissipates rapidly requiring higher amperage
- Oxide layer: Forms instantly at 2072°C, preventing proper fusion if not removed
- No color change: You can’t visually gauge temperature before melting
- High expansion: 2× steel—causes significant warping without proper technique
Choosing Your Aluminium Alloy
| Alloy | Weldability | Best Uses | Prep Requirements |
|---|---|---|---|
| 5052 | Excellent | Marine, automotive | Degrease thoroughly |
| 6061 | Good with filler | Structural frames | Preheat 200-300°F |
| 3003 | Good | HVAC, cookware | Clean only |
| 1100 | Excellent | Electrical work | Wire brush lightly |
Avoid 7xxx series alloys—these crack easily during home welding and require professional techniques beyond DIY capabilities.
TIG vs MIG: Equipment Selection Guide
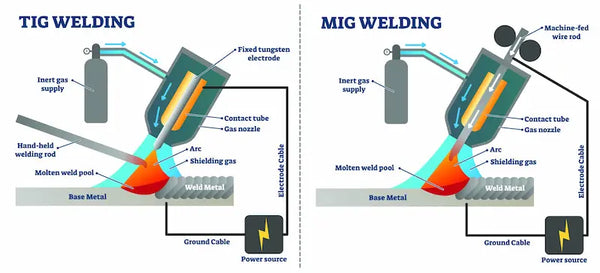
TIG Setup for Beginners (Recommended)
TIG welding offers superior control for aluminium, making it ideal for learning. Your starter kit needs:
Essential TIG Components:
– AC/DC welder with square-wave output (minimum 200A)
– High-frequency start feature (prevents tungsten contamination)
– Foot pedal for precise amperage control
– Pure tungsten electrodes (green band)
– 4043 filler rods (1/16″, 3/32″, 1/8″)
– 100% argon gas at 15-20 CFH
Budget TIG Starter Kit ($800-1200):
– Import AC/DC 200A machine
– Air-cooled 17-series torch
– 80 cu ft argon cylinder (leased)
– Basic filler rod selection
MIG Setup for Production Work
MIG welding aluminium requires specialized equipment to prevent wire-feeding problems:
MIG Requirements:
– Spool gun or push-pull system (standard wire feeders won’t work)
– U-groove drive rolls (prevents crushing soft aluminium wire)
– Teflon liner (reduces friction for smooth feeding)
– 100% argon shielding gas (no CO2 mixtures)
– Aluminium wire (4043 or 5356)
MIG Settings Reference:
| Thickness | Wire Speed | Voltage | Technique |
|———–|————|———|———–|
| 1/16″ | 250-300 IPM | 17-18V | Push 15° angle |
| 1/8″ | 400-450 IPM | 20-21V | Steady travel |
| 1/4″ | 500-600 IPM | 22-24V | Multi-pass |
Critical Material Preparation Steps
Surface Cleaning Protocol
Step 1: Degrease
Apply acetone with lint-free cloth, wiping in one direction only. Change cloths frequently to prevent recontamination. Allow 10 minutes for complete evaporation before proceeding.
Step 2: Oxide Removal
Use a stainless steel brush dedicated solely to aluminium. Brush in the direction of grain lines with light pressure. Clean immediately before welding—oxide reforms within 4 hours.
Step 3: Joint Prep
Bevel joints to 75-degree included angle. Remove 1/16″ from each surface. Finish with 120-grit to minimize contamination before welding.
Proper Fit-Up Techniques
Gap Guidelines:
– Butt joints: 1/16″-1/8″ gap for full penetration
– Corner joints: Tight fit with minimal root opening
– Fillet welds: Maximum 1/32″ gap
Clamping Strategy:
Use aluminium backing bars for heat sinking. Tack weld from center toward ends, spacing tacks every 3-4 inches to control distortion.
Master TIG Aluminium Welding
Arc Starting and Puddle Control
Starting Sequence:
1. Position tungsten 1/8″ above surface
2. High-frequency start—never touch metal
3. Establish puddle within 3 seconds
4. Add filler immediately after puddle forms
Torch Movement:
– Push angle: 15-20 degrees (pulling causes porosity)
– Travel speed: Consistent—watch puddle size for proper heat
– Arc length: 1/8″ or less to maintain gas coverage
Filler Rod Technique
Keep rod within argon envelope throughout welding. Use dip technique: touch rod to puddle edge, withdraw 1/2″. Maintain 15-degree rod angle from surface for optimal fusion.
Common Patterns:
– Stacked dimes: 1/8″ spacing between ripples (indicates proper travel speed)
– Continuous bead: 3/8″ width on thin material (under 1/8″)
– Multi-pass: Maximum 1/4″ single pass width (for thick material)
Fixing Common Welding Defects
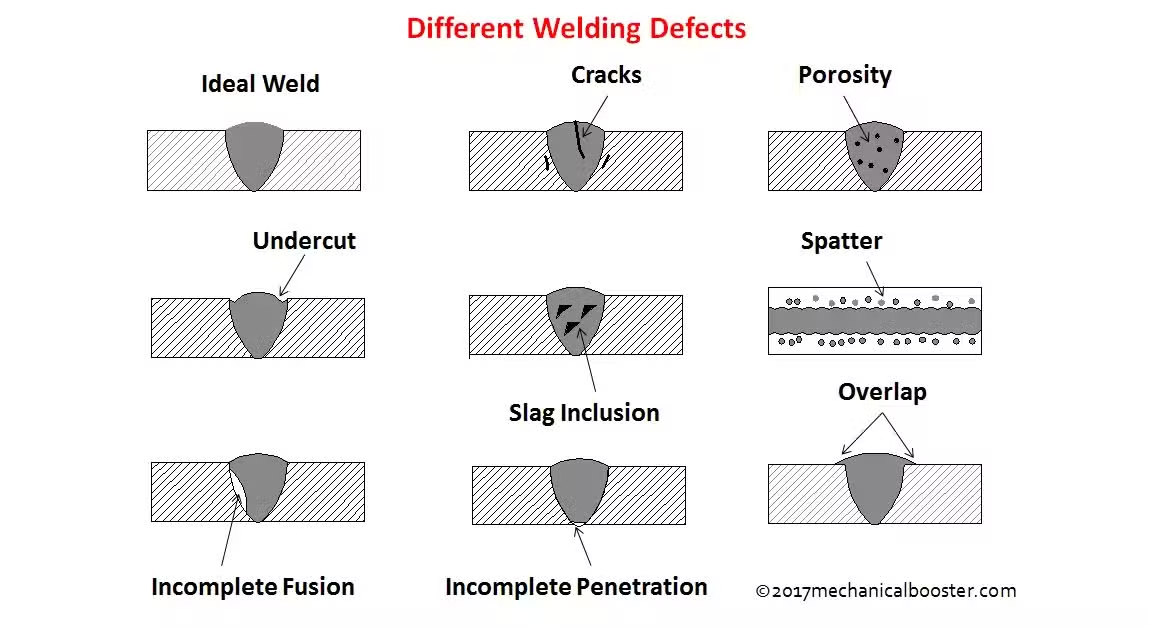
Eliminating Porosity
Root Causes & Solutions:
– Contaminated base metal → Re-clean with dedicated brush
– Inadequate gas coverage → Check for drafts, increase flow to 20-25 CFH
– Dirty filler → Replace at first contamination sign
– Excessive arc length → Maintain 1/8″ maximum
Preventing Cracks
Hot Cracking Prevention:
– Use 4043 filler for crack-sensitive alloys
– Preheat thick sections to 200-300°F
– Peen weld bead while warm to relieve stress
– Reduce heat input with faster travel
Cold Cracking Solutions:
– Store filler rods in dry environment
– Preheat material to drive off moisture
– Use 5356 filler for better ductility
– Allow slow cooling—never quench with water
Post-Weld Processing
Cleaning and Inspection
Immediate Steps:
– Stainless brush while warm (not hot) to remove oxide
– Acetone wipe for residual compounds
– Visual inspection for cracks or porosity
Finishing Options:
– 80-grit flap disc for blending welds
– Scotch-Brite wheels for uniform finish
– Chemical brightening for cosmetic parts
Simple Quality Testing
Home Testing Methods:
– Bend test: 180° bend on 1″ strip (shouldn’t crack)
– Visual: Silver/gold colors acceptable (black indicates contamination)
– Dye penetrant: $30 kit from auto store for crack detection
– Pressure test: 5 PSI air with soapy water for leak detection
Skill Development Roadmap
Progressive Practice Schedule
Weeks 1-2: Puddle control on 1/8″ flat stock (no filler)
Weeks 3-4: Adding filler rod consistently (3″ beads)
Weeks 5-6: 6″ butt joints with 100% penetration
Weeks 7-8: Vertical and overhead positions
Common Beginner Errors
Critical Mistakes to Avoid:
1. Using DC current on aluminium (only AC works)
2. Wrong filler alloy selection (causes cracking)
3. Oversized tungsten for material thickness
4. Contaminated brushes (use dedicated aluminium tools)
5. Skipping cleaning steps (oxide prevents fusion)
Real Project Applications
Building an Aluminium Toolbox
Materials: 0.100″ 5052-H32 sheet, 4043 filler 3/32″
Sequence: Cut → Clean → Tack → Weld → Grind external welds flush
Repairing Lawn Furniture
Challenge: Old, dirty castings with hidden cracks
Solution: Preheat 350°F, use 4043 filler, drill stop-holes, peen while warm
Mastering how to weld aluminium at home requires patience with surface preparation and heat control. Start with thicker material (1/8″) using TIG, then progress to thinner stock and MIG techniques. Your first welds may look rough, but consistent practice on clean material yields professional results within weeks—saving you hundreds on shop repairs while expanding your DIY capabilities.


