

Your bedroom window won’t close properly, cold air seeps through gaps at night, and yesterday you noticed a small crack spreading across the glass. Sound familiar? Before calling an expensive repair service, understand that most common window problems can be fixed with basic tools and patience. This guide walks you through repairing everything from broken glass to stuck sashes, saving you hundreds of dollars while restoring your windows to perfect working condition.
Stop Immediate Window Damage Before It Worsens
Secure Broken Glass Within Minutes
When you notice cracks or broken panes, act quickly to prevent injury and further damage. Tape cracked glass immediately using duct tape in an X pattern across the entire surface—this simple step prevents dangerous shattering while you arrange permanent repairs. For windows with large breaks, especially those above ground level, board up with 1/2-inch plywood cut 2 inches larger than the opening on all sides. Secure with 2-inch galvanized screws into solid framing, pre-drilled every 8 inches to prevent splitting.
Check your window frame’s structural integrity by pressing along the edges. Soft spots indicate rot, while visible gaps between frame and wall suggest larger structural issues. If your window shows signs of frame separation or sits above the first floor, call a professional immediately—these repairs require specialized equipment and expertise.
Identify Your Exact Window Type for Targeted Repairs
Different window styles require specific repair approaches. Single and double-hung windows use counterweights or springs that fail over time. Casement windows rely on crank mechanisms that strip gears. Sliding windows depend on rollers that develop flat spots. Awning windows use scissor hinges that loosen with age.
Look for manufacturer labels on the window frame or hardware—these provide model numbers essential for ordering correct replacement parts. If labels are missing, photograph the hardware and measure glass thickness before visiting suppliers. Most window repairs take 2-4 hours for beginners, saving $200-600 per window compared to professional service.
Fix Stuck Single and Double-Hung Windows in Under 30 Minutes
Replace Broken Sash Cords That Cause Slammed Windows
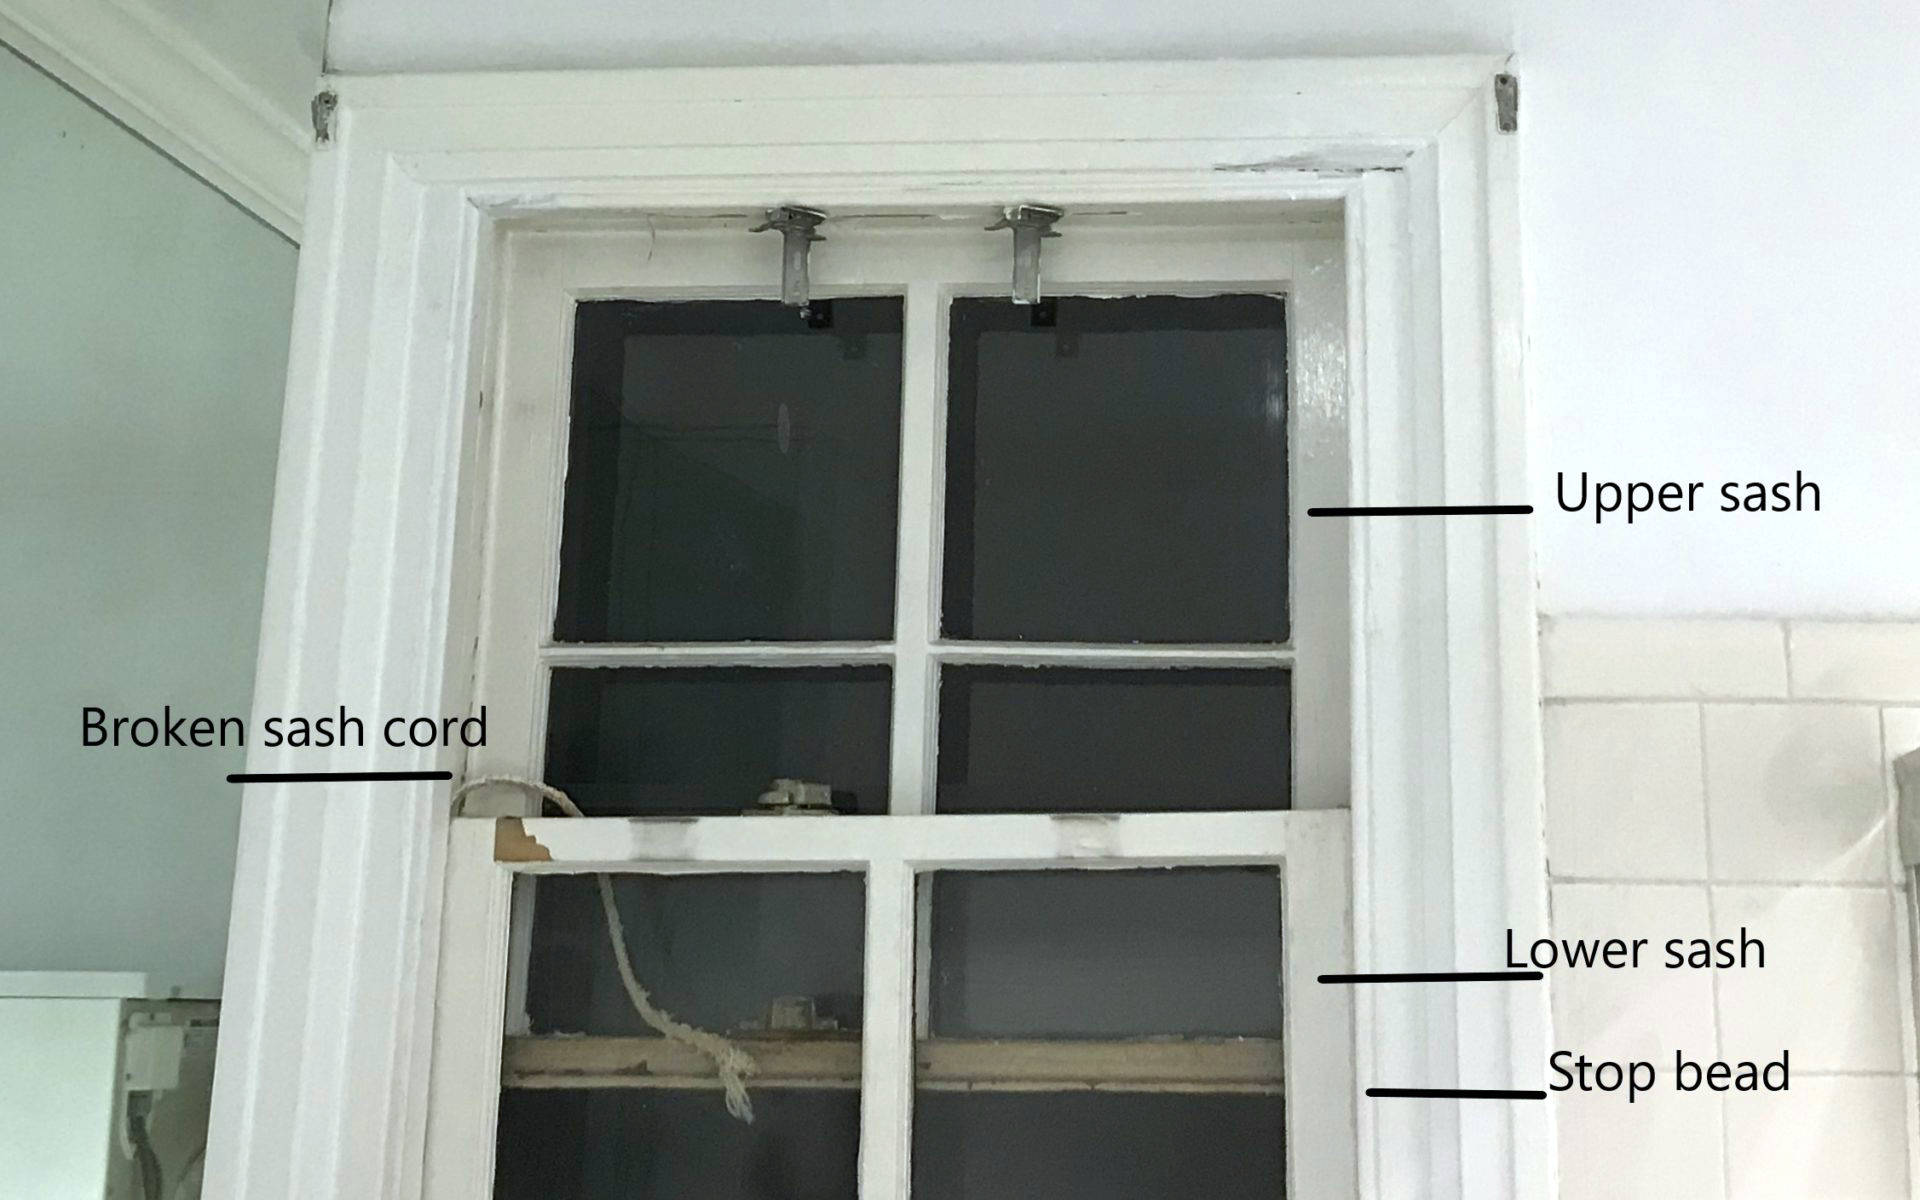
When your window slams shut unexpectedly, broken sash cords are likely culprits. These cotton or nylon cords connect the window sash to counterweights hidden in the frame.
Remove the interior stop molding carefully using a putty knife to avoid cracking the wood. Tilt the lower sash inward and lift it out of the frame. Access the weight pocket through a small door on the window jamb—usually secured with one or two screws. Remove old cord remnants from both the pulley and sash groove.
Feed new 1/4-inch cotton sash cord through the pulley, tying it securely to the cast iron counterweight. Match the weight exactly—weights are typically marked with poundage on the side. Reattach the cord to the sash using a knot and wood screw, ensuring proper tension. Test the balance by raising and lowering the sash—it should stay in position without assistance.
Restore Modern Balance Systems Without Special Tools
Modern windows use spiral balances instead of weights. When these fail, replace the entire cartridge rather than attempting repairs. Remove the sash to access the balance tube, typically held by screws at the top of frame. Measure the tube length and color code—these indicate tension strength required for your window size.
Install new balances by reversing the removal process. Wind the spiral clockwise three turns before attaching to the sash bracket. Test operation through full travel—adjust tension by adding or removing spiral turns until the sash moves smoothly and stays in position. This repair typically takes 20 minutes per side.
Repair Broken Glass Safely and Permanently

Temporary Crack Repairs That Buy You Time
Small cracks under 6 inches can be temporarily stabilized using clear epoxy. Clean the crack with glass cleaner and apply masking tape to the opposite side. Inject clear epoxy using a syringe, removing excess with a razor blade. Cure under UV light or allow 24-hour air cure before removing tape.
Never attempt repairs on double-pane windows showing fogging between panes—this indicates seal failure requiring complete glass unit replacement. Temporary solutions might buy you time, but permanent fixes require professional-grade materials.
Replace Single Pane Glass Without Professional Help
For permanent repairs, measure the glass opening precisely, subtracting 1/8-inch from both height and width. Score the replacement glass using a straight edge and glass cutter, snapping along the score with breaking pliers.
Remove old glazing compound using a heat gun set to 150-200°F. Clean the rabbet groove thoroughly before applying a thin bead of new glazing compound. Insert the new glass pane carefully, securing it with glazing points every 4-6 inches. Apply fresh compound at a 45-degree angle, tooling it smooth with a putty knife. Allow 7-14 days cure time before painting. This entire process takes 1-2 hours with proper tools.
Weatherproof Your Windows to Stop Drafts Immediately
Replace Failed Weatherstripping in 15 Minutes
Old weatherstripping causes energy loss and drafts. Remove old material completely and clean surfaces with alcohol-based cleaner. Measure the gap when windows are closed—typically 1/8 to 1/4 inch—accounting for material compression.
V-strip tension seal provides 10-15 year durability for most applications. Start installation at the longest straight section, cutting miters at corners using a sharp utility knife. Apply firm pressure along the entire length, testing operation and adjusting if binding occurs. This quick fix can reduce heating costs by up to 15% according to energy studies.
Upgrade Energy Efficiency With Simple Modifications
Consider low-E coating upgrades when replacing glass. Hard coat (pyrolytic) offers durability with slight tint, while soft coat (sputtered) provides higher performance but requires edge deletion. Argon gas fill improves insulation by 30% over air-filled units.
For immediate improvement without replacement, apply magnetic storm windows that attach with strong magnets—these create an additional air space that dramatically improves insulation. This solution works particularly well for historic homes where window replacement isn’t desirable.
Prevent Future Window Problems With Simple Maintenance
Monthly Window Maintenance That Takes 5 Minutes
Operate all windows monthly to prevent sticking and identify developing problems. Clean tracks and hinges, lubricating moving parts with silicone spray. Inspect for visible damage or wear, addressing issues before they become major repairs.
Pay special attention to bottom rails on exterior windows—these collect debris and moisture most readily. A quick vacuum of track channels prevents 80% of sliding window problems before they start.
Annual Deep Maintenance That Extends Window Life
Repaint wood frames every 3-5 years, focusing on bottom rails and joints. Ensure proper drainage by keeping weep holes clear and maintaining exterior caulking. Inspect weatherstripping for compression set—replace if it doesn’t spring back when pressed.
Test window balance by opening halfway—if it drifts closed or won’t stay open, adjust sash cords or balance systems immediately. This simple check prevents sudden failures that leave windows stuck open during bad weather.
Final Note: Most window repairs take 2-4 hours for beginners, saving $200-600 per window compared to professional service. Keep common parts like sash cord, weatherstripping, and basic hardware on hand for quick fixes. When in doubt about structural issues or high window access, consult qualified professionals—safety always takes priority over savings. Remember that consistent maintenance prevents 90% of major window problems, keeping your home comfortable and energy-efficient year-round.


