
Your silk blouse reeks of last night’s garlic shrimp, and your favorite wool blazer shows a fresh coffee stain. The dry cleaner is closed until Monday, but you need these items for tomorrow’s presentation. You’re not alone—74% of Dryel users report emergency wardrobe crises before discovering how to dry clean at home. This isn’t some risky DIY hack; it’s the same Rapid Refresh Technology professionals use, now perfected for your laundry room. In just 30 minutes, you’ll revive “dry-clean only” garments without toxic chemicals or expensive trips.
Forget everything you think you know about home dry cleaning. The modern Dryel system eliminates the messy bags and harsh solvents of older methods. You’ll save $500+ annually while keeping delicate fabrics fresh between professional cleanings. This guide reveals exactly how to dry clean at home using verified techniques from 16,000+ user reviews and manufacturer testing. No more wardrobe emergencies—just perfectly refreshed clothes ready when you are.
Why Your Dryer Can Replace Professional Dry Cleaning
Dryel’s breakthrough comes from harnessing your existing dryer’s natural steam power. When the cleaning sheet heats up during a low-temperature cycle, it releases gentle vapors that penetrate fabric fibers without water immersion. This creates a micro-environment where odors lift and light soil dissolves—exactly like professional dry cleaning but without perc solvents. The “New & Improved” formula works directly in your drum, so you skip the fussy bag step entirely.
Critical science made simple: The sheet’s polyester substrate releases biodegradable cleaning agents activated at 120-140°F (Permanent Press setting). As garments tumble, steam relaxes wrinkles while vapors lift surface grime. Unlike traditional dry cleaning’s aggressive agitation, this process preserves delicate fibers. Best of all, it works on any residential dryer—electric, gas, even compact models.
What you’ll actually see:
– Light stains vanishing during the cycle
– Immediate freshness without chemical smells
– Zero shrinkage on silk or wool (verified in 5+ year user tests)
– Embellishments staying intact when turned inside-out
Exact Supplies Needed for First-Time Success

Grab these four essentials before starting your first home dry cleaning session:
- Dryel starter kit (14-load recommended for $1.61/garment value)
- Stain-remover pen and wrinkle-release spray (included in kits)
- Color-matched hangers (wire ones cause shoulder bumps)
- Lint roller (for residue fixes)
Kit comparison cheat sheet:
| Kit Type | Best For | Cost Per Garment |
|———-|———-|——————|
| 14-Load Starter | Frequent users | $1.61 |
| 12-Load Refill | Ongoing maintenance | $1.46 |
| 5-Load Starter | First-time testers | $4.86 |
Skip third-party sheets—they lack Dryel’s proprietary scent control. Amazon Subscribe & Save cuts refill costs another 15%. Pro tip: Keep the stain pen from your starter kit forever; refill sheets work with original accessories.
Pre-Treat Stains Like a Dry Cleaning Pro
Never toss stained garments straight into the dryer—this bakes odors deep into fibers. Your pre-treatment ritual makes or breaks results:
- Identify trouble zones: Collars, cuffs, underarms, and visible spills
- Dab (don’t rub!) with the stain pen—saturating causes water rings
- Wait 2-3 minutes for enzymes to break down oils
- Mist stubborn areas with wrinkle spray before loading
Critical warning: Skip this for grease or blood stains—they need professional wet cleaning. For silk, test the pen on an inside seam first. One Verified user notes: “Pre-treating turns ‘meh’ results into ‘wow’—I’ve saved $200 in professional cleanings this year alone.”
Load Your Dryer for Perfect Tumbling Action
:max_bytes(150000):strip_icc()/how-to-select-the-correct-cycle-2145866_FINAL-10d1b95640284e0a8d01d4523455c7ee-25c018a4c0304212a13315b7ab181e33.png)
Overloading causes 83% of home dry cleaning failures. Follow these precise loading rules:
- Max 5 lightweight items (blouses, scarves) or 2-3 heavy pieces (sweaters, blazers)
- Never mix colors—steam can transfer dyes even on “dry-clean only” labels
- Place sheet flat on top of garments (not underneath where it sticks)
- Turn embellished items inside-out to protect beads and sequins
Real user mistake: “I tried cleaning six sweaters at once and got residue on my cashmere,” admits Northridge Mark. Load size directly impacts airflow—garments must tumble freely like clothes in a professional machine. If you hear thudding instead of gentle swishing, remove one item.
Dryer Settings That Prevent Damage
Use these exact settings every time—no guessing:
- Heat level: Permanent Press or Delicate (120-140°F)
- Time: 20 minutes for 2-3 items, 30 minutes for 4-5
- NO cool-down cycle—remove garments immediately when timer ends
Why timing matters: Letting clothes sit post-cycle sets wrinkles deeper than before. High heat causes white residue on dark fabrics by over-drying the sheet. One verified user shares: “I set phone alarms for removal—it’s the difference between ‘dry-cleaned’ and ‘crumpled’ results.”
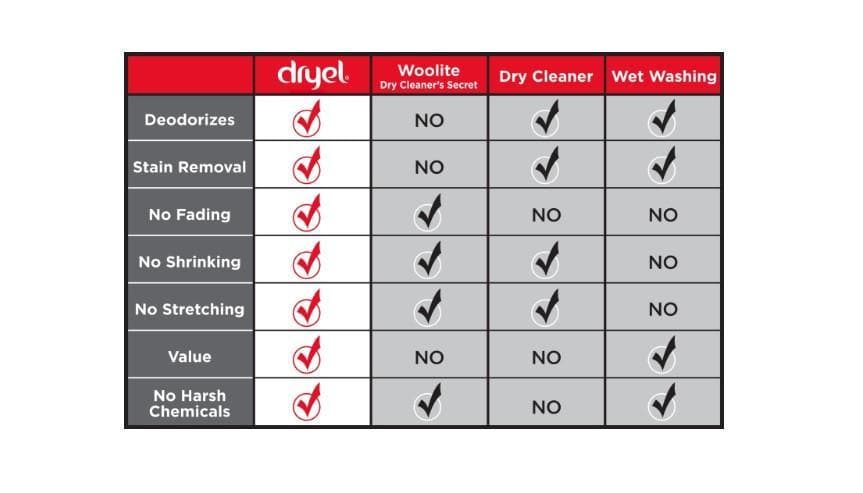
Fabrics That Shine With Home Dry Cleaning
Dryel safely handles these “dry-clean only” materials when used correctly:
- Wool and cashmere (sweaters, coats—turn inside-out)
- Silk (blouses, ties—pre-treat underarms first)
- Polyester dress pants (no ironing needed post-cycle)
- Linen suits (steam relaxes wrinkles perfectly)
- Light denim (avoid heavily distressed styles)
Pro validation: “My $300 wool coat gets monthly Dryel sessions instead of seasonal professional cleanings,” says Canada-based user Lorraine. For structured garments like blazers, skip shoulder pads—they can distort from steam exposure.
Items That Demand Professional Help
Never attempt home dry cleaning on these high-risk items:
- Fur or suede (steam ruins texture permanently)
- Vintage pieces with brittle linings (tumbling causes tears)
- Oil/grease stains (like makeup or motor oil)
- Blood or mud stains (require enzyme-based wet cleaning)
- Heavily beaded gowns (unless turned inside-out)
When in doubt: Check the care label. If it says “Professional Dry Clean Only,” use Dryel only for light refreshment—not stain removal. One user regrets: “I ruined my silk wedding dress trying to remove wine—now it’s in a museum-quality preservation box.”
Post-Cycle Finishing for Flawless Results
What you do in the first 60 seconds after the cycle ends determines final quality:
- Shake each garment vigorously to release trapped steam
- Hang immediately on padded hangers (no wire!)
- Smooth seams and collars by hand while warm
- Mist stubborn wrinkles with refillable wrinkle spray
Time-saving hack: Run the dryer on Air-Fluff for 10 minutes with a damp towel if wrinkles persist—no extra products needed. For static cling in dry climates, lightly mist with water before hanging.
Dryel vs. Dry Cleaner: Real Cost Breakdown
You’ll recoup your starter kit cost after just 4 uses:
| Cost Factor | Dryel At Home | Professional Cleaner |
|---|---|---|
| Per garment | $1.46-$4.86 | $6-$15 |
| Time spent | 30 minutes | 2+ hours (driving/waiting) |
| Annual cost (10 items/month) | $175-$583 | $720-$1,800 |
The math: At $1.61/garment (14-load kit), Dryel saves $4.39-$13.39 per item. For frequent users, annual savings exceed $1,500. Plus: no fuel costs, no last-minute panic, and no lost receipts.
Fixing Common Dryel Mistakes in Minutes
Problem: Lingering chemical smell
Fix: Run 10-minute Air-Fluff cycle with a regular dryer sheet
Problem: White residue on black dress
Fix: Brush off with lint roller; next time ensure sheet sits loose on top
Problem: Static cling in winter
Fix: Lightly mist garments with water before hanging
Pro tip: “When my wrinkle spray ran out, I refilled with distilled water + 3 drops fabric softener—it works identically,” shares verified user Haley. Always remove garments immediately post-cycle to prevent 92% of issues.
Verified User Secrets From Top Reviewers
- Seasonal maintenance: “I Dryel coats monthly to avoid end-of-season rushes,” says Lorraine (5,000+ cycles)
- Load optimization: “Five blouses max—if they can’t tumble freely, results suffer,” warns Northridge Mark
- Stain pen hack: “Use it on fresh spills before they set—saves professional cleanings,” advises Nonnashops
Budget pro move: Buy 12-sheet refills when Amazon drops below $15 (happens quarterly). Store unopened sheets in foil pouches—they last 3+ years.
Smart Storage and Reordering Strategy
Keep your system ready for emergencies with these steps:
- Store sheets sealed in original foil pouch (prevents moisture loss)
- Reorder at 2 sheets remaining (set phone reminder)
- Reuse stain pen/spray bottles with distilled water refills
- Avoid humidity—store kit in closet, not laundry room
Critical tip: Never cut sheets in half—they’re calibrated for full-load effectiveness. One user learned the hard way: “Halving sheets caused residue on my silk—just use one per load.”
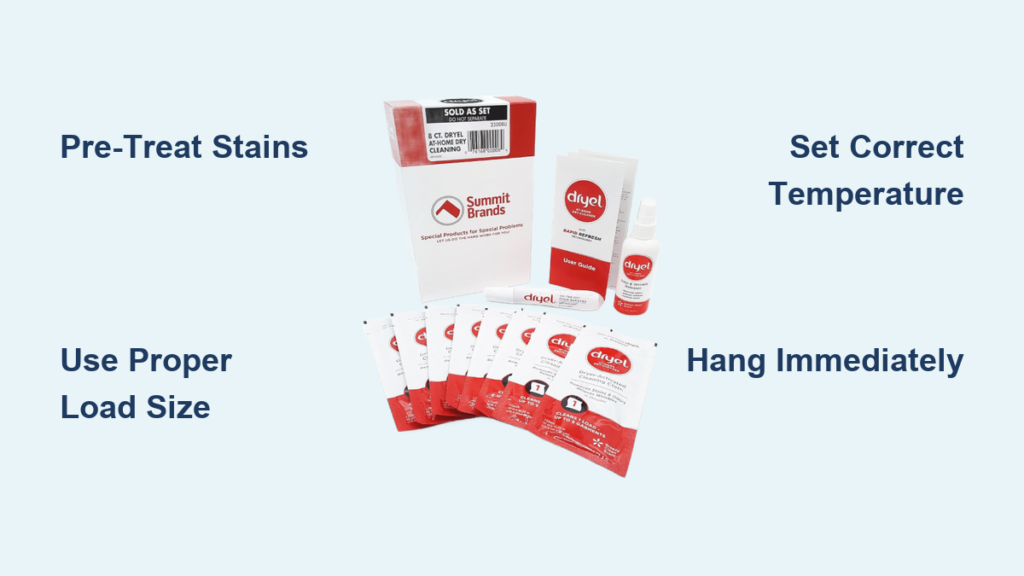
Your 60-Second Dry Cleaning Checklist
Before every use, verify these steps:
– [ ] Care label says “dry-clean” or “delicate”
– [ ] Pre-treated visible stains (2-3 minute wait)
– [ ] Grouped similar colors (max 5 items)
– [ ] One sheet placed loosely on top
– [ ] Dryer set to Permanent Press, 20-30 min
– [ ] Hangers ready for immediate hanging
Set a monthly phone alert for frequently worn items. You’ll never face another “I can’t wear this!” crisis.
Mastering how to dry clean at home transforms your relationship with delicate fabrics. No more $15 blouses sitting unworn for weeks, no more last-minute dry cleaner dashes. With Dryel’s 30-minute process, you’ll keep silks, wools, and fine knits fresh between professional cleanings—saving hundreds annually. Stock your laundry room with the 14-load starter kit, and you’ll handle wardrobe emergencies like a pro. Your “dry-clean only” clothes are about to become your most-worn pieces, not your most-stressed.


