
Tired of paying $3 per bottle for alkaline water when you could create it yourself for pennies? You’re not alone—millions are discovering how to make ionized water at home to save money while gaining potential health benefits like improved hydration and antioxidant properties. Whether you’re dealing with chronic fatigue or simply want cleaner, better-tasting water, creating ionized alkaline water at home puts you in complete control of quality and cost.
This guide reveals seven scientifically-backed methods to transform ordinary tap water into therapeutic ionized water using everything from simple kitchen staples to advanced filtration systems. You’ll learn exactly which approach fits your budget and lifestyle—plus how to test, store, and maintain your homemade ionized water safely. No more guessing whether those expensive bottled waters actually deliver what they promise.
Pick Your Perfect Ionizing Method
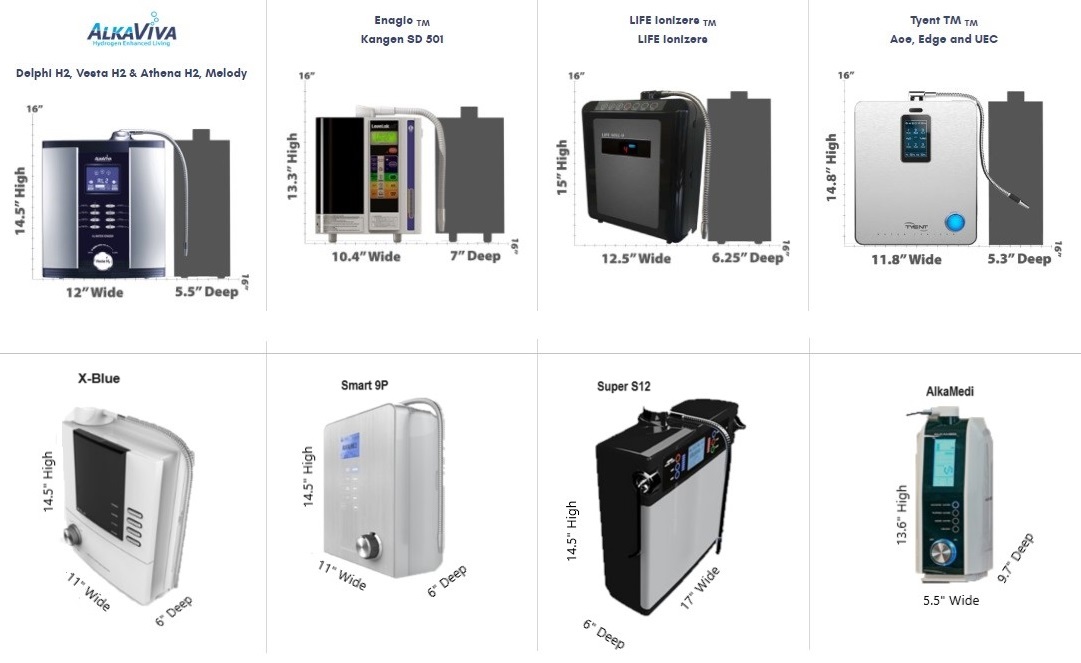
Water Ionizer Machines: Professional Results On Tap
Water ionizer machines deliver consistent, adjustable pH levels through electrolysis. These countertop units connect directly to your faucet, using platinum-coated electrodes to split water into alkaline and acidic streams within seconds.
Before You Buy:
– Budget: $400-$4,000 depending on features
– Counter space: Most units are 12″x8″x15″
– Water quality: Works best with 20-30 PSI pressure
– Electrical: Requires standard 110V outlet
Installation Steps:
1. Attach diverter valve to kitchen faucet
2. Connect inlet hose to machine
3. Place drain hose in sink for acidic water
4. Run cleaning cycle before first use
5. Test pH levels across all settings
Pro Tip: Start with pH 8.5 for drinking water. Use pH 9.5-10 for cooking, and save pH 11+ for cleaning produce only.
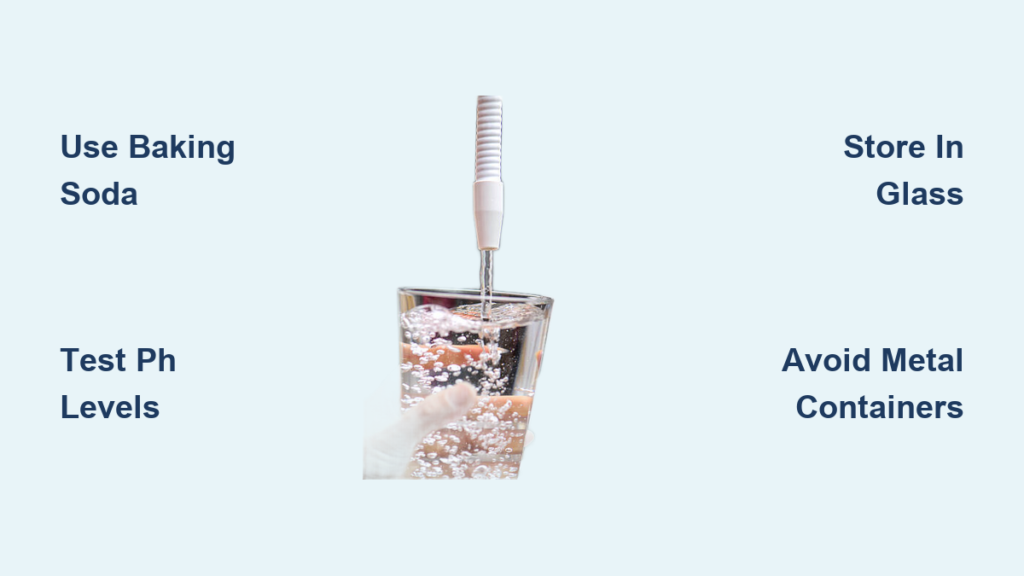
Baking Soda Method: Budget Solution Under $5
Transform filtered water into alkaline water for pennies using aluminum-free baking soda. This method raises pH quickly but requires careful measurement to avoid health risks.
Materials Needed:
– 1 liter filtered water (avoid tap water with chlorine)
– 1/8 teaspoon aluminum-free baking soda
– Glass container with lid
– pH testing strips or digital meter
Step-by-Step Process:
1. Measure exactly 1 liter of filtered water
2. Add 1/8 teaspoon baking soda (not heaping)
3. Stir vigorously for 30 seconds until dissolved
4. Test pH—should read 8.0-8.5
5. Drink within 24 hours, store refrigerated
Warning: Skip this method if you’re on blood pressure medication or sodium-restricted diets. Each serving adds 150mg sodium.
pH Drops: Portable Power in Seconds
Concentrated alkaline minerals in liquid form offer the fastest, most convenient ionizing method. Three drops per glass delivers consistent pH 9.0-9.5 water anywhere.
Quality Markers:
– Look for potassium and magnesium-based drops
– Avoid sodium hydroxide-heavy formulas
– Check concentration: 100-200 servings per bottle
– Verify third-party testing for heavy metals
Usage Protocol:
1. Add 3 drops to 8 oz filtered water
2. Stir 15 seconds for even distribution
3. Test with pH strip (adjust drops as needed)
4. Consume within 4 hours
5. Store drops away from sunlight
Top Picks:
– Alkavision: 3 drops = pH 9.5
– PuripHy: 5 drops per liter = pH 9.0
– Alkalife: 2 drops per 8 oz = pH 9.5
Lemon Salt Method: Mineral Boost Overnight
This counterintuitive method uses acidic lemon to create alkaline-forming compounds during digestion. The Himalayan salt provides 84 trace minerals for enhanced hydration.
Night Before Preparation:
1. Juice 1/2 organic lemon into glass pitcher
2. Add 1/4 teaspoon pink Himalayan salt
3. Fill with 1 liter filtered water
4. Stir gently, cover with cloth
5. Let sit 8-12 hours at room temperature
Morning Protocol:
– Drink 12 oz upon waking
– Store remainder in glass container
– Finish within 24 hours (do not refrigerate)
– Notice subtle mineral taste—this is normal
Benefits: Enhanced adrenal support, natural electrolyte replacement, improved cellular hydration compared to plain water.
Test Your Water Quality Like a Pro
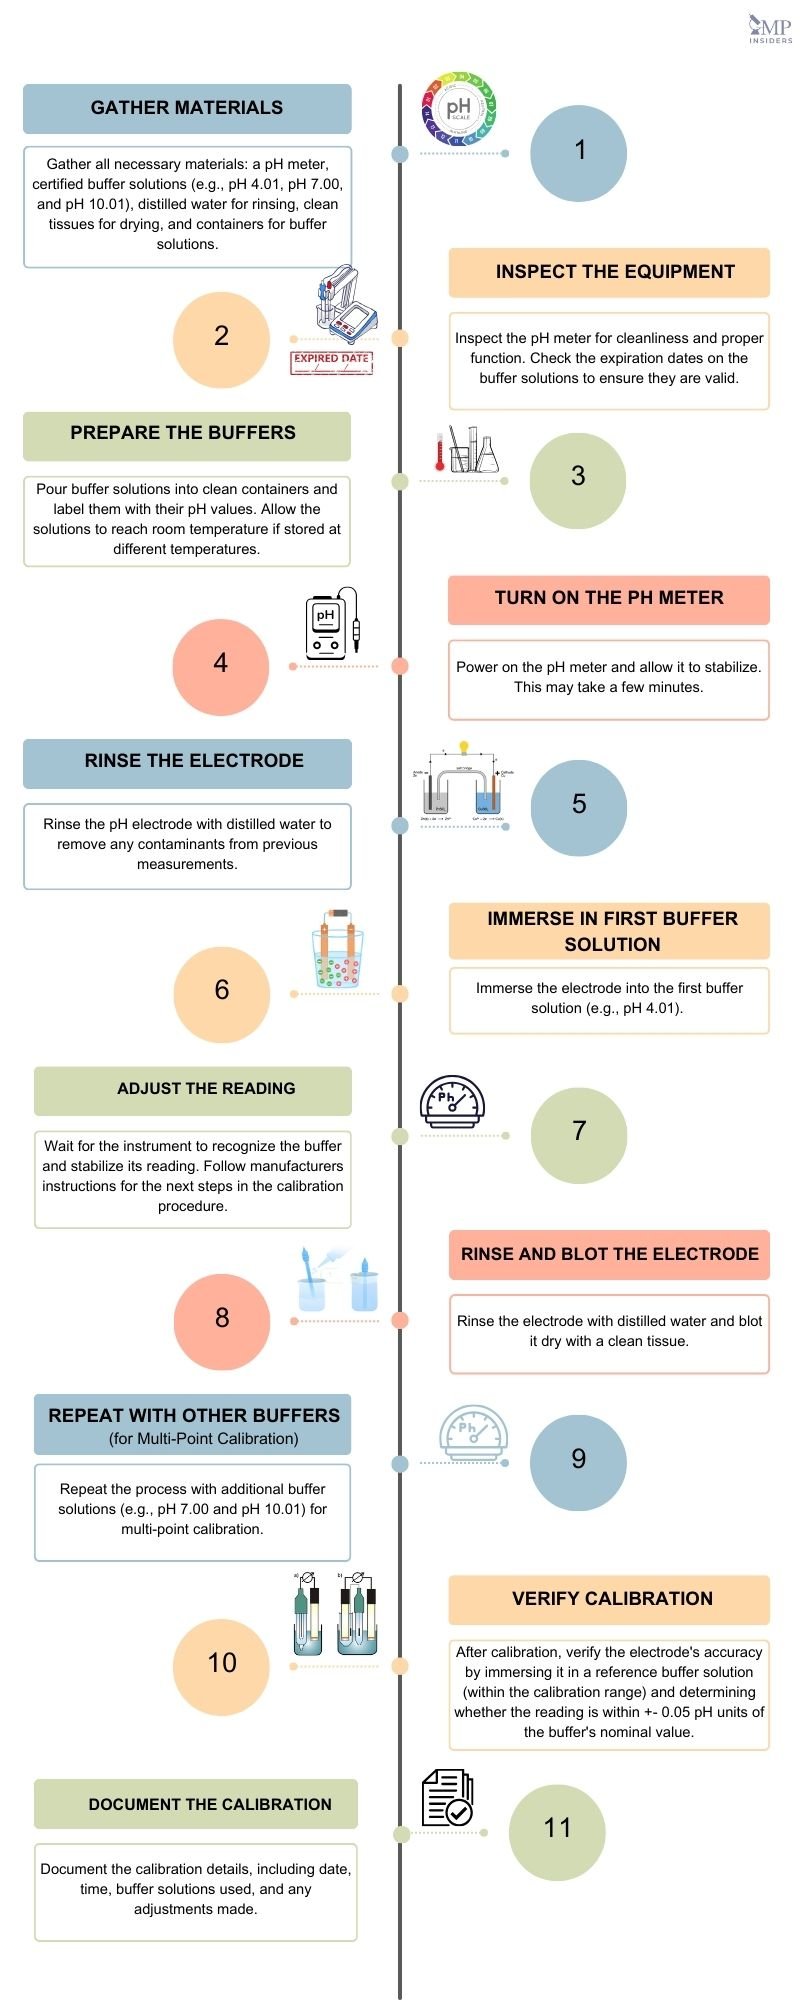
Digital pH Meters: Most Accurate Results
Calibration Protocol:
– Calibrate monthly using pH 7.0 buffer
– Store electrode in KCl solution
– Rinse with distilled water between tests
– Replace electrode yearly ($30-50)
Pro Tip: Test immediately after ionizing—pH drops 0.5-1.0 points within 30 minutes due to CO2 absorption.
ORP Testing for Antioxidant Power
Measure antioxidant potential using ORP (Oxidation Reduction Potential) meter. Negative values indicate antioxidant capacity.
Target Ranges:
– Tap water: +200 to +400 mV (oxidizing)
– Good ionized water: -100 to -400 mV
– Excellent ionized water: -400 to -800 mV
Testing Protocol:
1. Calibrate meter with 225 mV solution
2. Test immediately after ionizing
3. Record values for different pH levels
4. Note decline over 24-48 hours
Master Essential Maintenance Routines
Ionizer Machine Care: 30-Minute Monthly Routine
Daily (2 minutes):
– Run acidic water 30 seconds post-use
– Wipe exterior with damp microfiber cloth
– Check flow rate consistency
Weekly (15 minutes):
– Clean electrode chamber with citric acid
– Check filter life indicator
– Test pH calibration
Monthly (30 minutes):
– Deep clean with 2% citric acid solution
– Replace prefilters if needed
– Calibrate pH/ORP meters
Storage Safety Rules: Keep Water Potent Longer
Container Guidelines:
– Use only glass or BPA-free plastic
– Avoid metal containers (reacts with alkaline water)
– Fill completely to minimize air exposure
– Store away from direct sunlight
Freshness Timeline:
– Room temperature: 12-24 hours max
– Refrigerated: 3 days maximum
– After 72 hours: pH drops significantly
– Discard if cloudy or metallic taste
Avoid Costly Health Mistakes
pH Won’t Increase? Check These 4 Culprits
Source Water Issues:
– Too pure (RO without remineralization)
– High chlorine levels (use filtered water)
– Low mineral content (add trace minerals)
– Wrong temperature (use cold water)
Equipment Problems:
– Expired test strips or uncalibrated meter
– Worn ionizer plates (after 3-5 years)
– Clogged filters reducing flow
– Incorrect machine settings
Health Safety Protocol: Start Smart
Starting Guidelines:
– Begin at pH 8.0-8.5 maximum
– Limit to 2-3 glasses daily first week
– Increase gradually over 2-3 weeks
– Monitor body’s response carefully
When to Avoid:
– Kidney disease or reduced function
– Taking pH-sensitive medications
– Pregnancy or breastfeeding (consult doctor)
– Low-sodium diets (baking soda method)
Calculate Your True Costs: Year 1 Breakdown
One-Year Investment Comparison

Water Ionizer Machine ($1,200 model):
– Initial: $1,200
– Filters: $200
– Electricity: $50
– Total Year 1: $1,450
pH Drops Method:
– Drops: $150 (daily use)
– Filtered water: $100
– Testing supplies: $50
– Total Year 1: $300
Baking Soda Method:
– Baking soda: $15
– Filtered water: $100
– pH strips: $25
– Total Year 1: $140
Alkaline Pitcher:
– Pitcher + filters: $120
– Total Year 1: $120
Break-even point: Ionizer machines become cost-effective after 3-4 years for families drinking 2 gallons daily. Single users benefit more from drops or pitchers.
Troubleshoot Like a Professional
Fix Metallic Taste in 15 Minutes
Quick Solutions:
– Replace ionizer filters immediately
– Run 2-minute cleaning cycle
– Check for electrode scaling (white buildup)
– Switch to different water source temporarily
Eliminate Cloudy Water Permanently
Diagnostic Steps:
1. Warm water slightly—mineral precipitation clears
2. Check filter breakthrough (replace if needed)
3. Clean container with vinegar solution
4. Test source water hardness levels
Advanced Home Techniques
Create Cleaning-Grade Alkaline Water
For Produce Wash:
1. Use ionizer’s highest alkaline setting
2. Add 1/8 teaspoon baking soda per quart
3. Soak vegetables 10-15 minutes
4. Rinse with filtered water
Safety Note: Never consume pH 11+ water. Use exclusively for cleaning.
Generate Sanitizing Acidic Water
From Ionizer:
1. Select acidic water setting (2.5-3.5 pH)
2. Collect in glass spray bottle
3. Store 1-2 weeks maximum
4. Use for countertops, cutting boards
Natural Alternative:
– 1 part white vinegar to 10 parts acidic ionized water
– Effective against 99% household bacteria
– Safe for food contact surfaces
Your Next Steps: Start with the method matching your current lifestyle and budget. Test pH levels daily for the first week to ensure safe, effective ionized water. Track how your body responds—many report increased energy and better hydration within days. Remember: the best method is the one you’ll actually use consistently. Whether that’s a simple baking soda solution or a premium ionizer, daily consumption matters more than perfect pH levels. Begin today with what you have, then upgrade as your needs evolve.


