
That metallic aftertaste in your morning coffee, the faint chlorine smell clinging to your shower steam, or the unsettling news about lead pipes in neighboring towns—these aren’t just annoyances. They’re urgent signals that your tap water may fall short of true health standards, not just legal minimums. Learning how to filter water at home is your fastest path to water you can trust, transforming every glass from a gamble into a health investment. This guide cuts through the confusion: you’ll pinpoint your specific water risks, match filters to those threats, and maintain your system without overspending. Forget one-size-fits-all solutions—we’re targeting your contaminants with precision.
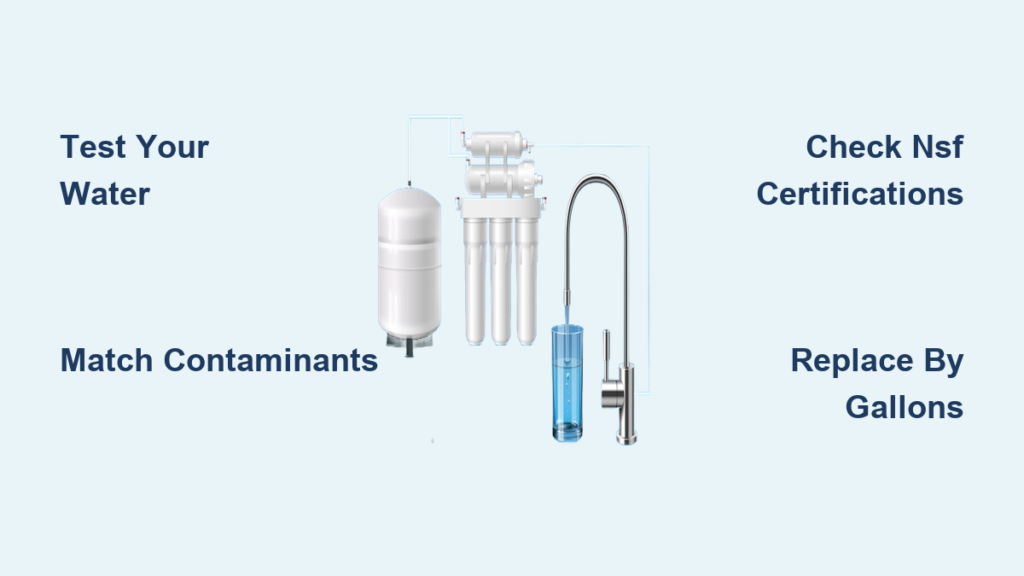
Decode Your Water Risk Profile Immediately
Check Bedrock and Pipe Age First
Your geography and plumbing age dictate your biggest threats. If you live in Southwest U.S. bedrock regions or New Hampshire, arsenic and uranium naturally leach into wells and city supplies. Cities with pre-1986 service lines—like Chicago, Pittsburgh, or Newark—still deliver lead flakes every time construction jolts pipes or hydrants get flushed. Don’t assume “compliant” means safe; aging infrastructure means your water faces unique hazards before it even reaches your tap.
Read Your CCR Like a Contaminant Detective
Grab your Consumer Confidence Report (CCR)—your utility’s annual EPA-mandated water quality snapshot—via the EPA portal or EWG’s tap-water database. Look past the “meets EPA standards” headline. That 15 ppb lead “action level” allows dangerous spikes in 10% of samples, even though the health goal is zero. Nitrate limits haven’t updated since the 1950s despite new cancer research, and PFAS/microplastics remain unregulated. This report reveals what legal loopholes hide.
Flag Priority Contaminants by Health Goal, Not Legal Limits
Circle any contaminant exceeding EPA Maximum Contaminant Level Goals (MCLGs)—the true health benchmarks—not just legal limits. If your CCR shows 9 ppb lead (below the 15 ppb action level), you still need lead-specific filtration. Arsenic, PFAS, THMs, and nitrates top the urgency list; these chemicals drive every filter decision you’ll make next.
Test Before You Buy Any Filter System
Order EPA-Certified Lab Kits, Skip Test Strips
$10 test strips give false confidence. Invest in Tap Score’s City Water Advanced panel or equivalent from an EPA-certified lab. It screens 111 analytes—from lead and PFAS to uranium and microplastics—with prepaid mailers and a digital dashboard. This $150-$300 test is cheaper than buying the wrong filter and pays for itself in targeted protection.
Interpret Results Using Health Benchmarks, Not Just Legality
A sample showing 18 ppb trihalomethanes isn’t “safe” just because it’s below the EPA’s 80 ppb legal limit—it’s 125× higher than EWG’s health guideline. Note every contaminant exceeding MCLGs or health-based guidelines (like 0.15 ppb for THMs). These become your non-negotiable filter requirements.
Document Baseline Numbers for Verification
Save your lab report PDF or screenshot the digital dashboard. After installing a filter, retest to confirm performance—especially for lead or PFAS. Set calendar alerts for annual retests or after plumbing work, as pipe disturbances can suddenly release trapped contaminants.
Match Filter Tech to Your Contaminants
Activated Carbon for Chlorine, THMs, and Pesticides
Solid carbon blocks (not granular) adsorb chlorine by-products like THMs, pesticides, and pharmaceuticals through microscopic pores. Crucially, carbon alone won’t remove nitrate, arsenic, or microbes—so if your test shows these, skip basic pitcher filters. Look for “solid block” certification to prevent channeling where water bypasses the carbon.
Ion Exchange for Lead, Fluoride, or Hard Water
Resin beads swap harmless sodium for lead, fluoride, or calcium ions. Faucet-mount filters like PUR use this for lead reduction, while whole-house softeners target hardness. Note: ion exchange requires brine recharge for softeners, and specialty resins (like for fluoride) have shorter lifespans—replace every 6 months in high-contaminant areas.
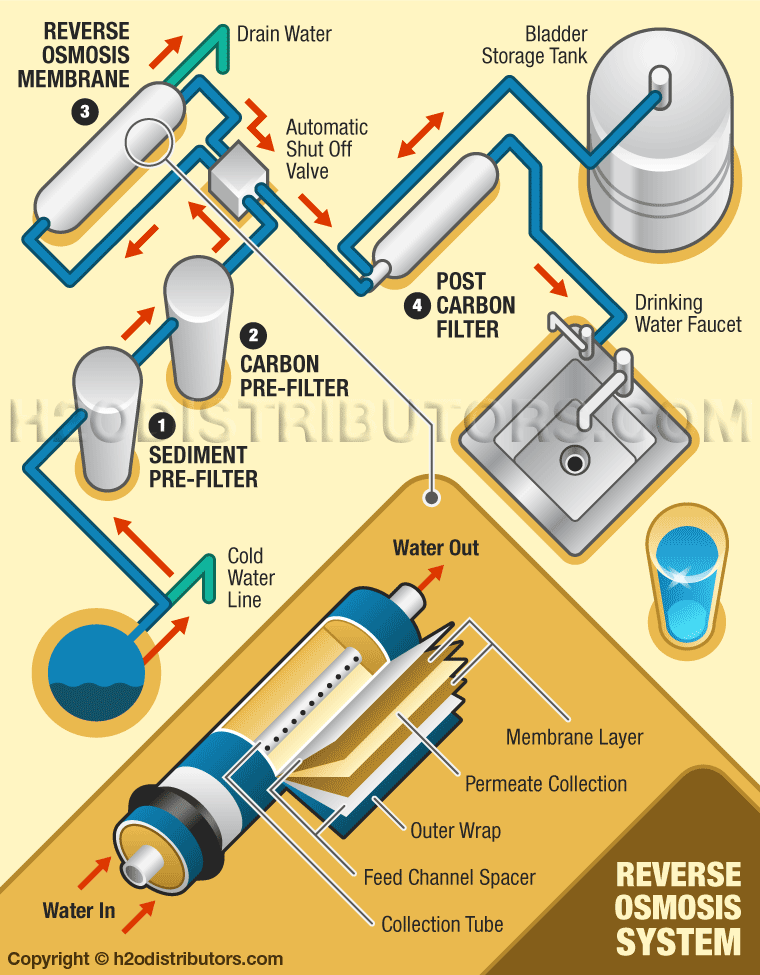
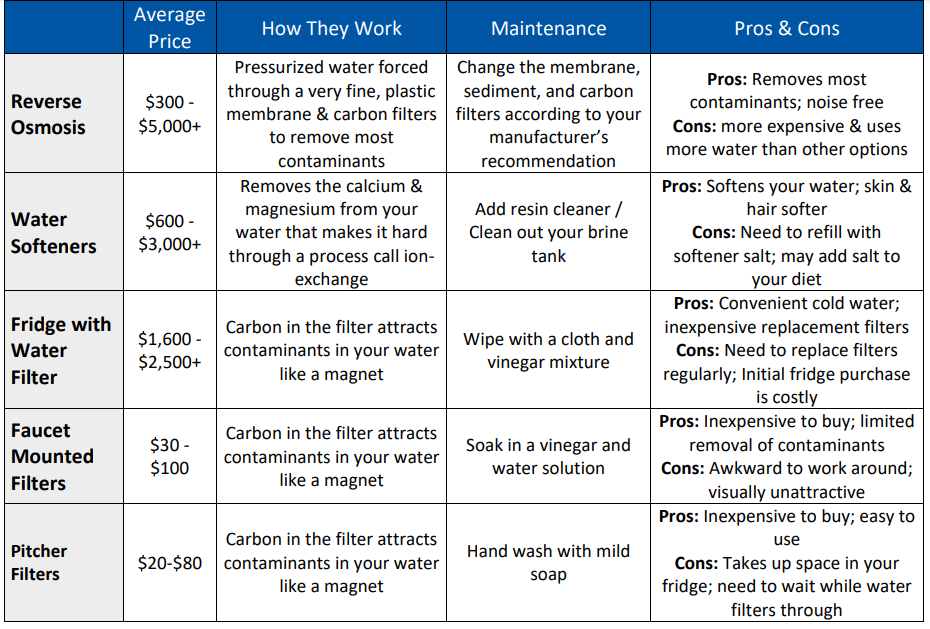
Reverse Osmosis for PFAS, Arsenic, and Microplastics
RO membranes force water through a 0.0001-micron barrier, removing arsenic, nitrate, PFAS, and microplastics. But it wastes 2-4 gallons per purified gallon and strips beneficial minerals. Only choose RO if your tests show these “broad spectrum” threats—and always pair it with a remineralization stage to restore calcium/magnesium.
UV and Ceramic for Well Water or Microbe Risks
UV lamps (254 nm wavelength) kill bacteria/viruses but require clear water and electricity—use only after sediment pre-filtration. Ceramic candles with embedded carbon (like Doulton filters) block cysts at 0.2-0.9 microns while improving taste. Ideal for well owners, but flow rates are slow—expect 0.5 gallons/minute versus carbon’s 1+ gallon.
Verify NSF-Certified Products in 2 Minutes

Target the Right Certification Standard
- NSF 53: Mandatory for lead/cyst reduction (check Performance Data Sheets for actual ppb reduction)
- NSF 58: Required for reverse osmosis claims
- NSF 401: Validates PFAS/pharmaceutical removal
- NSF 372: Confirms lead-free plumbing parts
Triple-Check Claims Against Databases
Search the NSF Product Database using your contaminant list—don’t trust website claims. Download the manufacturer’s Performance Data Sheet (PDS) to verify reduction rates for your specific threats. If a filter claims “removes 99% of lead” but the PDS shows it only tested down to 10 ppb (not 1 ppb), it’s useless for your 9 ppb lead problem.
Pick the Right Filter Format for Your Life
Pitcher Filters Compared by Real Contaminant Coverage
| Model | Best For | Certified Reductions | Cost Per Gallon | Lifespan |
|---|---|---|---|---|
| Epic Pure | THMs, lead | Lab-tested to non-detect | $0.41 | 150 gal |
| Clearly Filtered | PFAS, 365+ contaminants | NSF 42/53/372 | $0.50 | 365 gal |
| PUR Faucet | Budget lead/THM removal | NSF 42/53/401 | $0.16 | 100 gal |
Renters or low-budget users: Faucet mounts switch instantly between filtered/tap water but clog faster with hard water. Whole-house carbon systems ($500-$2,000) remove chlorine/sediment for showers but won’t protect drinking water from lead—always pair with point-of-use filters.
Emergency & Natural Methods That Actually Work
Boil Protocol for Microbe Emergencies
Rolling boil for 1 minute (sea level) or 3 minutes above 2,000 ft altitude kills bacteria/viruses. Critical: This does nothing for lead, PFAS, or chemicals—only use when microbial contamination is confirmed (e.g., boil advisories).
DIY Sand-Charcoal Filter for Sediment Reduction
Layer cloth → 2 inches crushed charcoal → 3 inches fine sand → 3 inches gravel in a bucket. Filters remove sediment and improve taste but must be followed by boiling to kill microbes. Moringa seed coagulant (1 crushed seed per liter) reduces turbidity but requires secondary disinfection—never rely on it alone for pathogens.
Maintain Filters & Slash Long-Term Costs
Track Replacement by Gallons, Not Months
- Pitcher carbon: Replace at 40-150 gal (not 2 months) based on your water hardness
- RO membranes: Last 2-3 years but replace pre-filters every 6-12 months
- Ceramic candles: Clean with a scrub brush every 2-3 months; replace at 2,000 gal
Budget Real Annual Costs
- Pitcher: $20-$90 upfront + $50-$180/year (at $0.16-$0.50/gal)
- Under-sink RO: $150-$500 upfront + $60-$100/year (membranes + cartridges)
Reuse RO wastewater for plants and choose ceramic filters with washable elements to cut plastic waste by 80%.
- Grab your CCR or order a certified lab test.
- List contaminants exceeding health goals (MCLGs), not legal limits.
- Search NSF databases for filters targeting your specific threats.
- Compare formats by your priority: pitcher (convenience), faucet (speed), RO (comprehensive).
- Verify ongoing costs—replace filters by gallon count, not calendar dates.
Filtering water at home isn’t optional anymore—it’s the only way to guarantee your water meets health-based standards, not just legal loopholes. Test first, target your contaminants precisely, and maintain rigorously. Within days, that metallic taste vanishes, chlorine smell disappears, and every glass becomes pure, trusted hydration. Start tonight: pull up your CCR, spot one priority contaminant, and choose the filter that actually stops it. Your health can’t wait for “compliance.”


