
Your thermostat suddenly stops responding during a heatwave or deep freeze. That sinking feeling hits—until you realize replacing your home thermostat is simpler than changing a light bulb. Most homeowners complete this project in 45 minutes with basic tools, avoiding $150+ service calls. The secret? Following a precise sequence: disconnect power, document wiring, connect new terminals, and verify operation. This guide cuts through confusing jargon to deliver actionable steps for forced-air furnaces, heat pumps, and radiator systems—whether you’re installing a $25 programmable model or a smart thermostat with geofencing.
Unlike complex HVAC repairs, thermostat replacement requires no specialized knowledge. You’ll only need a screwdriver, smartphone camera, and 30 minutes of focused work. By the end, you’ll gain precise climate control and potential 10-15% energy savings through automated scheduling. Let’s transform your home’s comfort system without risking damage to your HVAC equipment.
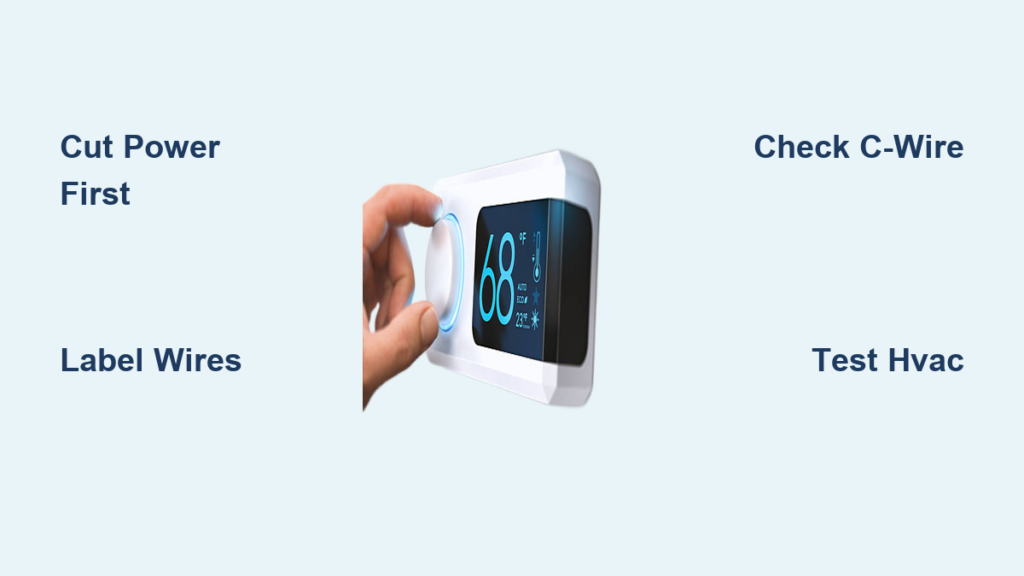
Cut Power to Your HVAC System Before Removing Old Thermostat
Never skip this critical safety step—even battery-powered thermostats connect to 24V wiring that can short-circuit your furnace. Start by locating your electrical panel and turning off both the furnace and air handler breakers. Most homes have separate switches: one labeled “FURNACE” near the unit and another for the air handler in the attic or closet. If breakers are unlabeled, flip the main HVAC switch first, then test individual units.
Verify Power Disconnection with Temperature Testing
Adjust your old thermostat to an extreme setting: set heating to 90°F or cooling to 55°F. Listen carefully for system activation—silence confirms power is off. Critical warning: Older thermostats may still display battery-powered screens even when HVAC power is disconnected. Never rely on a blank screen as proof; physical silence is your only reliable indicator.
Keep Your Old Thermostat as a Backup Plan
Before disconnecting wires, place the old unit in a labeled box with its mounting screws. If unexpected wiring complications arise, you can quickly reinstall it to maintain climate control while troubleshooting. This is especially crucial during extreme weather—you’ll avoid shivering through installation or sweating out a failed smart thermostat setup.
Match Your New Thermostat to HVAC System Type
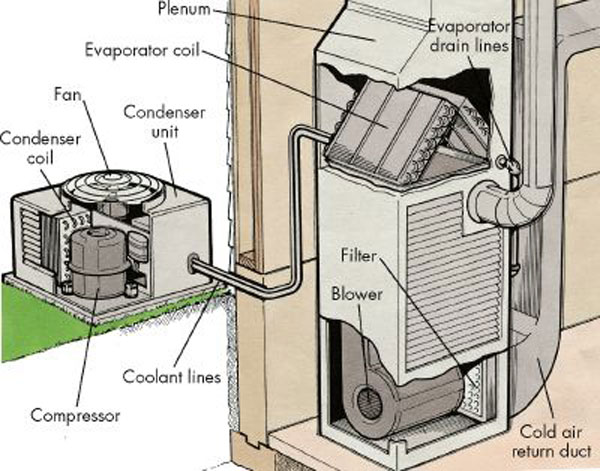
Choosing the wrong thermostat causes system malfunctions or damage. Your HVAC type—not brand—determines compatibility. Forced-air furnaces work with nearly all standard models, while radiator systems require low-voltage thermostats. Heat pumps need specialized units that manage reversing valves (look for “O” or “B” terminal labels). Check your current thermostat’s wiring or HVAC unit label for system identification.
Check for C-Wire Power Requirements
Modern smart thermostats require continuous power via a “C-wire” (common wire). Peek behind your existing thermostat: if a blue or black wire connects to the “C” terminal, you’re compatible. No C-wire? You’ll need a battery-powered model like the Honeywell T5 or a manufacturer-specific adapter (Ecobee includes one free). Never force a C-wire connection—this risks short-circuiting your control board.
Ignore Brand Compatibility Myths
Your Carrier furnace works perfectly with a Honeywell thermostat, and a Trane heat pump pairs seamlessly with Google Nest. Focus on system type and features rather than matching brands. Basic programmable models cost ~$25 at Home Depot and work for 90% of homes—reserve smart thermostats for geofencing or humidity control needs.
Remove Old Thermostat Without Wiring Mistakes

Forcing removal damages delicate terminals. Start by gently prying the faceplate from the bottom edge—most snap off with light pressure. If it resists, check for hidden screws under the display or along the base. Never yank the unit; hidden fasteners cause 30% of DIY installation failures according to HVAC technicians.
Photograph and Label Every Wire Before Disconnecting
Take a high-resolution photo showing all wire connections—this is your emergency reference if labels fall off. Then use the stickers provided with your new thermostat to label each wire with its terminal code:
– R (Red): 24V power
– W (White): Heating call
– Y (Yellow): Cooling call
– G (Green): Fan control
– C (Blue/Black): Common wire (power return)
Disconnect Wires Using Proper Technique
Loosen terminal screws with a precision screwdriver (eyeglass size works best) or press release tabs on modern units. Pull wires straight out—no twisting or bending. Once free, unscrew the mounting plate. If wall holes are large, stuff insulation into the cavity to prevent drafts before installing the new base.
Mount New Thermostat Baseplate Level and Secure
Your thermostat’s accuracy depends on proper mounting. Hold the new baseplate against the wall with a level—tilted units misread room temperature. Mark screw holes through the template, drilling 1/8″ pilot holes. For drywall, insert plastic anchors to prevent sagging.
Avoid Common Mounting Errors
Pull all wires through the baseplate’s center opening before securing it. Tighten screws just until snug—over-torquing cracks plastic housings. If covering old holes, apply painter’s tape over gaps to block cold air infiltration. Test stability by gently tugging the base; wobbling causes inaccurate temperature readings.
Connect Wires to Correct Terminals in 60 Seconds
Modern thermostats use color-coded terminals matching standard HVAC wiring. Insert each labeled wire into its corresponding slot: red to R, white to W, yellow to Y, green to G. Push-in connectors click audibly when seated—give each wire a gentle tug to confirm.
Handle Special Cases Like Heat Pumps
Heat pump systems often have an extra orange wire (O/B terminal) controlling the reversing valve. Consult your new thermostat’s manual—this wire may connect to O (cooling priority) or B (heating priority). If unused, cap it with a wire nut and tuck it neatly into the wall cavity. Never leave bare wires exposed—this causes system shorts.
Restore Power and Test All HVAC Functions
Flip breakers back on while watching the thermostat display. Smart models boot up in 60-90 seconds; basic units show immediate readings. Begin testing immediately:
- Heating test: Set 5°F above room temperature—listen for furnace ignition within 2 minutes
- Cooling test: Set 5°F below room temperature—expect AC compressor startup in 90 seconds
- Fan test: Switch to “ON” mode—blower should run continuously without heating/cooling
If no response, power down immediately and recheck wire connections. Intermittent operation usually indicates a loose Y (cooling) or W (heating) wire.
Configure Smart Thermostat Features Without Overwhelm
Skip complex setups initially. Connect to WiFi through the thermostat menu, then download the manufacturer’s app for remote control. Enable one feature at a time:
- Geofencing: Activate automatic “Away” mode when your phone leaves home
- Filter alerts: Set monthly reminders based on runtime hours
- Scheduling: Start with simple setbacks—70°F when home, 65°F when asleep
Pro tip: Honeywell Lyric users should enable “Fine Tune” to adjust for humidity effects—this prevents overcooling in muggy climates. Don’t activate all features simultaneously; master basic scheduling first.
Fix Top 3 Thermostat Installation Failures Immediately
Most issues resolve in under 10 minutes with systematic checks:
No Power After Installation
- C-wire check: Ensure blue/black wire is fully seated in C terminal
- Breaker verification: Confirm both HVAC breakers are fully engaged (not tripped halfway)
- Battery test: Insert backup batteries if your model supports them
HVAC System Won’t Activate
- Wire mapping: Triple-check Y (cooling) and W (heating) connections
- System type setting: Verify thermostat is configured for heat pump vs. conventional in setup menus
- Emergency heat: For heat pumps, disable “Emergency Heat” mode which bypasses thermostat control
Missing C-Wire Solutions That Actually Work
- Use included adapter: Ecobee’s Power Extender Kit converts G-wire to C-wire function
- Try add-a-wire: Third-party kits like RC-Wireless add C-wire capability without new drilling
- Switch models: Install a battery-powered programmable thermostat if adapters fail
Maintain Your New Thermostat for Long-Term Reliability
Your thermostat will last 10+ years with minimal care. Wipe the screen monthly with a microfiber cloth to prevent dust buildup on sensors. Replace batteries annually in programmable models—even if the display seems fine. Smart thermostats self-update, but check for firmware upgrades quarterly through the companion app.
Critical energy tip: Program setbacks of 7-10°F during sleep or work hours—this delivers the promised 10-15% energy savings without comfort sacrifices. Start with a simple schedule: 68°F when home, 62°F when asleep. After two weeks, refine based on actual comfort.
With your new thermostat operational, you’ve gained precise climate control and potential cost savings. If you encountered C-wire challenges, document your solution—it helps future DIYers facing the same hurdle. Tonight, set your first automated schedule and enjoy smarter home comfort tomorrow.


