
You can’t see it, smell it, or taste it—yet carbon monoxide (CO) can kill you in minutes. This invisible gas claims hundreds of lives annually and sends thousands more to emergency rooms. The scariest part? Your home could harbor this silent killer right now, with no warning signs until it’s too late.
Here’s the good news: detecting carbon monoxide at home isn’t complicated or expensive. With the right approach, you can protect your family from this deadly threat in under an hour. This guide walks you through everything you need to know—from choosing the right detectors to spotting danger signs before they become emergencies.
Why CO Detection Saves Lives
Carbon monoxide tricks your body by binding to red blood cells 200 times more effectively than oxygen. You won’t cough, wheeze, or feel burning eyes like with smoke inhalation. Instead, flu-like symptoms appear—headaches, dizziness, nausea—often mistaken for a common virus until it’s too late.
The timeline is terrifying: At 50 parts per million (typical detector threshold), you’d experience mild symptoms after 8 hours. At 400 ppm, unconsciousness occurs within 2-3 hours. At 1,600 ppm, death can happen in just one hour. CO alarms aren’t optional safety equipment—they’re mandatory lifesavers. Every second counts when this gas builds up, and these devices provide the critical early warning your senses simply cannot.
Install Certified CO Detectors Correctly

Choose UL 2034 or IAS 6-96 Certified Devices
Look for these exact certifications on the packaging: UL 2034 (Underwriters Laboratory latest standard) or IAS 6-96 (International Approval Services). The U.S. Consumer Product Safety Commission (CPSC) specifically recommends these standards as minimum safety requirements. Skip any detector without these labels—non-certified units give false security and may fail when you need them most.
Strategic Detector Placement Rules
Must-have locations include the hallway outside each sleeping area (non-negotiable), each bedroom (especially children’s rooms), every floor including basements and attics, and near attached garages (10 feet from door). Never place detectors near fuel-burning appliances (causes false alarms), in bathrooms or humid areas, directly above heaters or stoves, or where air doesn’t circulate (behind curtains or furniture).
Pro tip: Mount detectors 5 feet from the floor—CO mixes evenly with air, but this height prevents tampering by children and pets while ensuring optimal detection.
Installation Made Simple
Wall mounting requires using included anchors and screws. Mark holes, drill pilot holes, insert anchors, then screw in bracket. Snap detector into place until you hear the click. Plug-in models should connect to outlets that aren’t controlled by wall switches for continuous power without battery replacement concerns. Hardwired units require a licensed electrician but connect directly to your home’s electrical system with battery backup—eliminating dead battery risks.
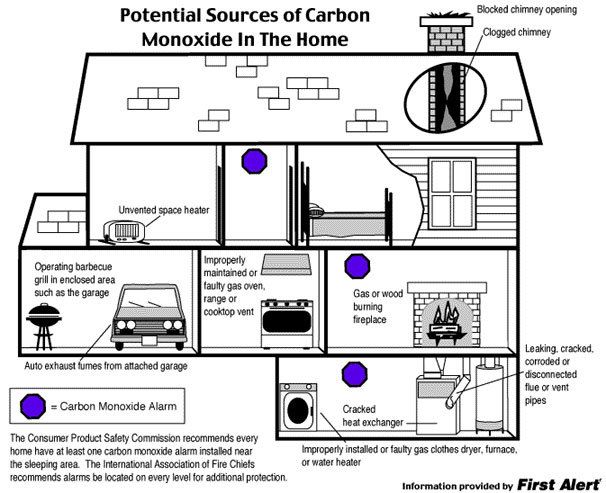
Spot Hidden CO Sources in Your Home
Kitchen Hazards You Can’t Ignore
Gas stoves with yellow flames instead of blue indicate incomplete combustion—a major CO risk. Range hoods must vent outside; recirculating models trap CO indoors. Ovens during self-cleaning cycles produce significant CO—always ensure proper ventilation during these high-heat operations. Remember that improper appliance use is one of the leading sources of dangerous CO levels in homes.
Heating System Red Flags
Furnaces showing rust, soot, or water streaks around vent pipes signal potential CO leaks. Fireplaces require completely open dampers before lighting to prevent backdrafting. Space heaters—never use kerosene or unvented gas models indoors without proper ventilation. According to the CPSC, improperly maintained, installed, or used fuel-burning appliances are among the top causes of elevated CO levels.
Garage Dangers That Threaten Your Family
Car idling for even 2 minutes in an attached garage can raise dangerous CO levels throughout your home. Power equipment like generators, pressure washers, and snow blowers must only be used outdoors—never in enclosed spaces. Install a CO detector inside your garage as an early warning system for these common but deadly mistakes.
Warning Signs Before Detectors Alarm
Physical Symptoms That Signal CO Exposure
Early warning signs often mimic the flu: persistent headaches that improve when you leave home, dizziness or nausea affecting multiple family members, fatigue that feels unusually severe, and ringing ears or blurred vision. Emergency symptoms requiring immediate evacuation include vomiting with severe headache, confusion or difficulty concentrating, chest pain in people with heart conditions, and loss of consciousness.
Home Indicators of Dangerous CO Buildup
Excessive condensation on windows near fuel appliances, a stale or stuffy feeling when appliances run, pilot lights that frequently blow out or burn yellow instead of blue, and black soot marks around appliance vents or on walls all indicate potential CO problems. These visual cues often appear before detectors sound an alarm.
Test Your CO Detectors Monthly
Simple Monthly Check Procedure
Press and hold the test button for 5-10 seconds until the alarm sounds. Release immediately to stop. If no sound, replace batteries or the entire unit. Battery replacement follows a specific schedule: standard batteries every 6 months (use daylight saving time as a reminder), 10-year sealed batteries require replacing the entire unit after a decade, and hardwired units need backup battery testing monthly with annual replacement.
Handling False Alarms Correctly
Common false alarm triggers include low battery (chirping every 30-60 seconds), humidity from showers (temporary—place detectors away from bathrooms), chemical fumes from cleaning products, and malfunctioning appliances (which require immediate investigation). During actual alarms: move all occupants to fresh air immediately, call 911, seek medical attention even for minor symptoms, and investigate the source only after professionals declare it safe.
Professional Inspection Checklist
Annual Safety Audit Requirements
Hire a licensed HVAC technician or certified home inspector specializing in combustion appliances. They’ll check your furnace heat exchanger for cracks, gas line connections for leaks, vent pipe integrity and proper draft, chimney condition and blockages, and appliance combustion efficiency. The CPSC urges consumers to have professional inspections of all fuel-burning appliances to detect deadly carbon monoxide leaks—a $150-300 investment that provides cheap insurance against CO poisoning.
DIY Visual Inspection Steps
Monthly quick checks should include looking for rust, corrosion, or damage on appliance exteriors, checking vent pipes for gaps or disconnected sections, ensuring outdoor vents aren’t blocked by snow or debris, and verifying gas flames burn blue (yellow tips indicate problems). These simple visual inspections catch many potential CO sources before they become emergencies.
Emergency Response Plan for CO Incidents
Create Your Family CO Escape Plan
Every family member must know two exit routes from every room, a designated safe meeting spot outside the home, emergency contacts (911, utility company, trusted neighbor), and when to seek immediate medical help for symptoms. Practice CO evacuation drills twice yearly alongside your fire escape plan—knowing exactly what to do saves precious seconds during an emergency.
After CO Exposure Protocol
Schedule medical check-ups within 24-48 hours even after brief exposure, as CO can cause lingering health effects. Don’t use suspect appliances until professionally inspected and repaired. Replace all detectors after any significant CO event—even if they seem functional—as their sensors may be compromised.
Maintenance Schedule That Works

Weekly Tasks (5 minutes)
Perform a visual check of all detectors showing green/powered status, test one detector (rotating weekly), and observe for new symptoms or unusual appliance behaviors. This quick routine ensures your detection system remains operational.
Monthly Tasks (15 minutes)
Test all detectors using test buttons, vacuum around each unit with a soft brush attachment, check expiration dates on units (replace at 7-10 years), and inspect visible vent pipes and appliance connections. These regular checks prevent many common CO issues.
Annual Tasks (2 hours)
Schedule professional inspection of all fuel-burning appliances, replace all detector batteries (including hardwired backup batteries), review and update your CO emergency plan with family, and check local building codes for new requirements. The CPSC recommends these annual safety measures as essential household maintenance.
Take action today: Install CO detectors in every sleeping area within 24 hours. The $30 investment could save your family’s lives. Remember, carbon monoxide doesn’t wait—neither should you. Properly installed and maintained CO detectors are your first line of defense against this silent killer, providing the early warning you need to protect what matters most.


