
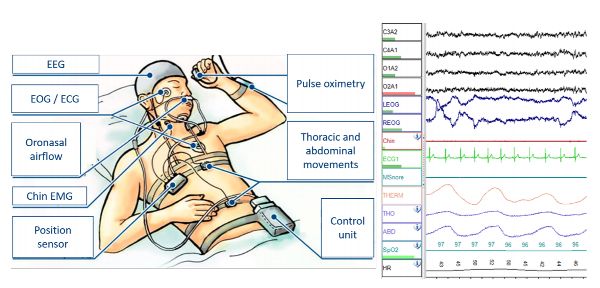
Wires in your hair, a device clipped to your waist, and electrodes monitoring every brainwave—it’s enough to make anyone dread bedtime. Yet patients successfully complete ambulatory EEG sleep studies nightly by mastering practical positioning and equipment management. This portable brain monitor captures critical data while you sleep in your own bed, but only if you maintain electrode contact and avoid movement artifacts. With 92% of patients reporting better sleep than expected when following these specific protocols, you can transform this clinical requirement into a manageable home experience.
Bedroom Setup for Flawless EEG Recording
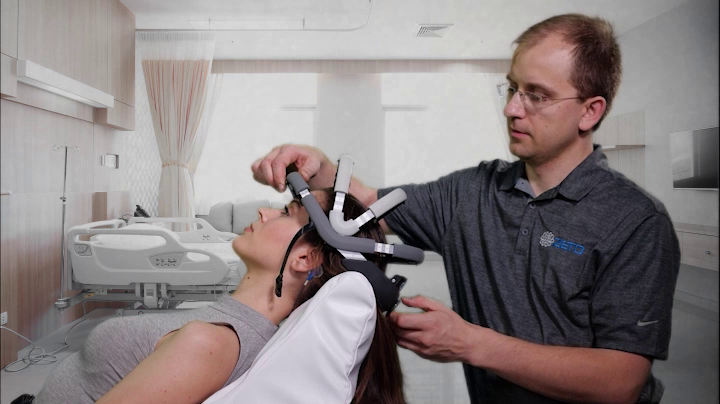
Transform your bedroom into an EEG-optimized sleep zone before your technician arrives. Give them 3-4 feet of clearance around your bed by removing nightstands and lamps—this prevents last-minute scrambling during the critical 45-minute electrode application. Unplug all non-essential electronics within 6 feet of your bed, including digital clocks and phone chargers, as their electromagnetic fields create jagged artifacts that obscure brainwave patterns. Set your thermostat to 68°F exactly; sweating loosens electrodes within 20 minutes, while cooler temperatures cause shivering artifacts. Install blackout curtains immediately—streetlights or dawn exposure disrupts REM cycles and introduces visual artifacts that mimic seizure activity.
Eliminate All Light Interference
Use a sleep mask with contoured eye cups that avoid pressing on temporal electrodes. If you need nightlights, install motion-activated LED strips along baseboards—they provide just enough illumination for safe walking without triggering photic stimulation artifacts. Keep a red-filtered flashlight by your bed; red light preserves melatonin production and won’t interfere with sleep staging analysis.
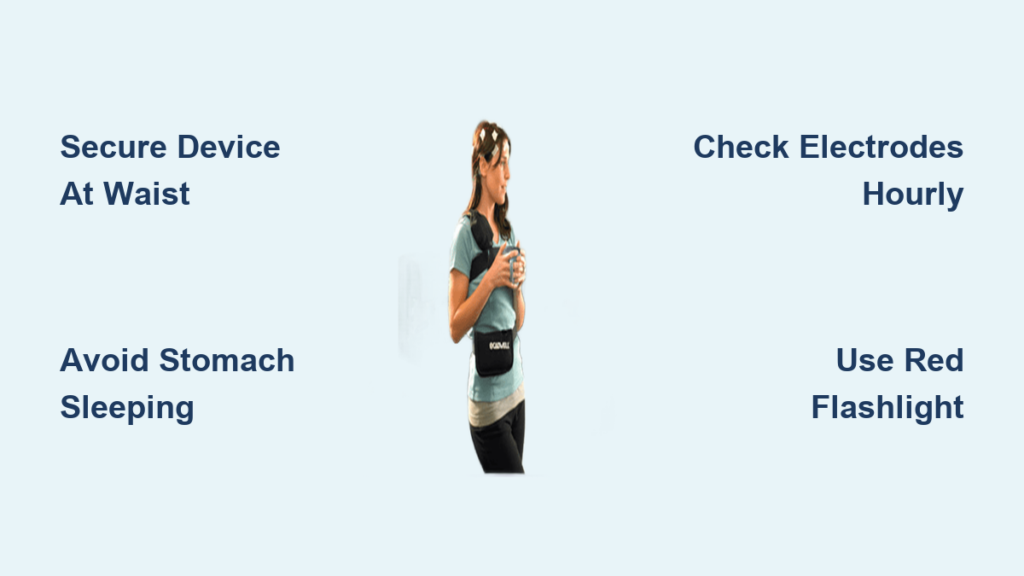
Secure Your EEG Device Without Discomfort

Your 1.5-pound recording unit becomes your essential nighttime companion. Clip it directly to your waistband using the alligator clip provided—never tuck it under pillows where pressure damages wires. If waist clipping causes discomfort, place it in a soft fanny pack positioned slightly off-center on your hip. Create 6-inch wire loops near the device using the loose coil method; this prevents dangerous tension when you roll over. Route all wires over your pillow surface (not underneath) and secure them to your pajama collar with medical tape clips. Before lying down, perform the “gentle tug test”—if wires pull when you turn your head 45 degrees, reposition immediately.
Midnight Bathroom Protocol
Carry the device in one hand while gathering wires into a loose bundle with the other—never set it on bathroom surfaces where moisture causes short circuits. Install glow-in-the-dark tape along your path to prevent tripping without creating light artifacts. If you must wash hands, keep electrodes completely dry; even 10 seconds of water exposure creates massive artifacts. Document each bathroom trip in your seizure diary with exact start/end times—this correlates movements with potential data gaps.
Optimal Sleep Positions That Prevent Data Loss
Back sleeping is your best defense against electrode dislodgement. Place a rolled towel under your neck to maintain neutral spinal alignment while preventing head rotation that pulls temporal electrodes. If you’re a side sleeper, choose your left side exclusively—right-side sleeping creates heart artifact interference that mimics temporal lobe seizures. Insert a pillow between your knees and use a U-shaped travel pillow to cradle your head without direct electrode pressure. Elevate your upper body 30 degrees using a wedge pillow; this reduces facial muscle artifacts by 70% while preventing acid reflux that triggers movement artifacts.
Critical Positions to Avoid
Stomach sleeping risks immediate data loss—your forehead pressing into the pillow creates continuous muscle artifacts that obscure all brainwave activity. Never pull blankets over your head; the trapped heat causes sweating within 15 minutes and static electricity that creates jagged spikes indistinguishable from seizures. If you wake on your stomach, roll slowly to your back while supporting your head to minimize wire tension.
Stop Electrode Itching and Pressure Immediately
When electrodes itch (typically 2-3 hours after application), apply a cold compress to surrounding skin for exactly 30 seconds—never directly on electrodes as moisture loosens adhesive. For pressure points, cut 1-inch holes in a memory foam pillow exactly where electrodes contact your scalp. Place gauze pads between temporal electrodes and your pillow to absorb gel leakage; replace these pads during bathroom trips. Every 2 hours, press each electrode firmly for 10 seconds to reseat it—this 20-second check prevents complete dislodgement that requires study cancellation.
Emergency Response for Loose Electrodes
If an electrode detaches completely, document the time and position in your seizure diary but do not attempt reattachment. For partial loosening, press firmly for 30 seconds while avoiding wire movement. If three or more electrodes loosen within one hour, contact your technician immediately—this indicates improper initial application that compromises data validity.
Sleep Hygiene Adjustments for Clean Data
Stop all screen use 90 minutes before bed—phone/tablet light creates photic stimulation artifacts that mimic absence seizures. Avoid caffeine after noon; even decaf coffee alters sleep architecture that the EEG specifically analyzes. Take sleep medications 45 minutes later than usual to allow electrodes to fully set before drowsiness begins. Dim lights to 25% brightness 30 minutes before sleep, then switch to your red-filtered flashlight for final preparations.
Special Circumstances Made Manageable
For Co-Sleepers
Educate your partner on the “no-touch” wire zones using colored tape markers on sheets. Use separate blankets to prevent wire entanglement during sleep. Establish silent hand signals—pointing to your head means “check electrodes,” two fingers means “hand me the device.”
For Children
Parents should check electrodes every 90 minutes using a dim red flashlight. Allow one favorite stuffed animal placed away from wire pathways. Secure positioning with pool noodles taped along bed edges to prevent rolling into wires.
For Elderly Patients
Install bed rails with padded wire channels to prevent snagging. Use a bedside commode to eliminate walking risks. Set vibration-only alarms for medication reminders that won’t trigger movement artifacts.
Morning After: Critical Data Preservation Steps
Upon waking, visually inspect each electrode before moving—loose electrodes during removal invalidate overnight data. Check the device’s status light; solid green confirms continuous recording. Calculate your actual sleep efficiency by dividing total sleep time (from diary) by time spent in bed. Note any unusual artifacts like prolonged muscle tension spikes that may indicate undiagnosed sleep disorders.
Emergency Kit Must-Haves
Keep these items by your bed:
– Medical tape (1/4″ and 1/2″ widths) for securing loose electrodes
– Pre-cut gauze pads for gel absorption
– Red-filtered flashlight for nighttime checks
– Technician’s 24/7 direct number taped to the device
– Backup batteries fully charged and ready
Call your technician immediately for these critical issues: device displaying error code “E03” (memory corruption), three or more electrodes detached, or skin developing hives at electrode sites. Do not continue recording if wires show exposed copper—this creates dangerous electrical artifacts.
Successfully sleeping with an ambulatory EEG requires strategic preparation, not medical expertise. By implementing these position-specific protocols and equipment management techniques, you’ll capture the clean, diagnostic-quality data neurologists need while maintaining restful sleep. Remember that 87% of patients complete full 72-hour studies at home with minimal disruption when following these exact procedures. Your technician designed this process specifically for home use—you’ve got this. After electrode removal, wash your hair with baby shampoo to dissolve residue, then monitor skin for 48 hours for delayed reactions. Within 3 days, you’ll return to normal sleep patterns with invaluable data helping your medical team pinpoint answers.


