
Your air conditioner sputters through another sweltering afternoon, your energy bills keep climbing, and you’re searching “how to replace home ac unit” while wiping sweat from your brow. If your cooling system is showing its age or failing to maintain comfortable temperatures, knowing how to replace home ac unit properly can save you thousands in energy costs and prevent emergency breakdowns during peak summer heat. This practical guide walks you through the entire replacement process—from recognizing when it’s time for a new system to enjoying the benefits of your upgraded cooling solution.
Why Your Current AC Unit Needs Replacement Now
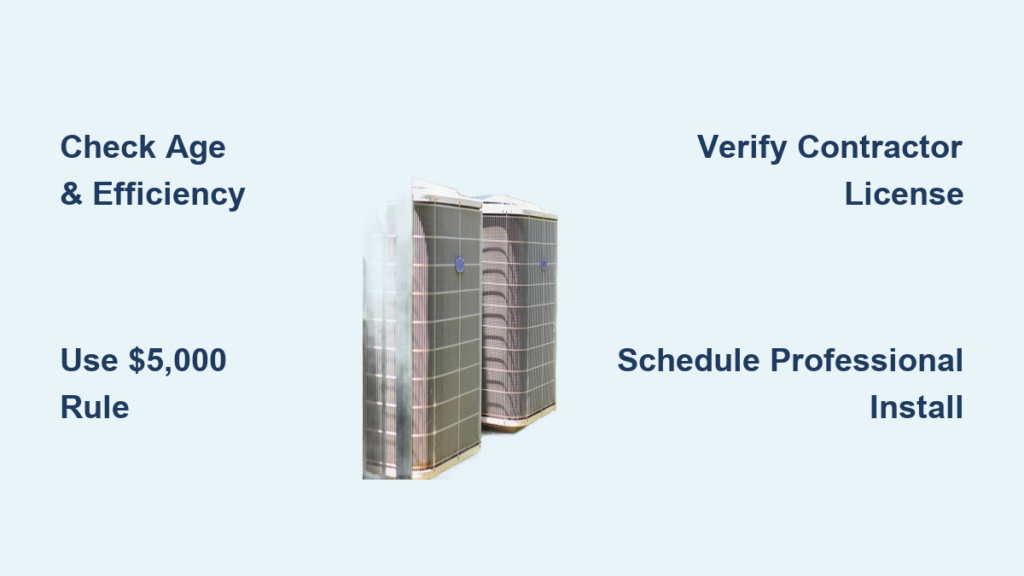
Age Threshold: 10-20 Year Systems
When your AC unit hits 10-15 years old, it’s entering the danger zone for reliability and efficiency. Jennifer Fletcher of Modern Air Solutions confirms: “Systems over 10-15 years old often need replacement when they can no longer keep your home comfortable.” Older units typically operate on outdated refrigerants like R-22 that are now phased out, making repairs increasingly expensive and difficult. Your aging system likely runs at 10 SEER efficiency compared to today’s minimum 14 SEER2 standard, costing you significantly more in monthly energy bills.
Escalating Repair Frequency and Costs
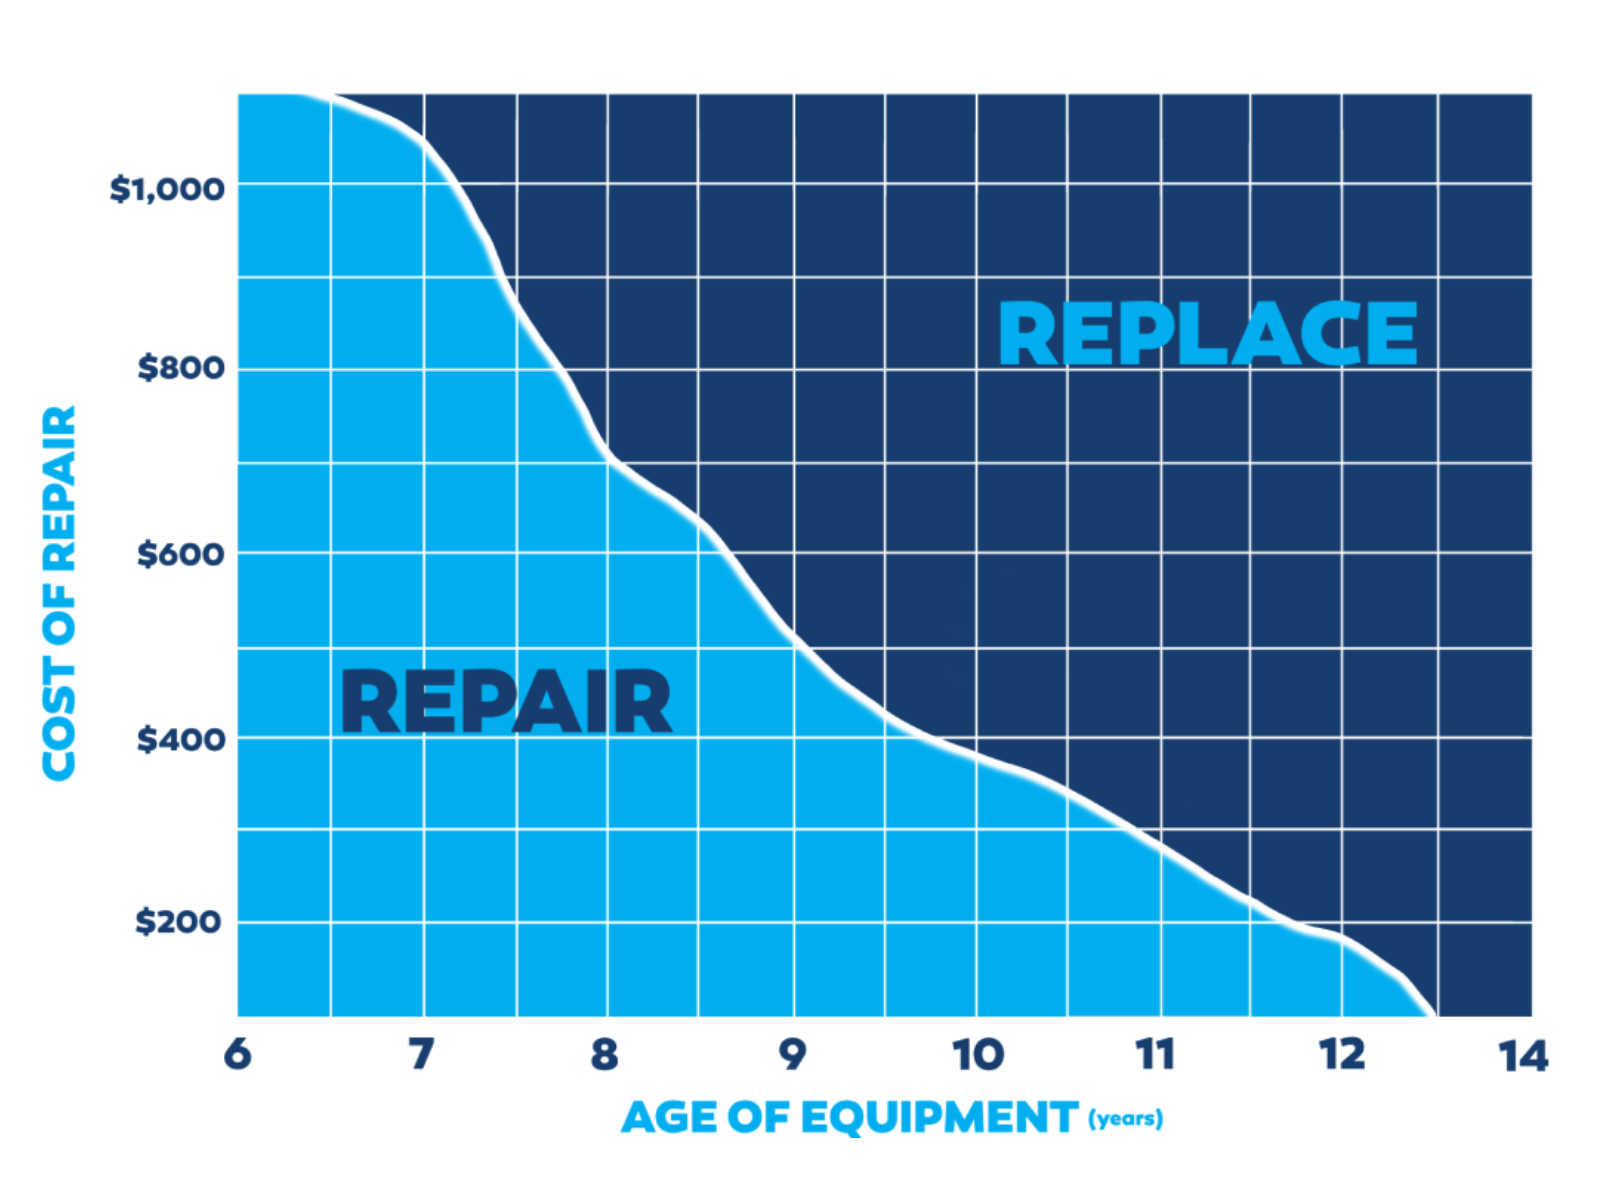
Track your service calls—if you’ve needed professional repairs more than twice in the past year, replacement becomes the smarter financial choice. Curtis Herchenbach of Herchenbach Mechanical explains: “Each repair adds labor costs, indicating the system is approaching end-of-life.” Apply the $5,000 rule: multiply your system’s age by the repair cost. If the total exceeds $5,000, replacement makes better financial sense than continuing to patch an aging system.
Inconsistent Cooling Throughout Your Home
Walk through your house during peak cooling hours and note rooms that feel significantly warmer than others. This uneven temperature distribution often signals fundamental issues with your aging system that repairs can’t fix. Properly sized new equipment delivers consistent comfort throughout your home, eliminating hot spots and reducing overall energy consumption as your system no longer struggles to compensate for inadequate cooling capacity.
The Critical $5,000 Rule for Replacement Decisions
When Repair Still Makes Financial Sense
Don’t rush to replace if your system shows only isolated problems. Younger units under 10 years often justify repair, especially when issues involve single components like capacitors or blower motors. Many apparent failures stem from simple thermostat issues—check batteries and settings before assuming the worst. Single electrical faults like tripped breakers or failed contactors typically represent cost-effective repairs on otherwise healthy systems.
Professional Assessment Saves Money Long-Term
Schedule a professional evaluation when your system shows multiple warning signs. Most reputable HVAC companies offer free assessments that include Manual J load calculations to determine your home’s precise cooling requirements. This professional insight prevents costly mistakes like oversizing (which causes humidity issues) or undersizing (resulting in insufficient cooling), ensuring your new system delivers optimal performance and efficiency from day one.
Choosing Your New AC System Size Correctly
Manual J Load Calculation Process
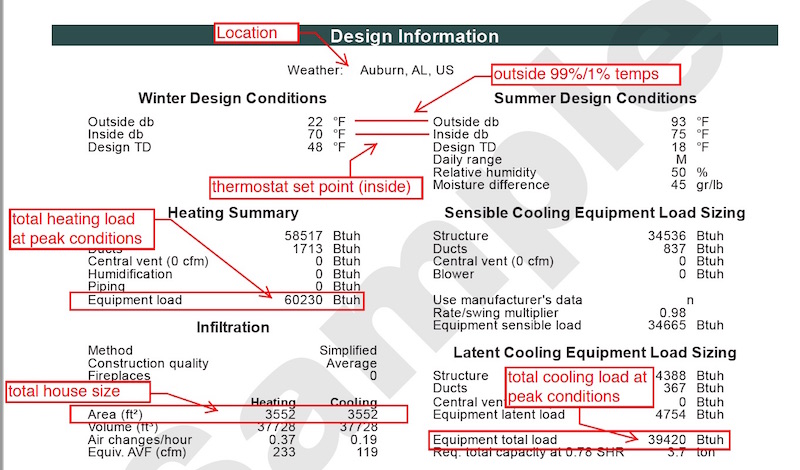
Never skip the Manual J calculation—this industry-standard assessment determines your home’s exact cooling needs based on square footage, insulation levels, window types, and local climate data. Licensed contractors perform this precise analysis to prevent the common mistake of installing oversized equipment, which short-cycles and fails to properly dehumidify your home. Proper sizing ensures your new AC unit runs efficiently while maintaining consistent comfort throughout your living spaces.
System Type Selection for Your Climate
Your local climate heavily influences the best system type for your home. Central air systems work well for whole-house cooling through existing ductwork, while heat pumps provide both heating and cooling—ideal for moderate climates. Mini-split systems offer efficient zoned cooling for homes without ductwork or for additions where extending ducts isn’t practical. Ensure indoor and outdoor components are matched as engineered pairs to achieve the rated SEER2 performance and maximize your energy savings.
Finding Qualified HVAC Contractors Who Deliver
Verify Licensing and Insurance Before Signing
Confirm your contractor holds current state HVAC licensing and carries adequate liability insurance. Request a certificate of insurance directly from their provider—never accept verbal assurances. Proper licensing protects you from substandard work and safety violations while ensuring the contractor follows local building codes. Contractors without proper credentials often deliver shoddy installations that void manufacturer warranties and create safety hazards.
Compare Detailed Written Estimates
Request comprehensive written proposals that itemize equipment models, efficiency ratings, warranty terms, and complete cost breakdowns. Beware of bids significantly lower than competitors—they often indicate cut corners or hidden charges that emerge later. A quality estimate should include ductwork assessment, electrical requirements, refrigerant type, and any necessary modifications to your home’s infrastructure. Take time to compare at least three detailed proposals before making your final decision.
Prepare Your Home for Seamless AC Replacement
Clear Access Routes Before Installation Day
Remove obstacles from pathways to both indoor and outdoor units at least 24 hours before installation. Provide 3-foot clearance around your outdoor condenser for equipment removal and new unit placement. Move patio furniture, garden hoses, and decorative items away from work areas. This preparation saves valuable time during installation and prevents accidental damage to your property during the replacement process.
Document Your Existing System Setup
Photograph your current setup including electrical disconnects, refrigerant lines, and thermostat wiring before the old system is removed. These reference images help verify proper installation of new components and serve as valuable documentation for future maintenance. Locate your manufacturing rating plates on both outdoor and indoor units to record serial numbers for warranty purposes before the installation team arrives.
What to Expect During AC Unit Installation
System Removal and New Unit Placement
Professional technicians safely recover refrigerant from your old system following EPA guidelines before disconnecting electrical connections and removing mounting hardware. They position your new outdoor unit on a proper pad or brackets, ensuring level installation with adequate clearance for airflow. The indoor air handler connects to existing ductwork, with modifications as needed to optimize airflow throughout your home.
Testing and Calibration for Peak Performance
The final installation phase includes thorough system testing: airflow verification, refrigerant level checks, thermostat calibration, and performance optimization across all operating modes. Technicians document these measurements to establish baseline performance data for warranty records. You should receive a comprehensive walkthrough covering thermostat operation, filter replacement procedures, and maintenance schedules before the installation team leaves your property.
Understand True AC Replacement Costs

Complete Cost Range and Breakdown
Home AC replacement costs typically range from $5,000-$12,000 for complete central air systems, though prices vary based on system size, efficiency, and installation complexity. Basic 14-16 SEER2 systems cost $2,500-$6,000 for equipment alone, while high-efficiency 18-20 SEER2 models range from $6,000-$12,000. Factor in $1,000-$5,000 for ductwork modifications when needed, plus electrical upgrades or thermostat replacements.
Save With Available Incentives
Take advantage of federal tax credits offering up to 30% of system cost for qualifying high-efficiency models. State and utility rebates provide additional $500-$3,000 savings—check energystar.gov/rebate-finder for current programs in your area. Many manufacturers also offer seasonal promotions that can further reduce your out-of-pocket costs. These incentives often shorten the payback period for higher-efficiency equipment through accelerated energy savings.
Maximize Long-Term Savings After AC Replacement
Energy Savings Expectations
New high-efficiency systems typically reduce cooling costs 20-40% compared to 10-year-old units. A homeowner spending $3,000 annually on cooling could see bills drop to $1,800-$2,400 with modern equipment. These savings accelerate your return on investment while providing more consistent comfort throughout your home. Register your new system with the manufacturer within 30-60 days to activate the full warranty coverage—DIY installation attempts void manufacturer warranties.
Maintenance Schedule for Maximum Lifespan
Replace filters monthly during peak cooling season to maintain airflow and efficiency. Schedule professional maintenance twice yearly—spring for AC preparation and fall for heating system service. This routine care prevents 90% of premature failures and maintains your system’s efficiency ratings throughout its operational life. Properly maintained systems deliver 15-20 years of reliable service, making your initial investment in professional installation well worth the cost.


