
Picture stepping outside your door to harvest tonight’s dinner—crisp lettuce, sun-warmed tomatoes, and aromatic herbs at your fingertips. Starting a home garden transforms this dream into daily reality, whether you’re working with a sprawling backyard or a sunny apartment balcony. Growing your own food isn’t just about saving money—it’s about connecting with your food, reducing environmental impact, and creating a therapeutic hobby that rewards you with fresh flavors impossible to find in stores.
This guide walks you through every step from choosing your first seeds to harvesting your very first tomato, all within one growing season. Forget complicated gardening jargon—you’ll learn exactly how to start a home garden that thrives, even if you’ve never planted a single seed before. Let’s dig into the practical steps that will have you harvesting fresh produce in as little as 22 days.
Match Your Garden Type to Your Space Constraints
Don’t waste time and money on the wrong garden style for your living situation. Container gardening works perfectly for apartments and small spaces—you’ll need pots with drainage holes (5-gallon containers for tomatoes, 6-8 inch pots for herbs). Place containers on bricks to improve drainage and prevent water damage to surfaces.
Raised bed gardening suits beginners with yards—build 4×8 foot beds 6-12 inches deep using untreated cedar. Fill with 60% topsoil, 30% compost, and 10% vermiculite for the ideal growing environment. This controlled setup reduces weeds significantly compared to in-ground gardening, which requires tilling 8-12 inches deep and removing rocks and debris.
Vertical gardening maximizes space using walls or trellises—install supports capable of bearing 50-100 pounds when plants mature. Your space assessment should include measuring square footage and noting permanent structures that affect sunlight exposure.
Container Setup Checklist for Balcony Gardeners
- Drainage: Ensure 3-4 holes per container
- Size: Match to plant needs (tomatoes need 5-gallon minimum)
- Material: Avoid dark plastic in hot climates (causes root burn)
- Elevation: Use pot feet to improve air circulation beneath
Map Sunlight Patterns Before Planting Anything

Most vegetables require 6-8 hours of direct sunlight daily—planting in the wrong spot guarantees failure. Track daily sun patterns from 7 AM to 7 PM for three consecutive days, noting these critical zones:
- Full sun areas: 6+ hours direct light for tomatoes, peppers, squash
- Partial sun spots: 4-6 hours for lettuce, spinach, herbs
- Shade zones: Less than 4 hours for leafy greens and shade-tolerant herbs
Create a simple sketch marking shade patterns from buildings and trees throughout the day. This prevents the #1 beginner mistake: planting sun-loving vegetables in areas that only get afternoon shade. Warning: Morning sun is less intense than afternoon sun—prioritize southern exposure for maximum light.
Gather These 7 Essential Tools for First-Time Gardeners
Skip expensive equipment—start with these must-have tools that cover all basic gardening tasks:
- Stainless steel trowel: For transplanting seedlings and digging small holes
- Hand fork: 3-4 tines for weeding and soil aeration
- Bypass pruners: For clean cuts on tomatoes and herbs
- Hori-hori knife: With measurement markings for harvesting
- 28-30 inch spade: For digging and turning soil
- 2-gallon watering can: With removable rose attachment
- Soil pH meter: Digital with 0.1 accuracy
Invest in quality stainless steel tools—they’ll outlast cheap alternatives by decades. Skip unnecessary gadgets like soil scoops or specialized weeders until you’ve gardened for a full season.
Fix Your Soil in 3 Steps for Maximum Growth
Great gardens start with great soil—follow this simple three-step process:
Step 1: Test Before You Plant
Collect soil samples from 6-8 locations, digging 6-8 inches deep. Mix in a clean bucket, remove debris, and air-dry 24 hours. Test for pH levels (target 6.0-7.0), nitrogen, phosphorus, potassium, and organic matter percentage (aim for 5-10%).
Step 2: Amend Based on Results
– Clay soil: Add 2-3 inches coarse sand and 3-4 inches organic matter per 100 sq ft
– Sandy soil: Incorporate 3-4 inches compost plus 2 pounds peat moss per 100 sq ft
– pH adjustment: Apply 5-10 pounds lime per 100 sq ft to raise pH, or 1-2 pounds sulfur to lower it
Step 3: Build Organic Matter
Work in 2-4 inches of compost annually—this improves drainage in clay soils and water retention in sandy soils. Your plants will reward you with stronger growth and higher yields.
Pick These 5 Foolproof Starter Plants for Beginners
Start with these easy-to-grow vegetables that deliver quick results and build confidence:
- Radishes: ‘Cherry Belle’ matures in just 22-30 days—perfect for impatient beginners
- Lettuce: ‘Black Seeded Simpson’ ready in 45-50 days with continuous harvest potential
- Bush beans: ‘Provider’ yields in 50-55 days with minimal care requirements
- Zucchini: ‘Black Beauty’ produces abundant harvests in 48-55 days
- Basil: ‘Genovese’ ready for harvest in 60-75 days—grows well in containers
Pro Tip: Avoid tomatoes your first year—they’re susceptible to diseases and require more attention. Focus on these quick-win crops to build gardening confidence before tackling more challenging plants.
Start Seeds Right: Indoor vs. Direct Sowing Techniques
Your timing and method make all the difference in seed success:
Indoor Starting for Early Harvests
Begin 6-8 weeks before last frost date using sterile seed starting mix. Plant seeds 2-3 times their diameter deep. Maintain 70-75°F soil temperature with heat mats and provide 14-16 hours of LED light positioned 2-4 inches above seedlings. Ideal for tomatoes, peppers, and eggplants.
Direct Sowing for Simplicity
Plant when soil reaches 60°F—create furrows at proper depths:
– Lettuce: ¼ inch deep
– Beans: 1-2 inches deep
– Carrots: ¼ inch deep (thin to 2-3 inches apart)
Critical Step: Harden off seedlings over 7-10 days before transplanting:
– Days 1-3: 2-3 hours in shade
– Days 4-5: 4-5 hours with morning sun
– Days 6-7: Full morning sun, bring in at night
– Days 8-10: Leave overnight unless frost threatens
Water Like a Pro: Timing and Amounts That Prevent Problems

Most beginner gardens fail due to improper watering—follow this simple schedule:
Vegetables: 1-1.5 inches weekly, delivered in 2-3 sessions. Increase to 2 inches for fruiting tomatoes. Water early morning to reduce evaporation and prevent fungal diseases.
Herbs:
– Mediterranean herbs (rosemary, thyme): Allow soil to dry between waterings
– Moisture lovers (basil, parsley): Keep soil consistently damp
Check Moisture Correctly: Use the finger test—insert finger 2 inches deep. Water when dry. Container gardens need more frequent watering—lift pots to check weight (light = needs water).
Stop Common Pests Before They Destroy Your Crop
Identify and address problems before they escalate:
Recognize Early Warning Signs
- Aphids: Small green/black clusters on stems—wipe with soapy water
- Cutworms: Severed seedlings at soil level—use cardboard collars
- Tomato hornworms: Large green caterpillars—hand-pick daily
Organic Solutions That Work
- Neem oil: 2 tablespoons per gallon, spray weekly
- Insecticidal soap: 2% solution for soft-bodied insects
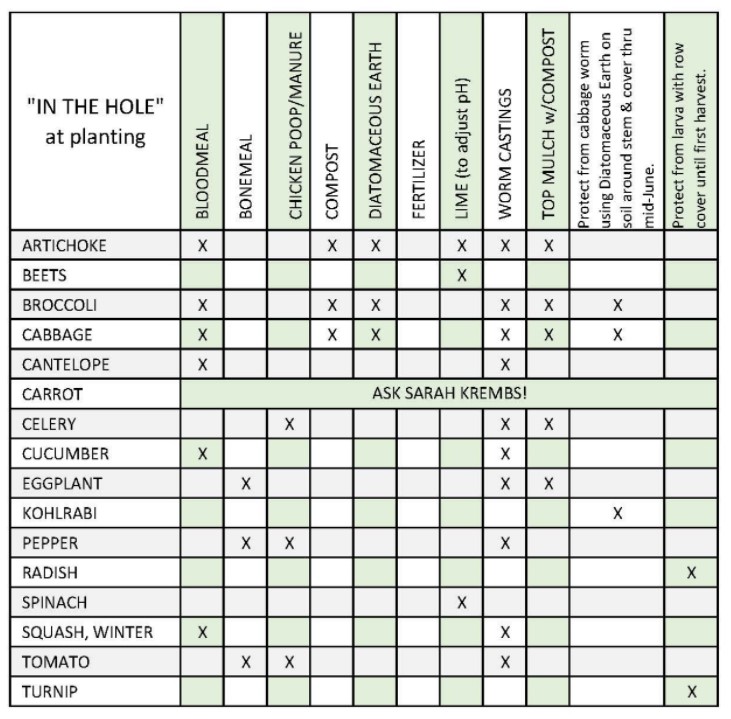
- Diatomaceous earth: Dust around plants for crawling insects
Prevention Tip: Plant marigolds throughout your garden—they repel nematodes and attract beneficial insects.
Track Your First-Year Costs vs. Food Savings
Understand your investment and potential returns:
Small container garden (10 containers): $150-265 startup
– Pots and containers: $50-100
– Soil and amendments: $30-50
– Seeds and plants: $20-40
– Basic tools: $50-75
Potential annual savings:
– 10 tomato plants: 100-200 pounds = $200-400 value
– 50 sq ft lettuce: 50-75 heads = $150-200 value
– 20 herb plants: Year-round supply = $300-500 value
Your first garden pays for itself within months while providing fresher, more nutritious food than store-bought alternatives.
Troubleshoot These 3 Beginner Garden Mistakes Immediately
Every new gardener makes these errors—know how to fix them:
Yellowing Leaves
Check these causes:
– Nitrogen deficiency: Yellow starts at bottom, apply nitrogen fertilizer
– Overwatering: Yellow with soft stems, reduce frequency
– Underwatering: Yellow with crispy edges, increase watering
Poor Germination
- Old seeds: Test on paper towel first
- Wrong temperature: Use heat mats or wait for soil to warm
- Incorrect depth: Follow seed packet exactly
Weak Seedlings
- Leggy plants: Not enough light—move closer to window or add grow lights
- Slow growth: Too cold—maintain 70-75°F for warm-season crops
- Damping off: Sterilize pots and use fresh seed starting mix
Starting your home garden isn’t about achieving perfection—it’s about growing alongside your plants. Begin with just three varieties: radishes, lettuce, and basil. These forgiving plants will teach you timing, watering rhythms, and the joy of harvesting what you’ve grown. Your first year focuses on building confidence—by year two, you’ll expand naturally, saving seeds, trying new varieties, and sharing extra harvests with neighbors. The garden becomes not just a food source, but a living calendar marking seasons through planting, tending, and harvesting. Remember: every expert gardener killed their first tomato plant—what matters is starting and learning from each season.


