
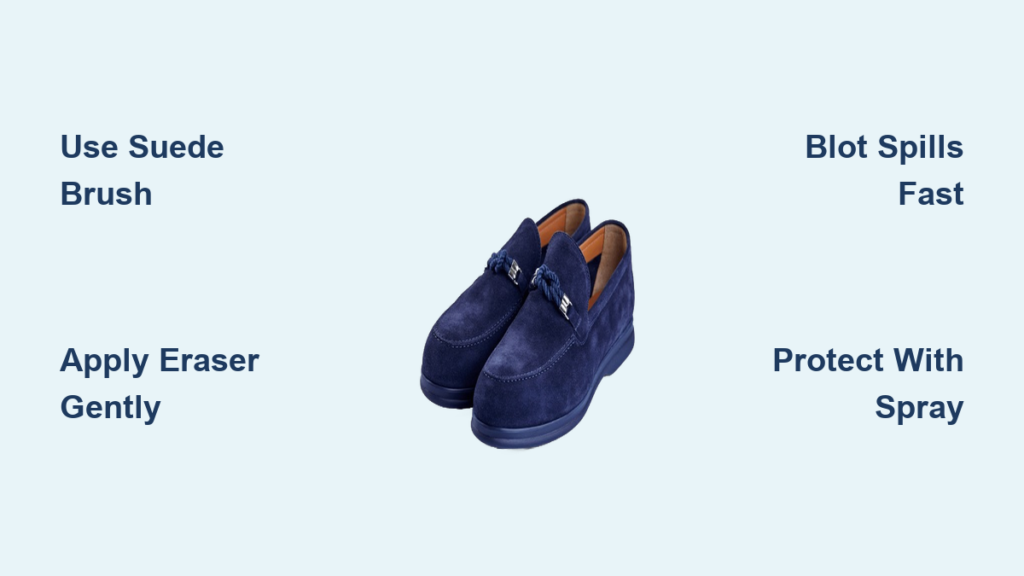
That sinking feeling when you spot a stain on your favorite suede shoes—it’s happened to all of us. Whether it’s an unexpected rain shower, an accidental coffee spill, or just everyday dirt buildup, suede’s luxurious texture makes it both stunning and frustratingly delicate. The good news? Most suede cleaning tasks can be handled right in your living room with simple tools and techniques.
This guide walks you through every step of restoring your suede shoes to their original glory, from emergency spill response to long-term maintenance. You’ll learn exactly what works, what to avoid, and how to prevent future disasters without expensive professional services. Discover how to clean suede shoes at home effectively while preserving that signature velvety texture that makes these shoes so special.
Essential Tools for Proper Suede Cleaning
Before attempting to clean suede shoes at home, gather the right supplies. Using improper tools can cause irreversible damage to this delicate material. Suede’s unique napped surface requires specialized equipment designed specifically for its texture.
Your suede emergency kit must include:
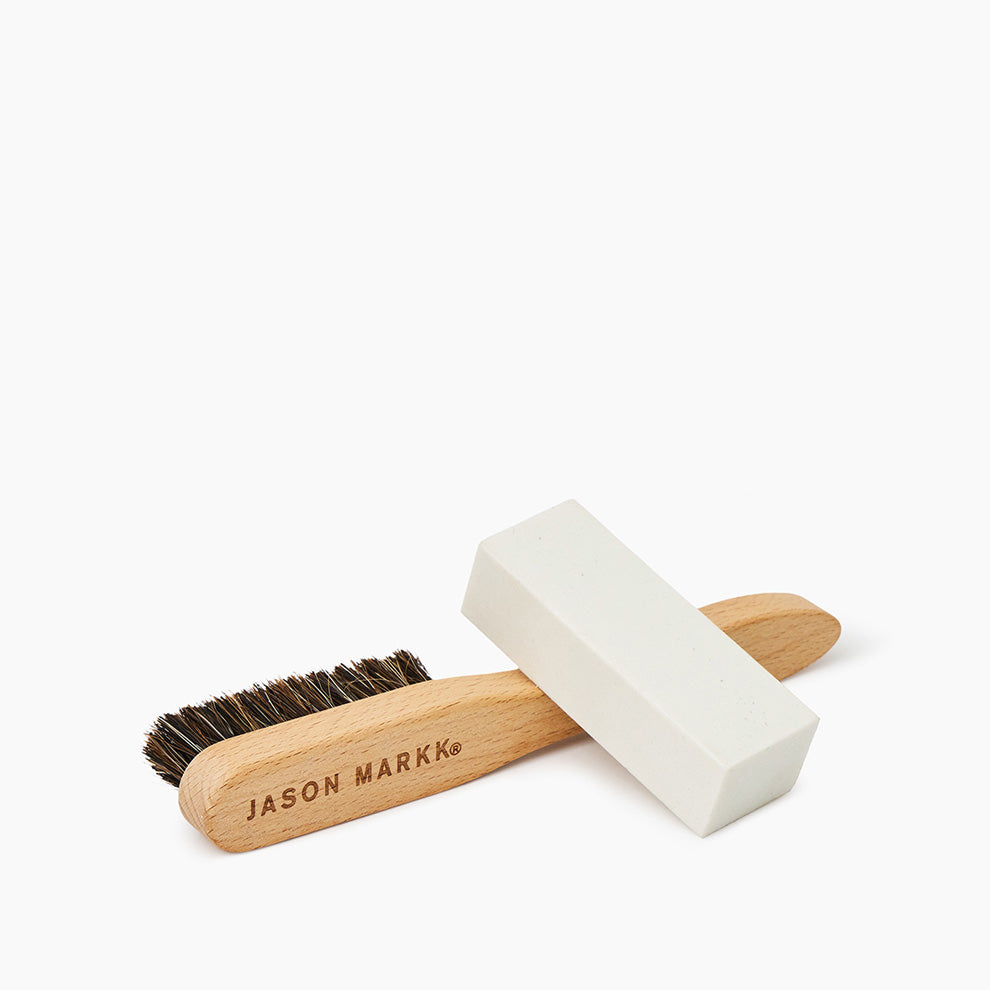
– Suede brush with horsehair bristles: The stiff bristles lift dirt without damaging fibers
– Crumbly rubber eraser: Specifically designed for suede stain removal
– Microfiber cloths: For gentle blotting and applying cleaning solutions
– Shoe trees or paper stuffing: Maintains shape during drying and cleaning
For specific stain situations:
– White vinegar for general stains and discoloration
– Baking soda or cornstarch for oil and grease absorption
– Cold water (used minimally and strategically)
– Suede-specific cleaner for deep cleaning sessions
Protection supplies you need:
– Colorless suede protector spray for waterproofing
– Breathable cotton storage bags (never plastic)
– Cedar shoe trees for moisture absorption and shape retention
Skipping these specialized tools and using household alternatives often leads to permanent damage. Regular shoe polish or household cleaners contain chemicals that will ruin suede’s delicate fibers.
Pre-Cleaning Assessment: Critical First Steps
Rushing into cleaning can turn a small mark into a permanent disaster. Take two minutes to properly assess your suede shoes before attempting any cleaning method.
First, check if your shoes are completely dry. Cleaning damp suede creates bigger problems than it solves. If they’re wet, stuff with paper towels and let air dry at room temperature—never use heat sources like hair dryers or radiators, which cause irreversible shrinking and stiffening.
Remove laces and any detachable embellishments before cleaning begins. Stuff shoes firmly with paper or shoe trees to maintain their shape throughout the cleaning process. This prevents creasing and ensures you can access every surface evenly. Set up your workspace with newspaper or old towels to protect surfaces from cleaning solutions and debris.
Dry Brush Surface Dirt Without Damage
Start with the gentlest method first when you clean suede shoes at home. Using your suede brush, work in the direction of the nap grain with light, consistent pressure. This removes loose dirt and debris without pushing stains deeper into the fibers.
Pro technique: Hold the shoe at different angles under good lighting. The nap changes direction across different panels—always brush with the grain to avoid creating bald spots or texture changes. For scuffed areas, use a gentle back-and-forth motion with slightly increased pressure. The goal is lifting matted fibers, not scrubbing through them.
If you don’t have a proper suede brush, a clean, soft toothbrush works as a temporary substitute. Avoid wire brushes or anything too abrasive that could permanently damage the nap. Brushing should take 2-3 minutes per shoe and immediately improves appearance in most cases.
Erase Stains and Scuffs Like a Professional
Your suede eraser is your best friend for most surface stains. Work in small circular motions, applying moderate pressure without grinding. The eraser’s crumbly texture lifts stains by gently abrading the top layer of fibers without damaging the underlying material.
Critical technique: Start with lighter pressure than you think you need. You can always repeat with more force, but over-erasing creates shiny, flattened patches that can’t be restored. For stubborn stains, let the eraser sit on the spot for 30 seconds before rubbing to allow it to absorb the stain.
After erasing, always follow up with your suede brush. This restores the natural nap and blends treated areas with the surrounding suede. The difference between brushed and unbrushed suede is immediately obvious—brushed areas look fresh and velvety while unbrushed spots appear flat and damaged.
Treat Water Stains Without Creating Rings
Ironically, water stains often require more water to fix—but with strict control. Lightly spray the entire affected area with clean water using a fine mist bottle. The key is even coverage without saturation, creating a uniform dampness across the entire panel.
Work the dampened area with your suede brush, moving in the direction of the nap. This distributes the moisture evenly, preventing water rings. Blot gently with a microfiber cloth, then let air dry completely before assessing results. Repeat if necessary, but allow 24 hours between treatments.
Critical warning: Never attempt this on colored suede without testing on a hidden area first. Some dyes react poorly to water, causing permanent color changes or bleeding. Always dry completely before applying any protective treatments.
Remove Oil and Grease Stains Effectively
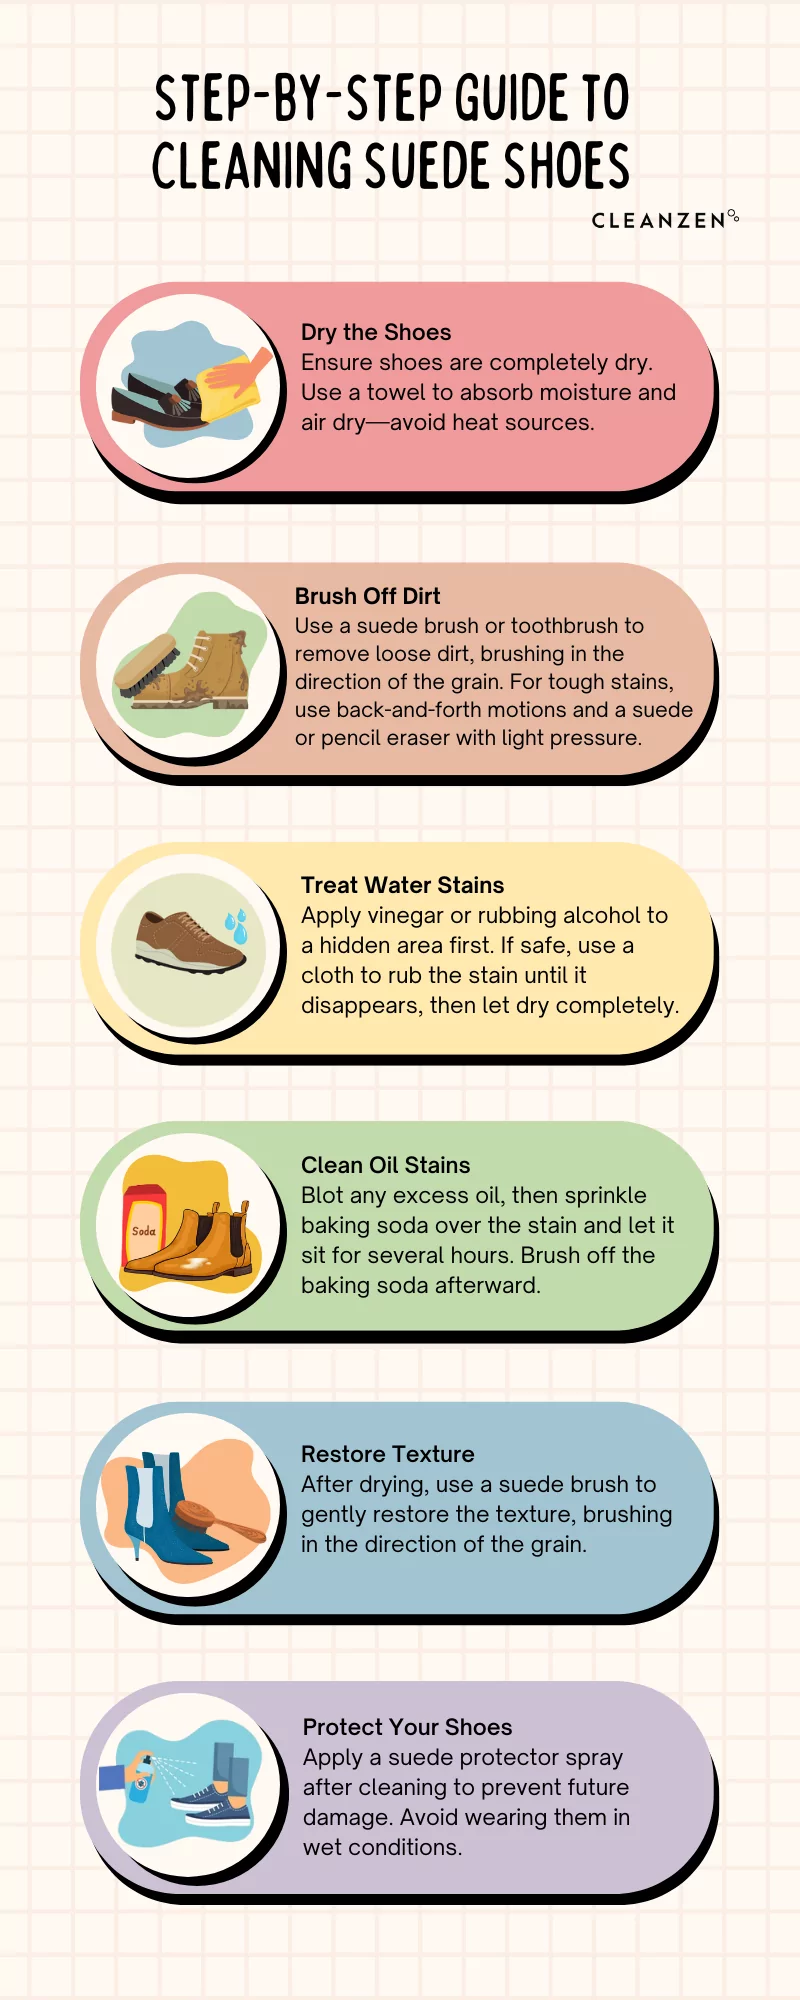
Oil stains are suede’s nemesis, but they’re not necessarily permanent. Immediately cover the stain with a thick layer of baking soda or cornstarch—completely burying the affected area. This powder acts as an absorbent, pulling oil from the suede fibers without spreading the stain.
Let the powder work overnight (minimum 8 hours). Resist the urge to check progress—patience pays off here. Brush away the powder with your suede brush the next morning. If any oil remains, repeat the process before attempting other methods. For stubborn stains, try a second application with fresh powder.
For older, set-in oil stains, mix a tiny amount of liquid dish soap with cold water. Apply with a barely damp cloth, pat gently for 10-15 minutes, then blot dry. This should be your last resort method as soap can leave residue if not completely removed.
Eliminate Salt Stains After Winter Walks
Winter’s salt stains create white, crusty patches that seem permanent. Mix cold water with a drop of liquid dish soap. Dampen a microfiber cloth with this solution—just barely wet, not dripping.
Pat the salt-stained areas gently, never rubbing. The salt dissolves into the cloth without spreading. Blot immediately with a clean, dry cloth. Repeat as needed, allowing complete air drying between passes. For severe salt damage, follow with a light application of white vinegar to neutralize remaining salts.
Winter survival tip: Keep a small suede brush and eraser in your car. Addressing salt stains within 24 hours prevents permanent damage and makes cleaning much easier. Don’t wait until you get home—treat salt stains as soon as possible.
Deep Clean With Suede Cleaner Properly
Sometimes surface cleaning isn’t enough. Suede cleaner penetrates deeper without saturating the material. Always test on an inconspicuous area first—even colorless cleaners can cause slight darkening that becomes permanent.
Apply a small amount to your microfiber cloth, not directly to the shoe. Work in small sections using light pressure. The cleaner should lift dirt without creating a wet spot. Blot immediately and let air dry completely before moving to the next section. Never apply cleaner to the entire shoe at once.
Frequency guideline: Deep clean only when necessary—every 2-3 months for frequently worn shoes. Over-cleaning strips natural oils and weakens suede fibers, making them more susceptible to future damage. Limit deep cleaning sessions to preserve your shoes’ longevity.
Restore the Nap After Cleaning
After any cleaning, your suede likely looks flat and lifeless. This is normal and completely reversible. Using your suede brush, work against the grain with short, gentle strokes. This lifts flattened fibers back to their original position without damaging them.
Focus extra attention on areas that received stain treatment. These spots often need more brushing to blend with surrounding suede. Continue until the surface feels uniformly soft and velvety across the entire shoe. Proper nap restoration takes 3-5 minutes of careful brushing but makes the biggest visual difference.
Apply Protective Spray Correctly
Prevention beats cure every time. Once shoes are completely dry and the nap is restored, apply a quality suede protector spray. Hold the can 6-8 inches away and apply in light, even coats—never saturate the material.
Critical timing: Apply protector at least 24 hours before first wearing. This allows the protective coating to fully cure. Reapply every 6-8 wears, or after any deep cleaning session. For winter conditions, apply an extra coat for added protection against salt and moisture.
Avoid walking in rain or snow for 48 hours after application. The protector needs time to bond fully with suede fibers. Proper protection extends your shoes’ life significantly and makes future cleaning easier.
Daily Maintenance Routine That Works
Prevention requires minimal daily effort but saves hours of deep cleaning. After each wear, give your shoes a quick 2-minute brush-down. Focus on toe and heel areas where dirt accumulates most.
Store suede shoes only when completely dry. Use cedar shoe trees to absorb moisture and maintain shape. Skip plastic storage bags—they trap moisture and create perfect conditions for mold growth. Instead, use breathable cotton bags for storage.
Quick storage rule: If you wouldn’t store your cashmere sweater there, don’t store suede shoes there either. Both demand similar climate control—cool, dry environments away from direct sunlight or heat sources.
Emergency Spill Response Protocol
When spills happen (and they will), speed matters more than perfection. Immediately blot—never rub—with paper towels. Remove shoes and stuff with paper to maintain shape while air drying.
Once dry, assess the stain type and follow the appropriate treatment protocol. Acting fast prevents liquids from penetrating deep into suede fibers where they’re harder to remove. For coffee or wine spills, apply baking soda immediately to absorb color before it sets.
Common Cleaning Mistakes That Ruin Suede
Avoid these suede-killing errors that turn simple problems into expensive replacements:
Never do this:
– Soak shoes in water or any liquid (suede’s primary enemy)
– Use washing machines or dryers (destroys the material)
– Apply heat sources (causes shrinking and permanent damage)
– Use household cleaners or shoe polish (contains damaging chemicals)
– Scrub aggressively or over-brush (flattens the nap permanently)
– Store damp shoes in enclosed spaces (causes mold and rot)
These mistakes account for 90% of ruined suede shoes. Proper technique matters more than the specific products you use when you clean suede shoes at home.
When Professional Help Makes Financial Sense
Some situations require expert intervention. Seek professional cleaning for large-area water damage, persistent stains after home treatment, or vintage/expensive suede where the risk of DIY mistakes outweighs cleaning costs.
Professional cleaning typically runs $15-50 per pair. Compare this to replacement costs when deciding—restoring a $200 pair for $35 is usually worthwhile. For everyday stains and maintenance, however, home cleaning is both effective and economical.
Key Takeaway: Suede care isn’t complicated—it just requires the right tools, gentle techniques, and consistent maintenance. Keep a basic cleaning kit handy, address problems quickly, and your suede shoes will maintain their luxurious appearance for years. The most important rule? Never use water as your first response, and always let suede dry completely before attempting any cleaning method. With these techniques, you’ll confidently clean suede shoes at home while preserving their elegant texture and extending their lifespan significantly.


