
That rusted vintage tool in your garage could be restored to its original glory in under an hour—without harsh chemicals or endless scraping. Home sandblasting delivers professional results for metal restoration, concrete cleaning, and paint stripping right in your backyard. This powerful technique removes decades of corrosion while creating the perfect surface for repainting. Whether you’re reviving a family heirloom or preparing patio furniture for a fresh coat of paint, learning how to sandblast at home unlocks a world of restoration possibilities with minimal physical effort.
Most DIYers mistakenly believe sandblasting requires expensive commercial equipment, but entry-level kits now make this technique accessible to serious hobbyists. The key to success lies not in expensive machinery but in proper safety protocols and technique. This guide cuts through the confusion to deliver exactly what you need to start sandblasting safely and effectively at home—no prior experience required.
Essential Safety Gear for Home Sandblasting
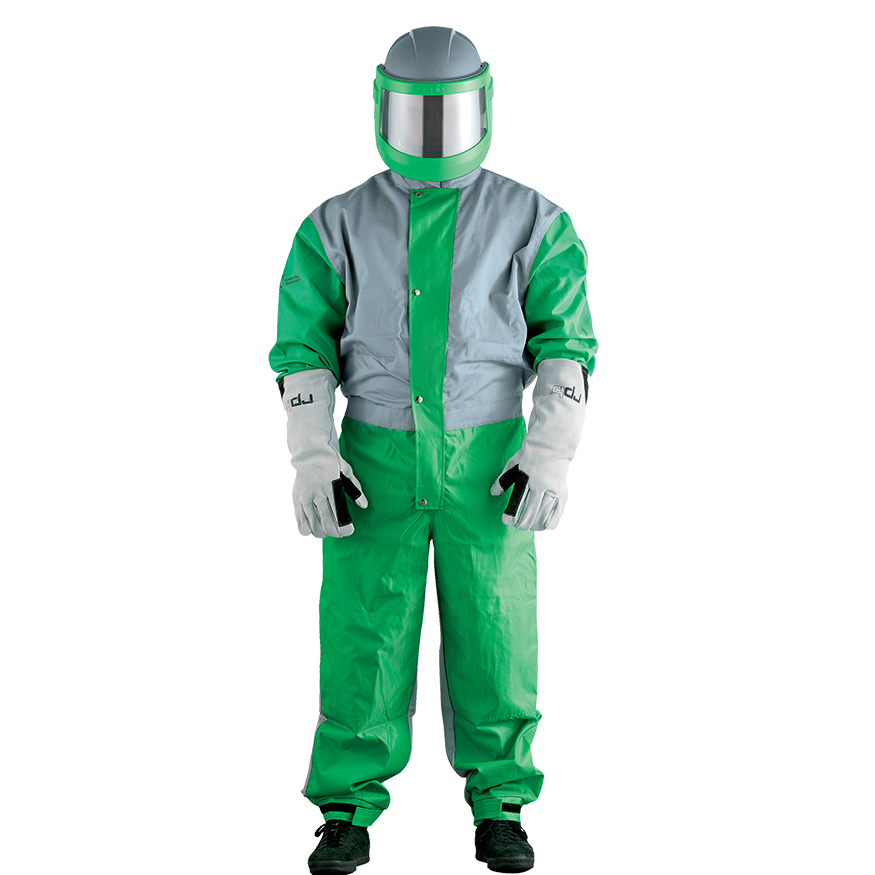
Skip safety equipment just once, and you risk permanent lung damage from invisible silica dust particles. Your respiratory system needs specialized protection that standard workshop masks can’t provide.
Must-Have Respiratory Protection
For silica-based media, a full-face respirator with P100 filters is non-negotiable—these capture particles as small as 0.3 microns. When using aluminum oxide or glass beads, a NIOSH-approved N95 respirator provides adequate protection for most home projects. Perform a seal check before each use: cover the filters and inhale sharply. If air leaks around your face, adjust the straps until you achieve an airtight seal.
Critical warning: Regular dust masks offer zero protection against sandblasting particles. Investing $150 in proper respiratory gear prevents thousands in future medical bills.
Complete Body Protection Setup
Protect every square inch of exposed skin:
– Heavy leather gloves (canvas tears instantly from high-velocity particles)
– Safety goggles worn UNDER your respirator for dual eye protection
– Ear protection rated 25+ NRR—continuous exposure to compressor noise causes permanent hearing loss
– Full coverage clothing with long sleeves, pants, and steel-toed boots
Pro tip: Work in a 50-foot exclusion zone when outdoors. For indoor projects, build a containment area using 6-mil plastic sheeting with taped seams and a HEPA-filtered exhaust system.
Equipment Setup for First-Time Users
Compressor Selection Made Simple
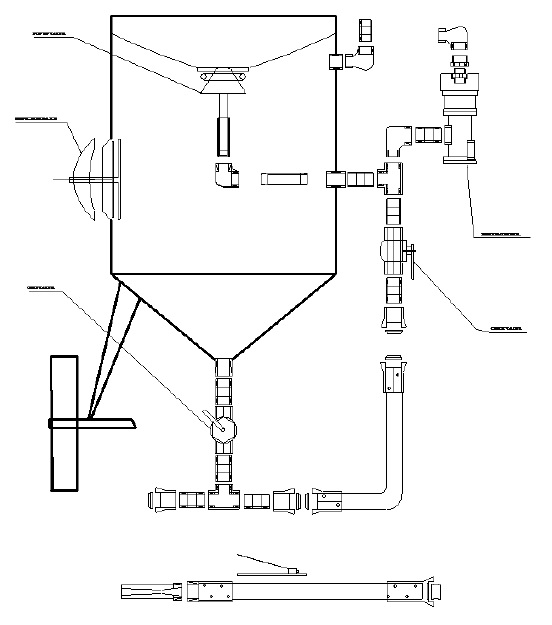
Your compressor’s CFM rating determines what you can realistically blast. For small jobs like restoring hand tools, choose a unit delivering 6 CFM at 90 PSI minimum with a 20-gallon tank. Larger projects like automotive parts require 25 CFM at 90 PSI with a 60-gallon tank. Oil-lubricated compressors need an inline air filter to prevent oil contamination that ruins your abrasive media.
Key mistake to avoid: Never operate beyond your compressor’s duty cycle. If your unit runs more than 50% of the time during blasting, you’ll cause premature failure.
Choosing Your First Abrasive Media
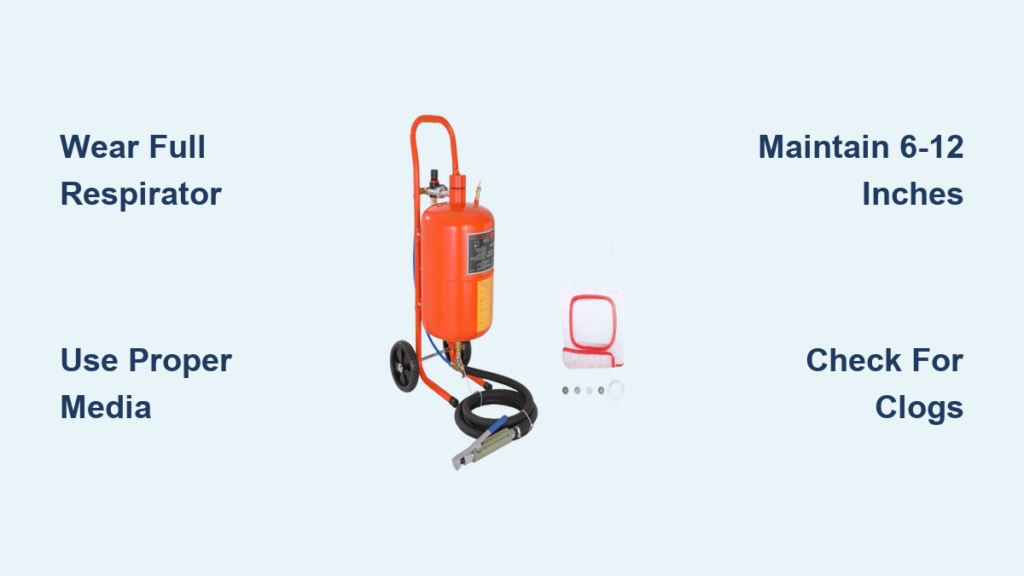
Beginners should start with aluminum oxide 80-120 grit—it’s reusable 6-8 times, creates minimal dust, and works on most materials. Avoid silica sand despite its lower cost; the health risks make it unsuitable for beginners.
Best media choices for home projects:
– Aluminum oxide: Ideal for rust removal and metal preparation
– Glass beads: Creates satin finishes on automotive parts
– Soda bicarbonate: Strips paint from wood without damaging fibers
Quick Setup Checklist
Before your first blast session:
– [ ] Drain compressor tank condensation via petcock valve
– [ ] Install moisture separator within 25 feet of blast pot
– [ ] Fill blast pot to 75% capacity maximum
– [ ] Verify nozzle size matches your media choice
– [ ] Test equipment on scrap material first
Step-by-Step Sandblasting Process
Surface Preparation Essentials
Never blast dirty surfaces—grease and oil embed into metal, causing future paint failure. Clean surfaces with acetone or mineral spirits, then pressure wash to remove loose debris. Mask adjacent areas with heavy-duty aluminum foil rather than painter’s tape, which tears under abrasive impact.
Starting Your First Blast Session
Follow this exact sequence:
1. Open air valve fully at compressor
2. Pressurize pot to 40 PSI initially
3. Test trigger on scrap material 2-3 feet away
4. Increase pressure gradually until achieving cutting action
5. Maintain 45-60 degree angle to surface
Critical technique: Keep the nozzle 6-12 inches from the surface. Closer distances remove heavy rust; farther positions prevent warping on thin metal. Use continuous sweeping motions overlapping passes by 30%—pausing creates permanent gouges.
Managing Media Flow
Adjust your metering valve until you see a dense, even spray pattern without excessive dust. Optimal flow produces maximum cutting efficiency while conserving media. Listen for changes in sound—a high-pitched whine indicates insufficient media flow.
Project-Specific Guidelines

Removing Rust from Automotive Parts
Use aluminum oxide 80-120 grit at 80-90 PSI. Remove all rubber components first—one stray blast can destroy bushings costing $50+. Work in the direction of metal grain, then immediately apply rust inhibitor to prevent flash rusting (appears within hours). Light etching creates optimal surface for primer adhesion.
Stripping Paint from Wood Furniture
Use soda bicarbonate at 40-60 PSI maximum—higher pressures carve into wood fibers. Hold the nozzle 12-18 inches away and test on the bottom first. Work with the grain direction for natural-looking results.
Warning: Soda kills vegetation instantly. Collect it immediately using tarps and dispose properly—never wash into storm drains.
Cleaning Concrete Driveway Stains
Ideal beginner project: Silicon carbide 40-60 mesh at 90-100 PSI. Pre-wet the surface to reduce dust clouds. Work in 2×2 foot sections, keeping the nozzle moving to avoid aggregate exposure in decorative concrete.
Troubleshooting Common Problems
When Media Stops Flowing
Immediate fixes:
– Moisture clogs: Install additional water separators
– Media bridging: Gently tap the pot sides with a rubber mallet
– Worn nozzle: Replace when the orifice becomes oval
Poor Cutting Performance
Quick diagnostics:
– Increase pressure in 10 PSI increments
– Check nozzle wear with drill bit gauge
– Switch to coarser media for heavy rust removal
– Screen contaminated media through window screen mesh
Cleanup and Media Reuse
Efficient Recovery Methods
Spread tarps downwind of your work area before starting. Use push brooms and dustpans for coarse media recovery, then a shop vac with HEPA filter for fine particles. A simple magnetic separator (magnet in a plastic bag) removes ferrous debris from reusable aluminum oxide.
Storage tip: Store clean, dry media in sealed 5-gallon buckets—moisture ruins entire batches.
Disposal Regulations
Critical: Test removed paint for lead using $10 swab kits. Lead-based paint debris requires hazardous waste disposal—contact your local EPA office. Non-hazardous media goes out with construction debris, but never wash into storm drains.
Budget Breakdown for Home Setup
Starter Kit Costs
Entry-level approach ($200-400):
– Basic siphon gun kit: $50-100
– Safety equipment: $150-200
– Initial abrasive media: $30-50
– Containment materials: $50-75
Operating costs: Expect $2-5 per hour in electricity and $8-30 per project in abrasive media depending on your choice.
Pro Tips for Better Results
Angle and Distance Mastery
Start conservative: 12 inches away at 45-degree angle. Move closer only for stubborn rust, backing off immediately when clean metal appears. Vertical surfaces work top-down—gravity helps remove debris instead of redepositing it.
Media Life Extension
Aluminum oxide users: Screen used media through 30-mesh hardware cloth to remove broken particles. Properly maintained media lasts 6-8 uses. Glass bead users: Collect and reuse through 20-30 cycles—just screen out paint chips and debris.
Final Takeaway: Learning how to sandblast at home transforms your restoration capabilities, letting you strip rust, remove paint, and clean concrete with professional results. Start with aluminum oxide media and basic safety gear to tackle small projects, then expand your capabilities as you gain experience. The initial investment pays off quickly when you consider the hours saved versus manual scraping and chemical stripping. Always prioritize safety—proper respiratory protection and containment separate successful DIY projects from dangerous mistakes. With these fundamentals mastered, you’ll find sandblasting becomes your go-to technique for everything from restoring vintage tools to preparing surfaces for painting. Your next restoration project could be just one weekend away from completion.


